


This tutorial shows you how to schedule Do Not Disturb on your iPhone, iPad, and Mac. Once you know the steps to do that, you can automate Do Not Disturb (DND) to turn on at the set time, and you won’t have to enable it every day manually. Your iPhone or Mac will take care of it.
About Do Not Disturb on Apple devices
If you have developed a healthy habit of going to bed and getting up at regular times, ensuring that notifications and calls don’t buzz at the most inopportune time is key to a good night’s sleep. Since iOS 6, iPhone and iPad have included a Do Not Disturb mode. The Mac has since OS X Mountain Lion.
When DND is enabled, it silences all incoming calls and alerts. But did you know that Do Not Disturb can be scheduled? I set my devices to auto-enter Do Not Disturb to prevent alerts from ringing, vibrating, or lighting up the screen while I’m asleep.
In this post, we’re going to teach you how to schedule Do Not Disturb mode on your iPhone, iPod touch, iPad, or Mac to turn on and off at the same times every day, choose who to allow calls from, and permit which apps to send notifications. Setting a schedule for Do Not Disturb ensures you won’t be disturbed at a certain time.
Please note that even though you don’t see or hear notifications arrive in Do Not Disturb mode, your device collects them in the Notification Center, where they can be viewed later.
How to schedule Do Not Disturb mode on iOS 15 and above
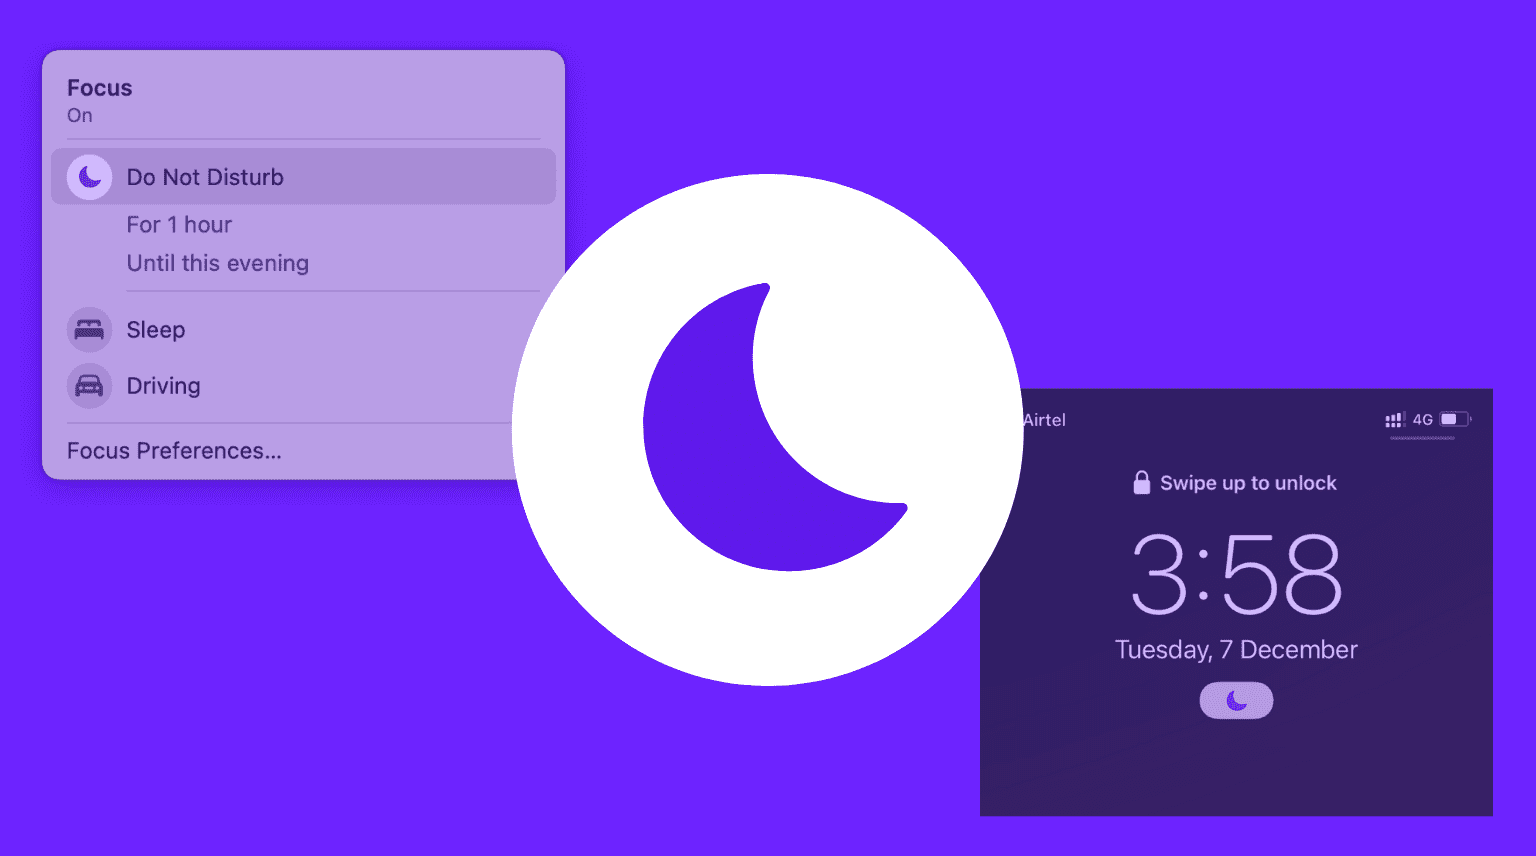
Starting with iOS 15, Apple has bundled the Do Not Disturb switch inside the new Focus option. Here’s how to schedule DND on iPhone and iPad running iOS 15 and iPadOS 15:
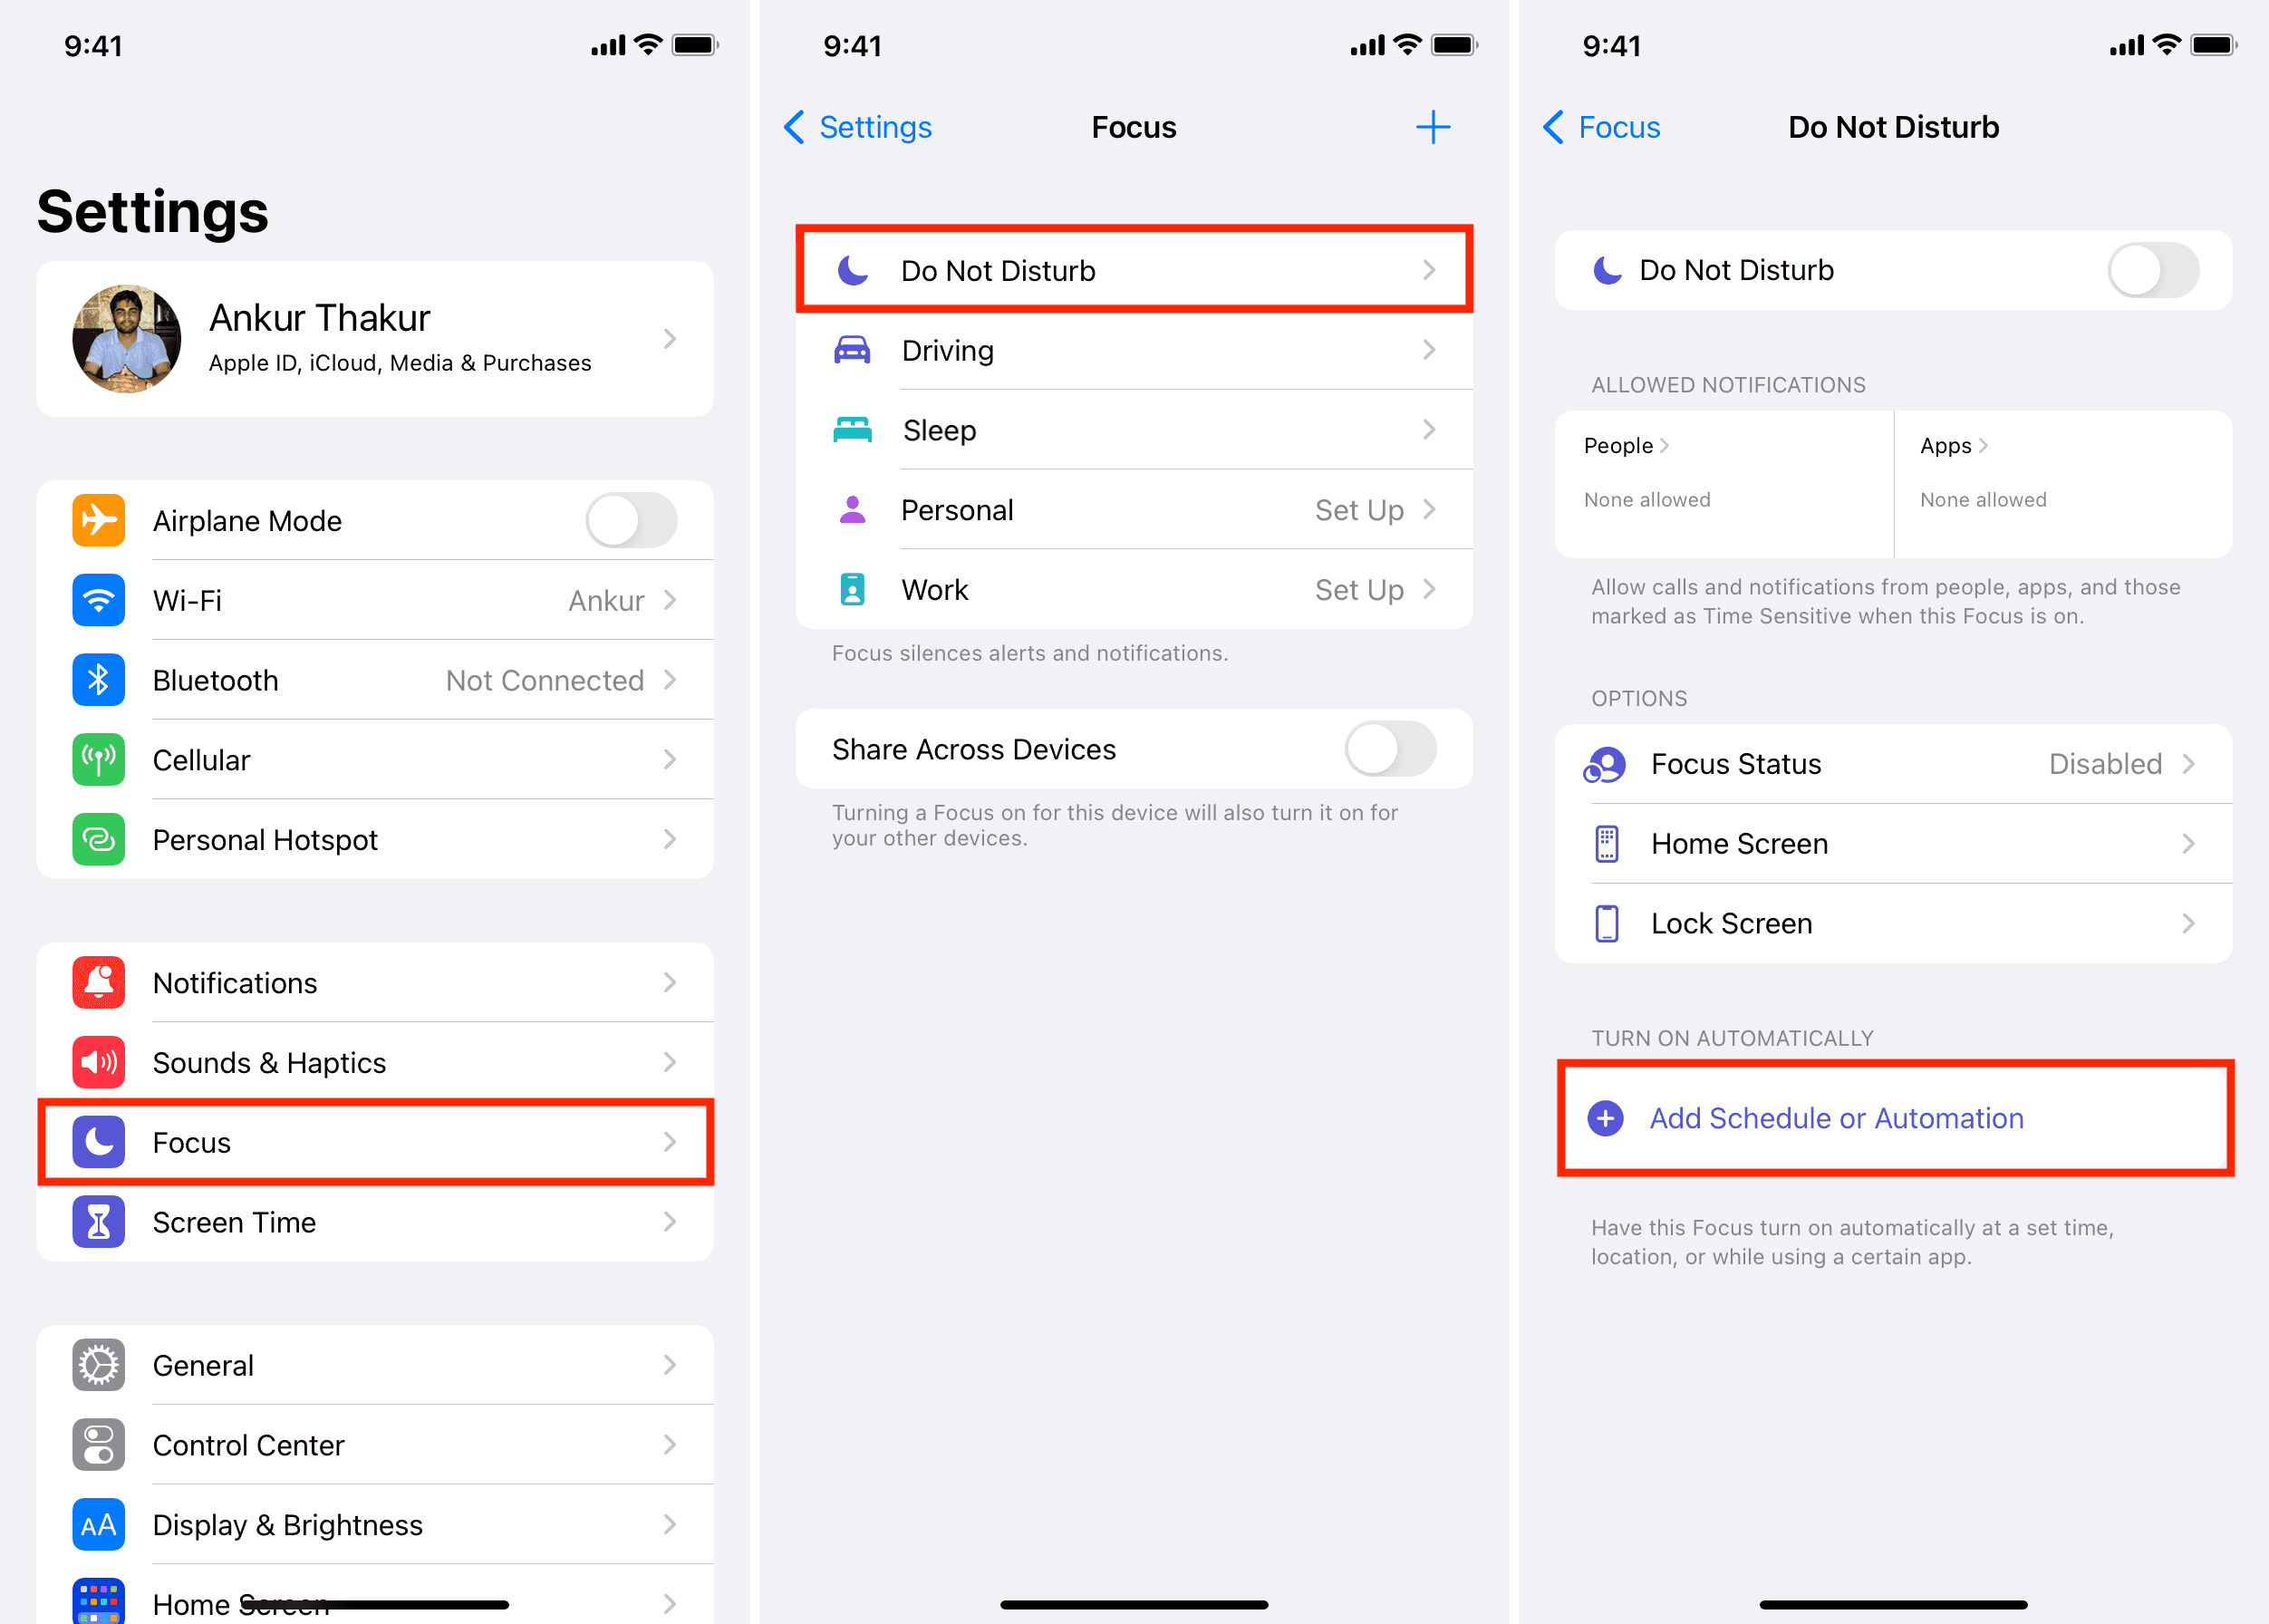
1) Go to Settings and tap Focus.
2) Tap Do Not Disturb.
3) Tap Add Schedule or Automation.
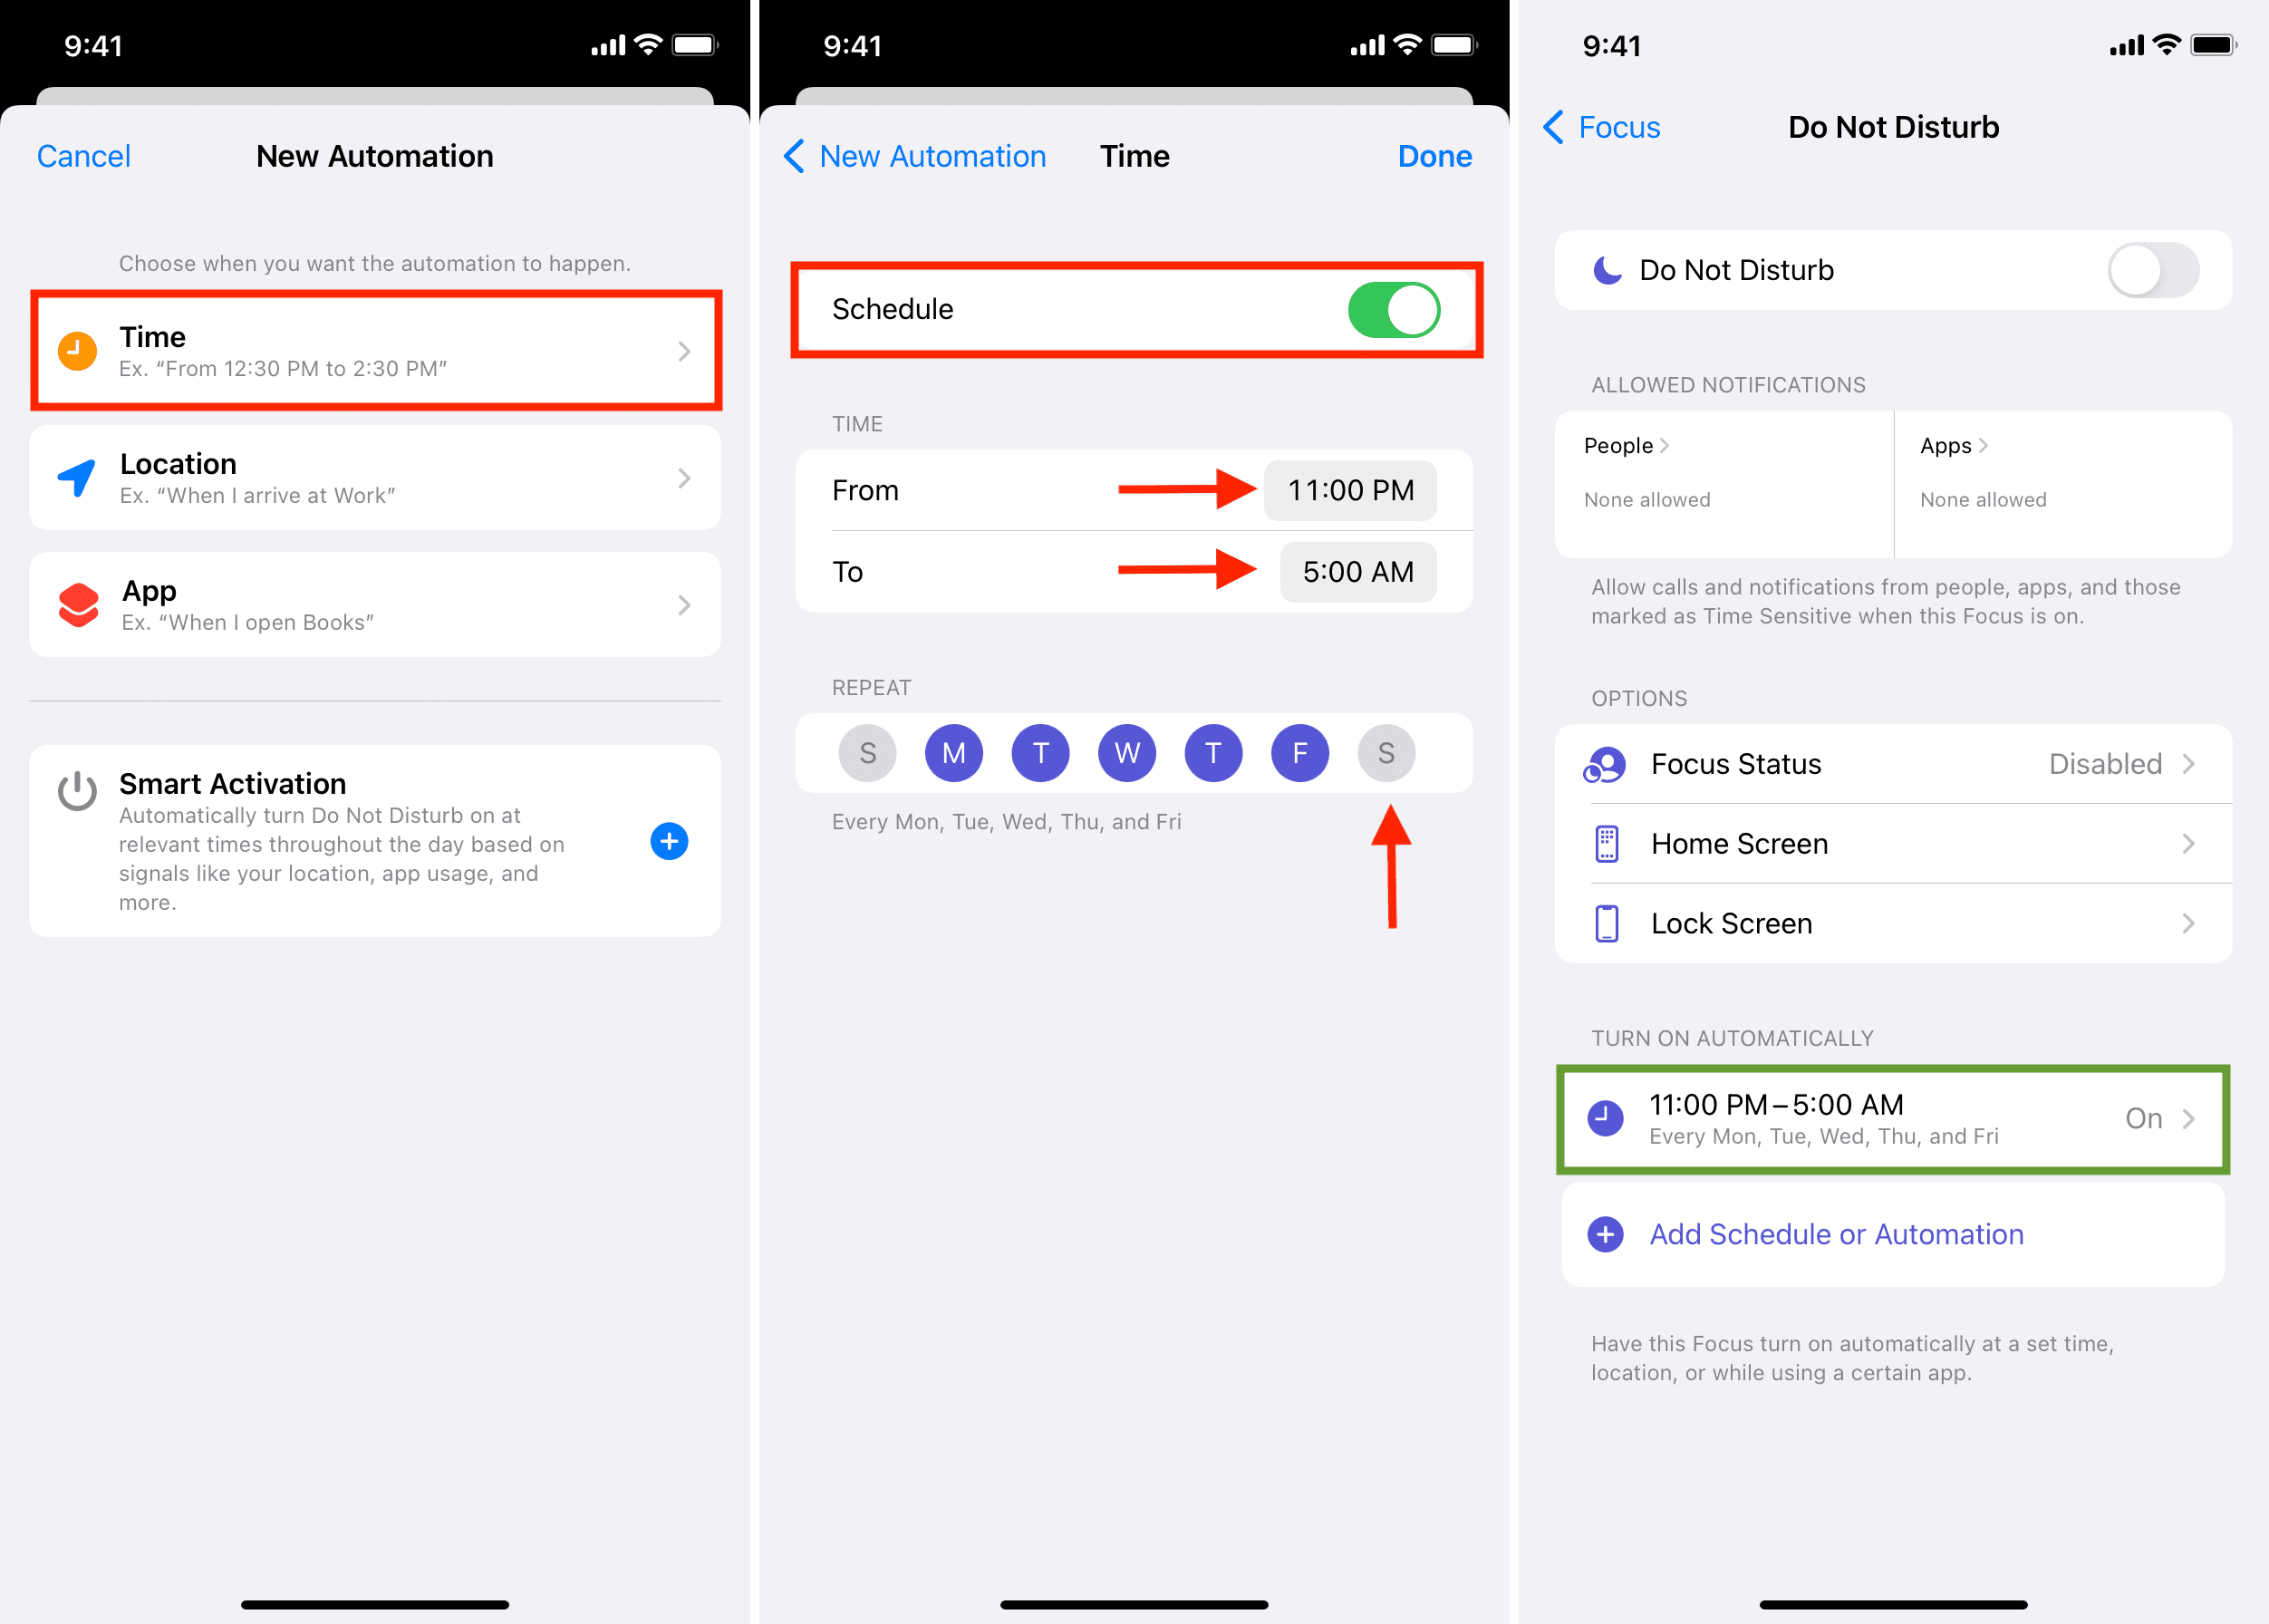
4) From here, you can choose Time, Location, or App when you want DND to start. For example, you can schedule automatic DND at 11 PM, or when you reach your office, or when you open the Books app to do some reading. Additionally, you can choose Smart Activation, which will automatically start DND after your iPhone has learned your habits based on location, app usage, etc. I am going with Time.
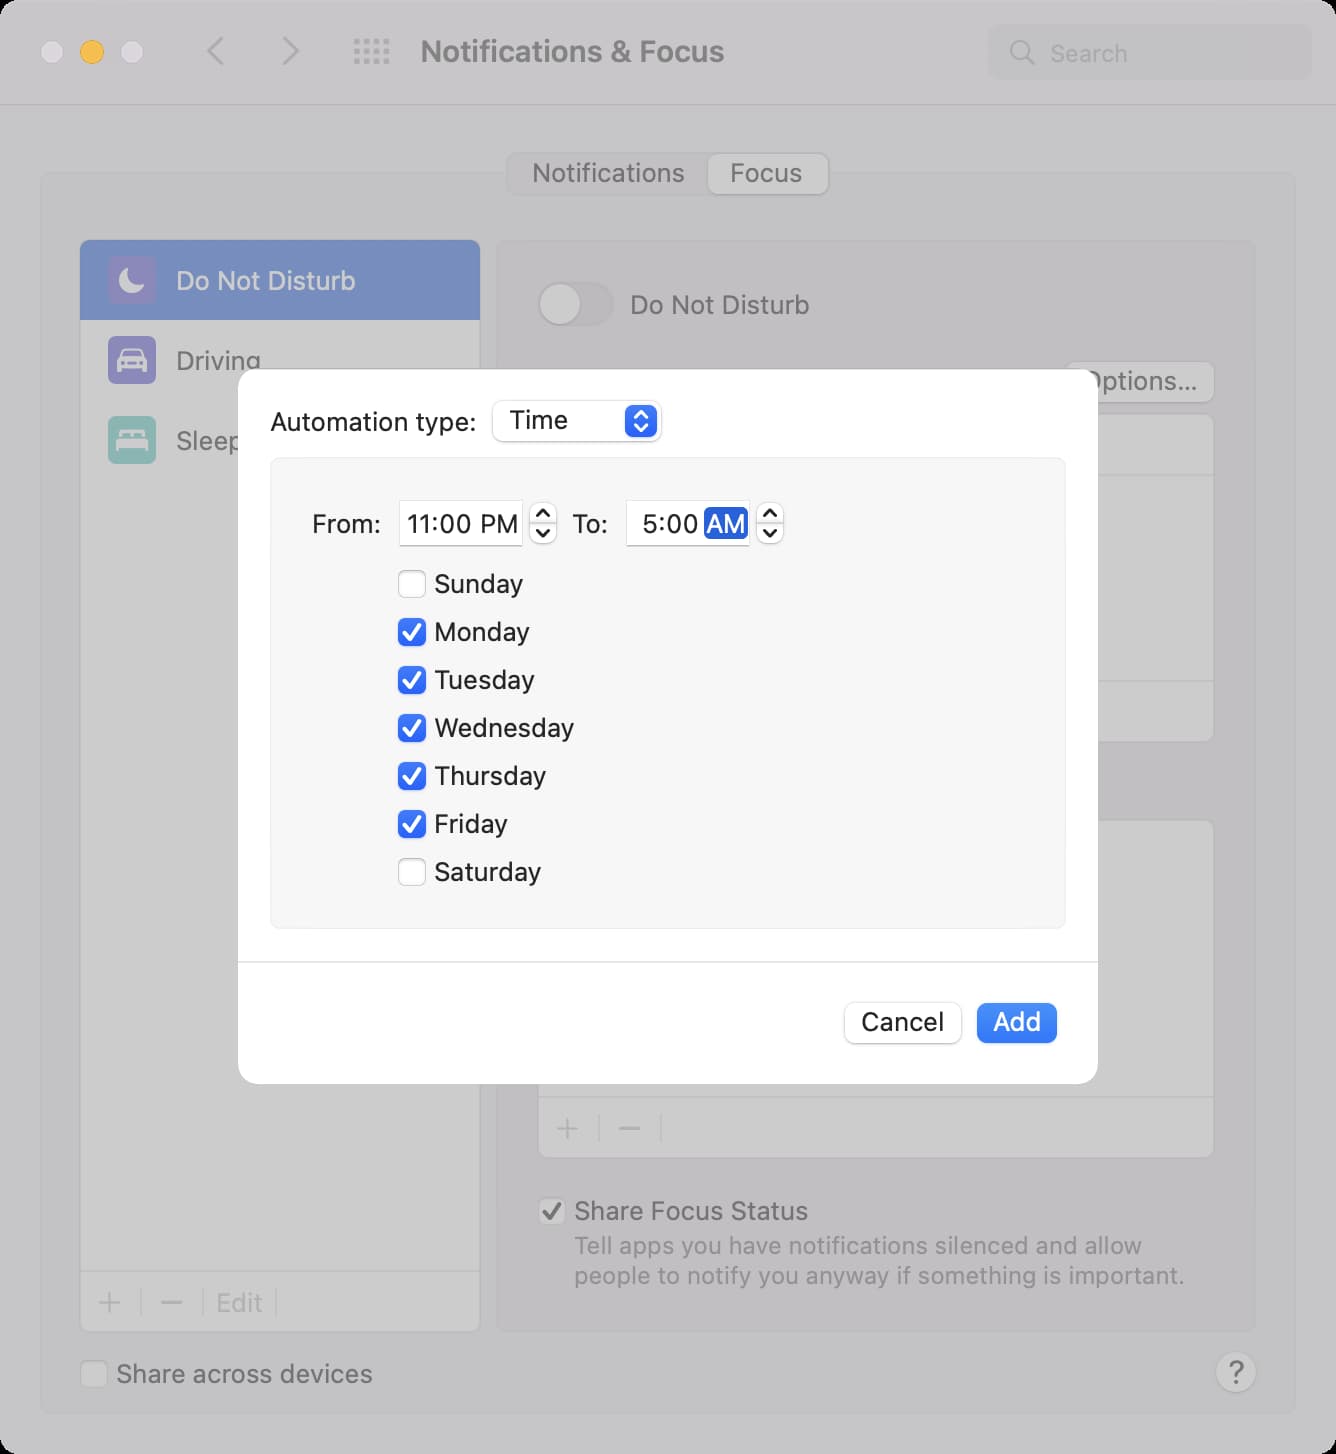
5) Set the From and To time values. Make sure to correctly enter AM and PM. Uncheck the days when you don’t want this DND automation.
6) Finally, tap Done to schedule Do Not Disturb mode on your iPhone.
Add exceptions to iPhone DND
Even during DND, if you have people (like your parents, kids) or apps (like your bank app) from whom you want to receive calls and notifications, you can add them as exceptions.
To do this, tap the People or Apps boxes > Add People or Add App and select from the list.
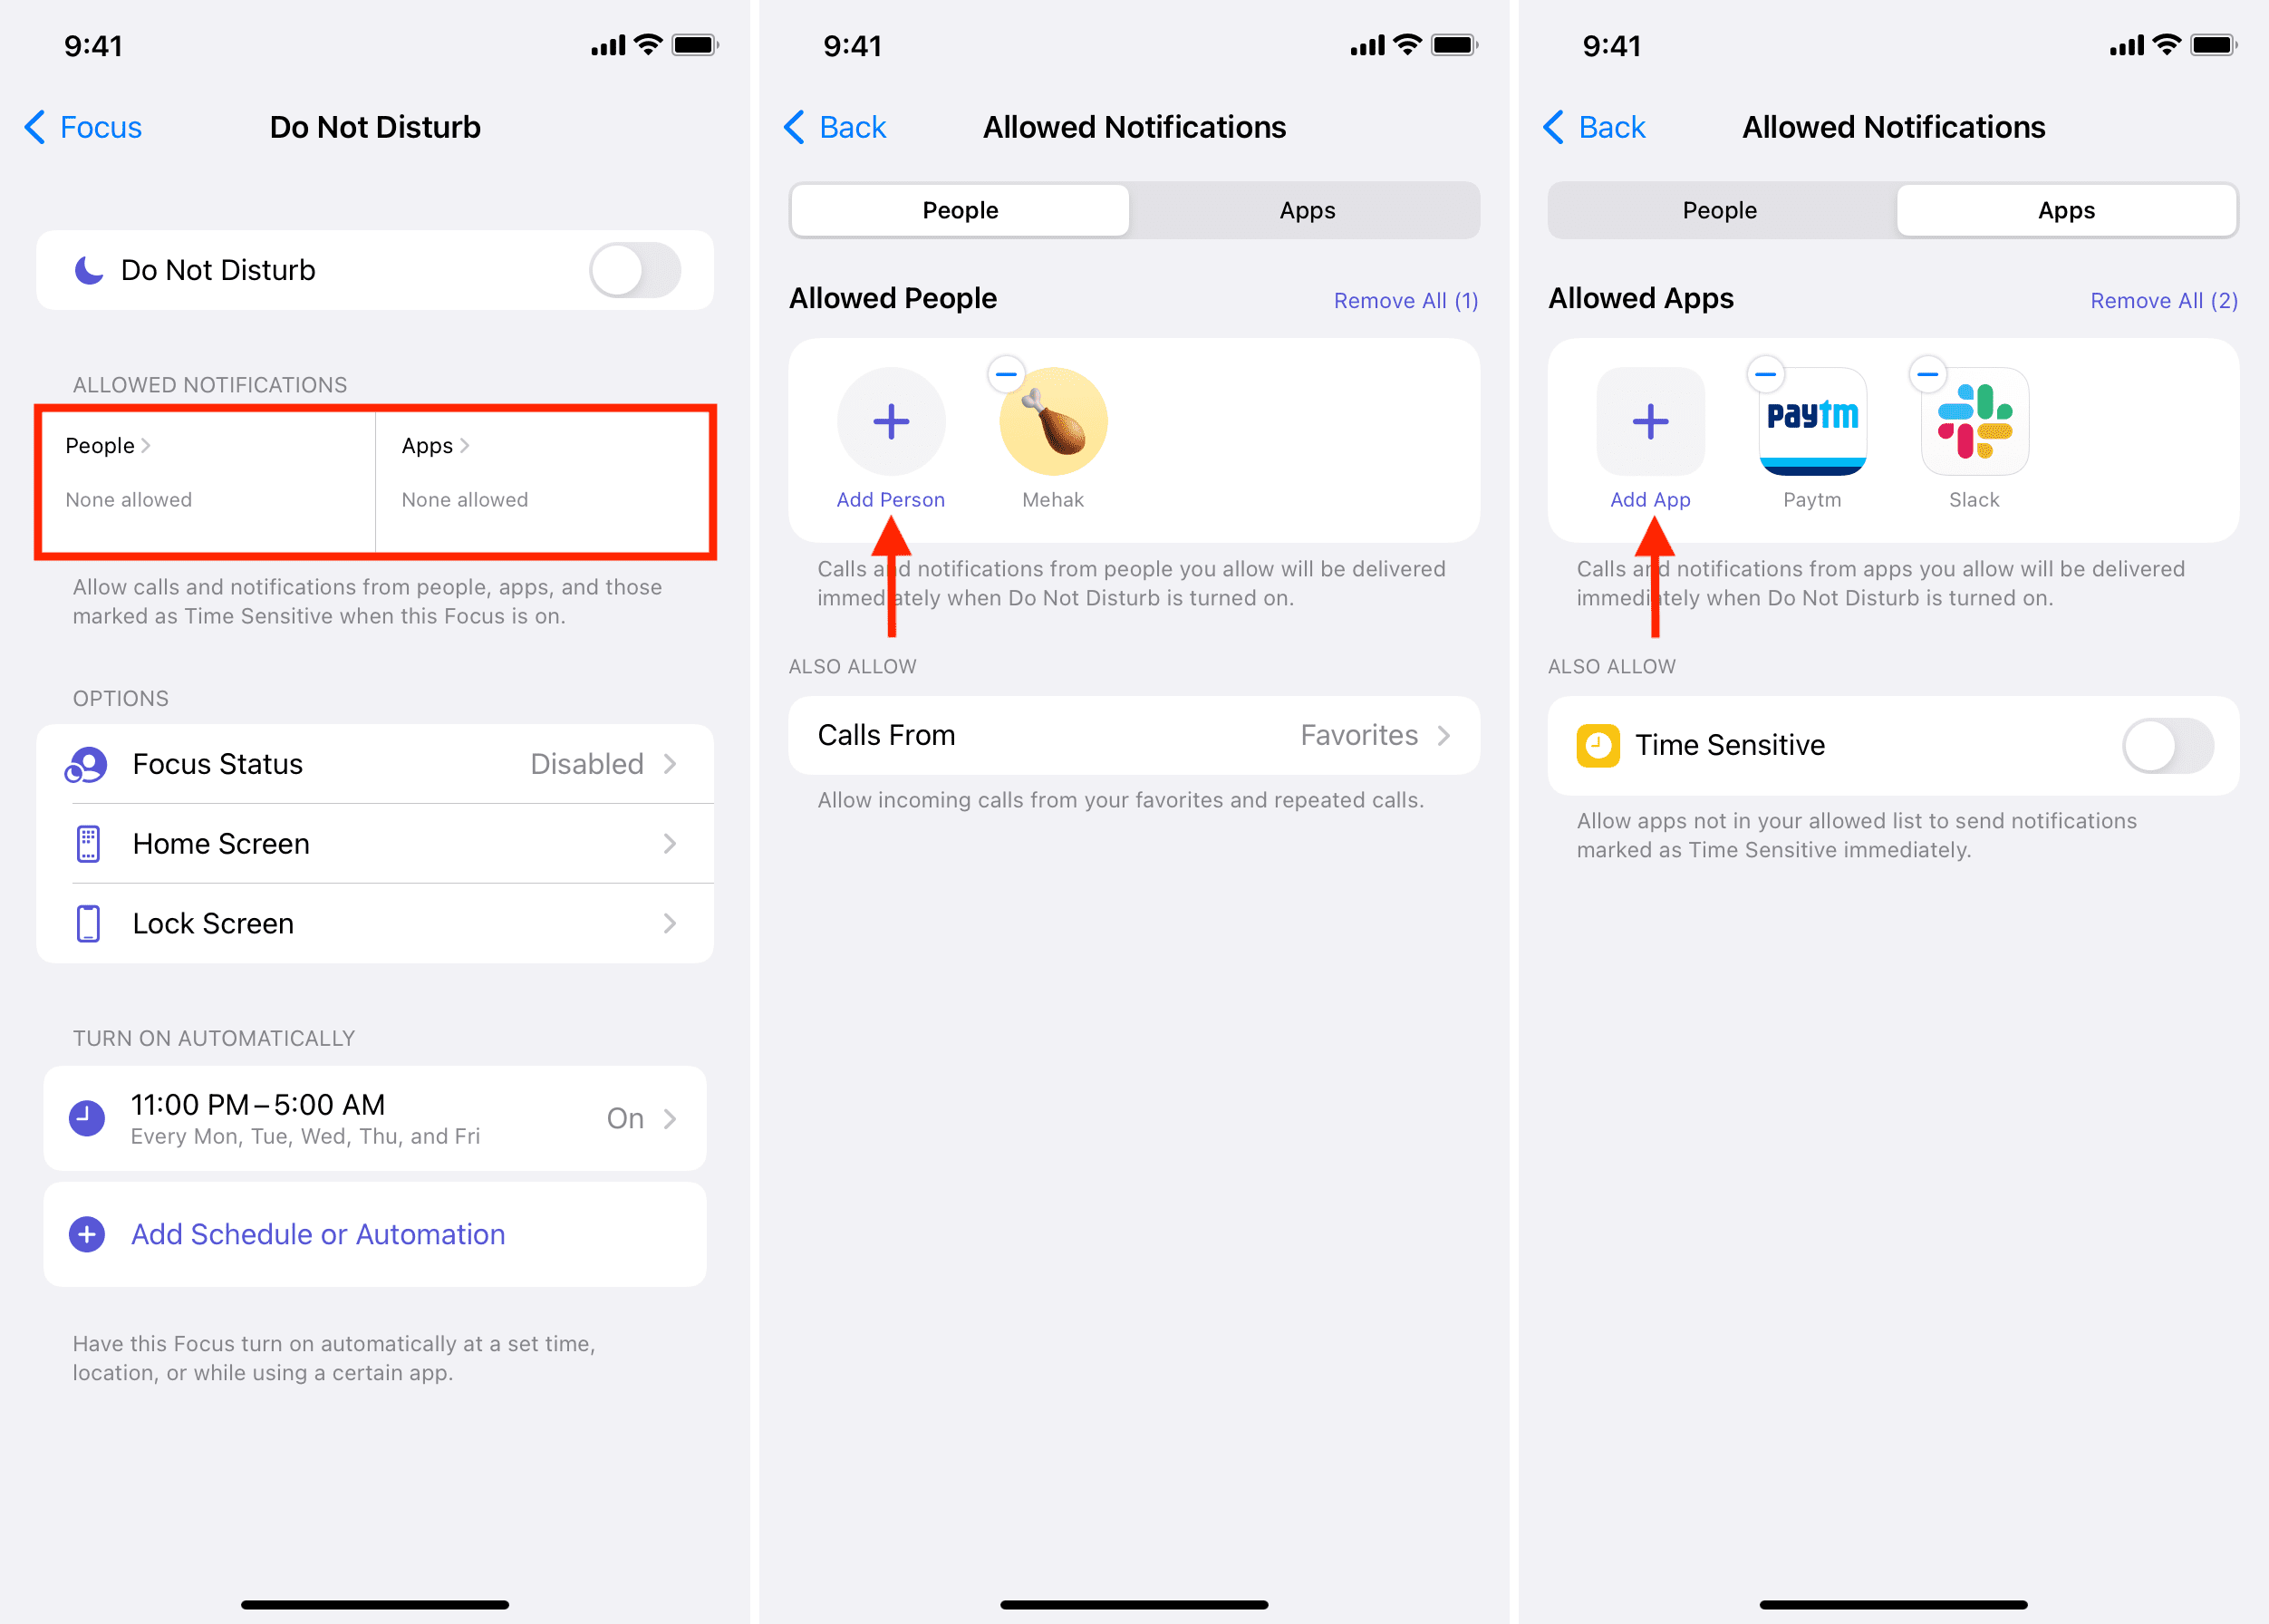
Additionally, you can also enable Calls From Favorites, All Contacts, No One, or Everyone.
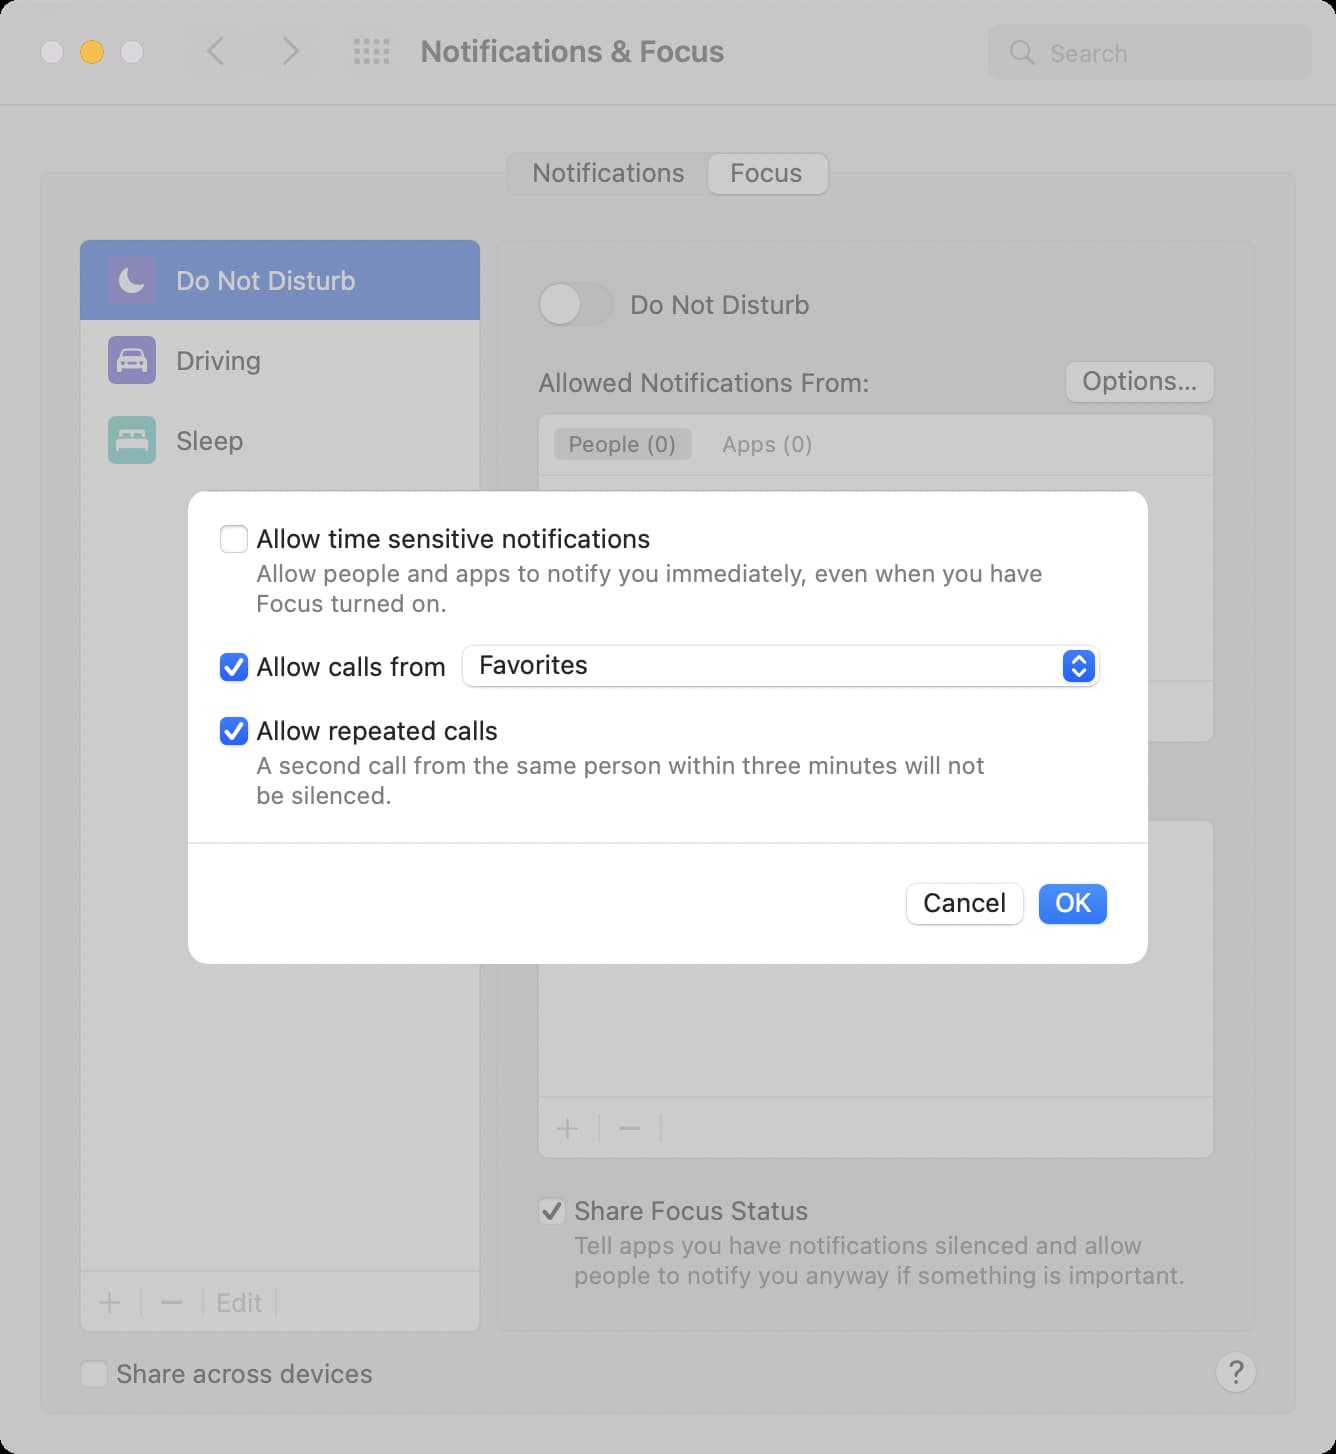
After enabling Allow Repeated Calls, the second phone call from the same person within three minutes will bypass DND, and you will hear the ring. It’s useful if someone wants to reach you for some emergency.
Similarly, you can enable Time Sensitive notifications even from apps not added as exceptions to the DND list. These are important notifications from apps like Reminders, Calendars, or ones you allow under Settings app > Notifications > app name > Time Sensitive Notifications.
Finally, you have three more options in DND titled Focus Status, Home Screen, and Lock Screen. You can learn about them in our separate post that covers the new Focus feature.
How to schedule DND on iPhone running iOS 14 and earlier
1) Go to Settings > Do Not Disturb on your iPhone, iPad, or iPod touch.
2) Flip the Scheduled button to the ON position, as shown below.
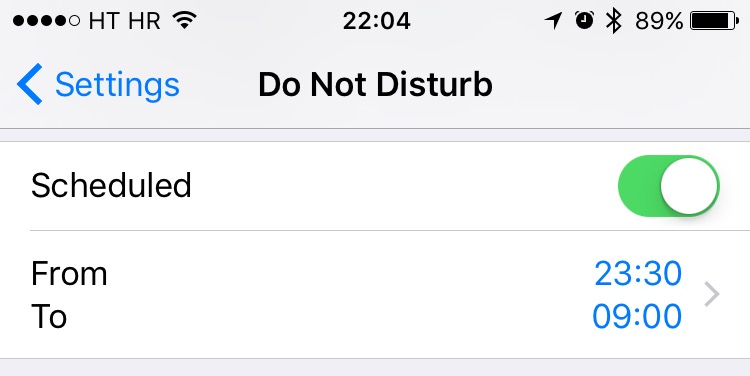 3) Now set quiet hours for Do Not Disturb mode.
 4) Next, choose when to be disturbed while Do Not Disturb mode is on:
- Silence: Choose to silence calls and notifications always or only when the device is locked.
- Allow Calls From: Allow calls from every one, no one, your favorites, or specific contact groups stored on your device or your iCloud account.
- Repeated Calls: If someone calls you twice within three minutes, the call won’t be silenced.
- Do Not Disturb While Driving: Limit notifications while driving, which can be set to Automatically, When Connected to Car Bluetooth, or Manually.
- Auto-Replies: Create automatic replies and decide who they’re sent to when in Do Not Disturb mode.

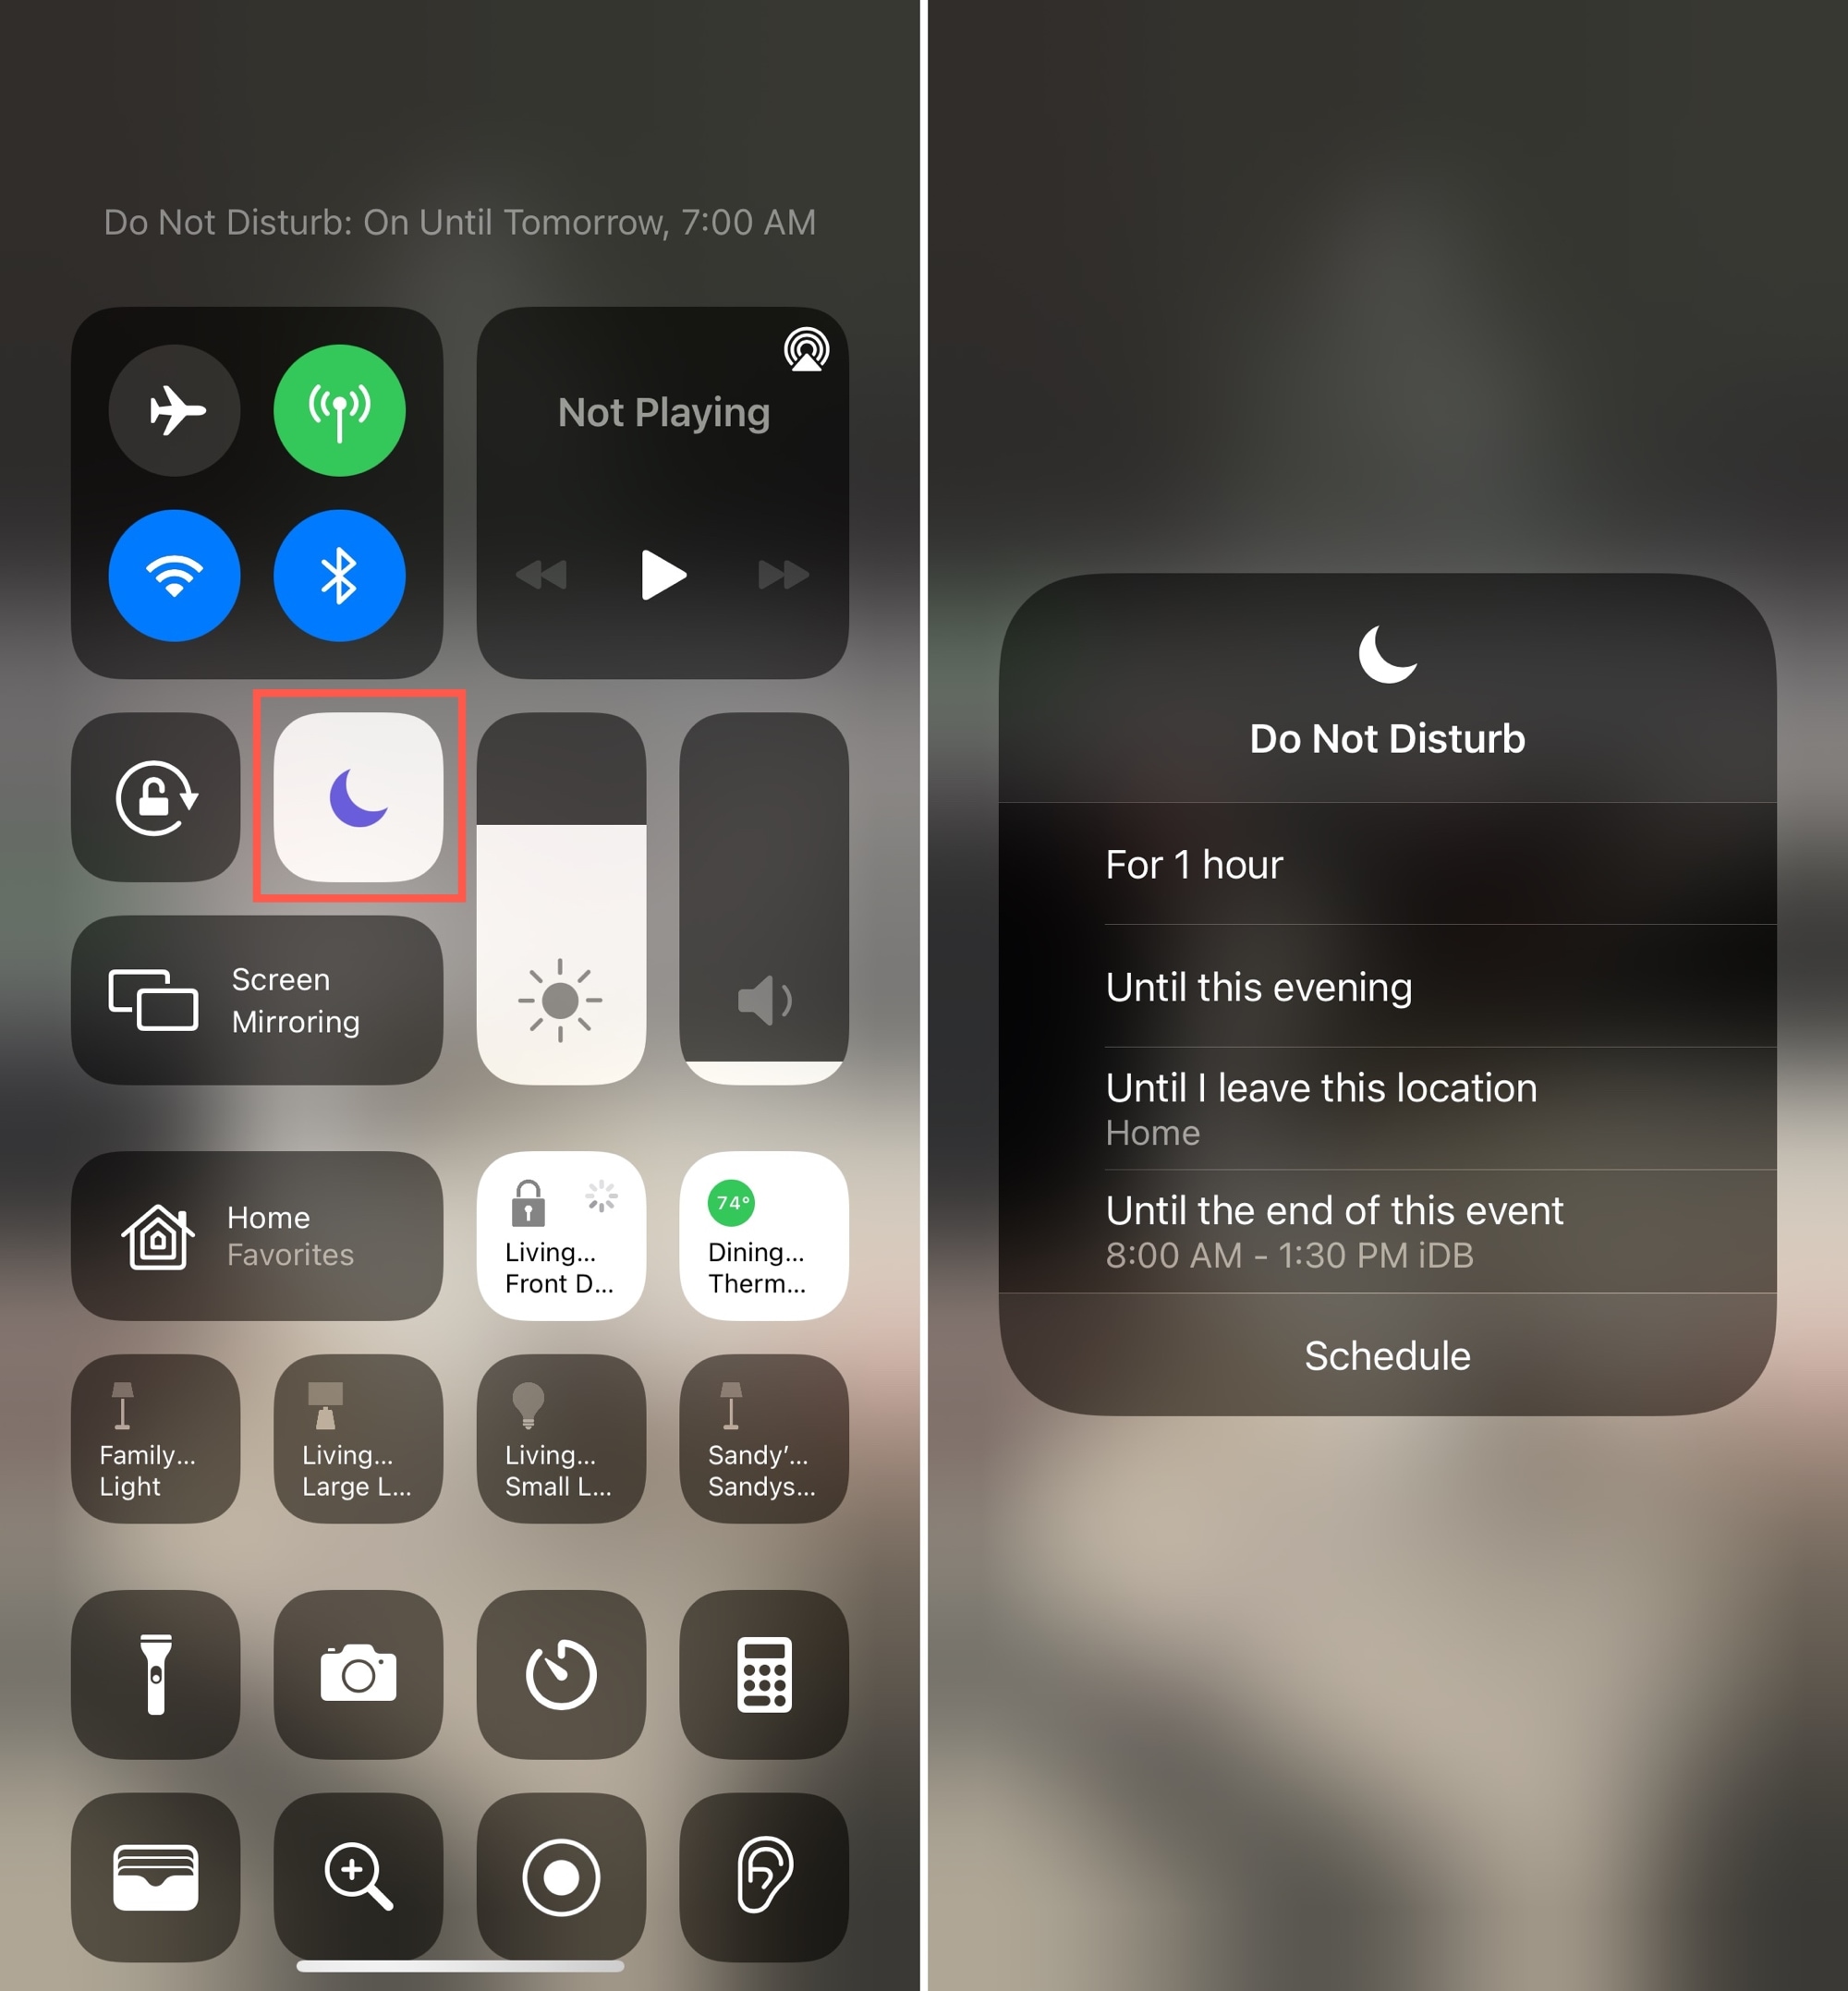
That’s it! Your iOS device will automatically enter and exit Do Not Disturb mode at the same time every day. When a device is in Do Not Disturb mode, a moon icon is shown in iOS’s status bar or the Control Center.
![]()
To manually turn Do Not Disturb on and off, flip the Schedule switch to the OFF position and set Manual to the ON/OFF position to enable/disable the feature.
Or, open Control Center and then tap the crescent moon icon. You can also tap and hold to select a time. Manually entering and exiting Do Not Disturb mode won’t change your set scheduling times and options.
How to schedule Do Not Disturb mode on Mac running macOS Monterey
Focus (and DND – as DND is now one of the Focus options) sync to your Apple devices if you have enabled the toggle for Share Across Devices. That means the Do Not Disturb time you set on your iPhone will import to your Mac. As a result, your Mac will also enter DND at the same time.
But if you want to set different DND times on your computer and iPhone or you only have a Mac and not other Apple devices, here’s how to schedule DND on macOS Monterey:
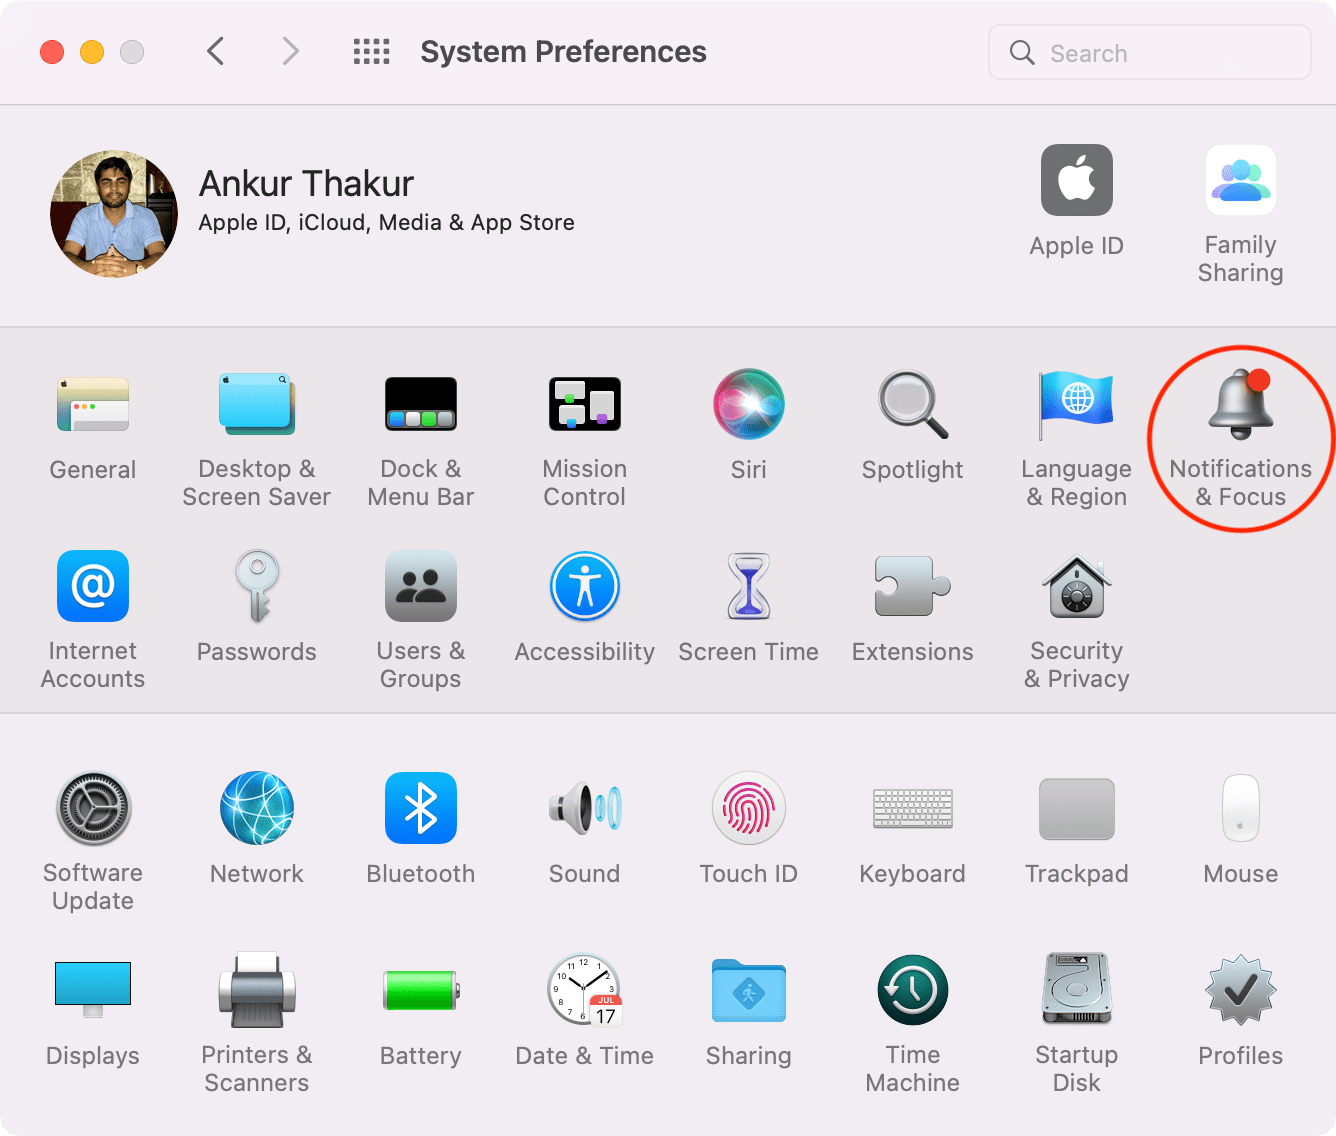
1) Click the Apple icon from the top left and choose System Preferences.
2) Click Notifications & Focus.
3) Go to the Focus tab.
4) Choose Do Not Disturb from the left sidebar, if not already.
5) Click the plus icon under Turn On Automatically.
6) Choose time-based, location-based, or app-based automation.
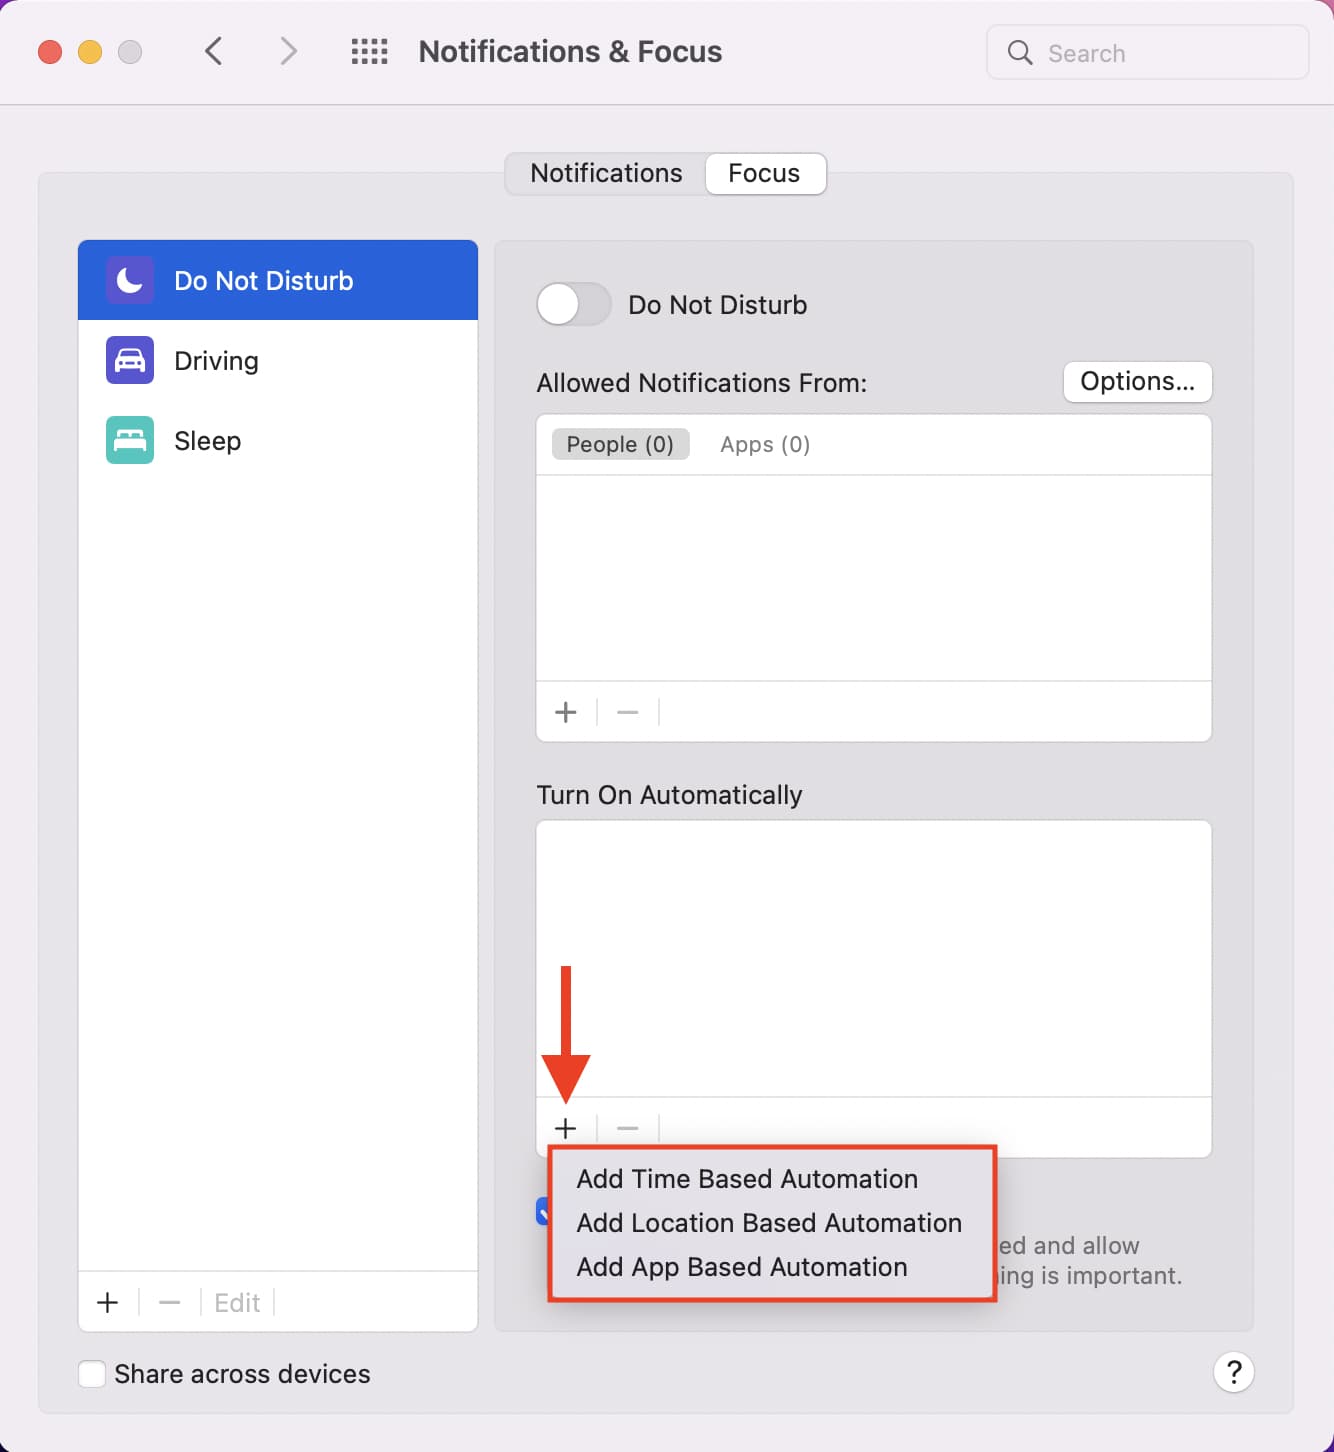
7) Set the time, location, or app and click Add to schedule DND on your Mac.
On this screen, you can click Options to allow calls from favorites, contacts, everyone. You can also choose to receive repeated calls and time-sensitive notifications.
Please note that you can schedule more than one Do Not Disturb automation. Simply choose Add Schedule or Automation and repeat the above steps.
How to schedule DND on Mac running macOS Big Sur and earlier
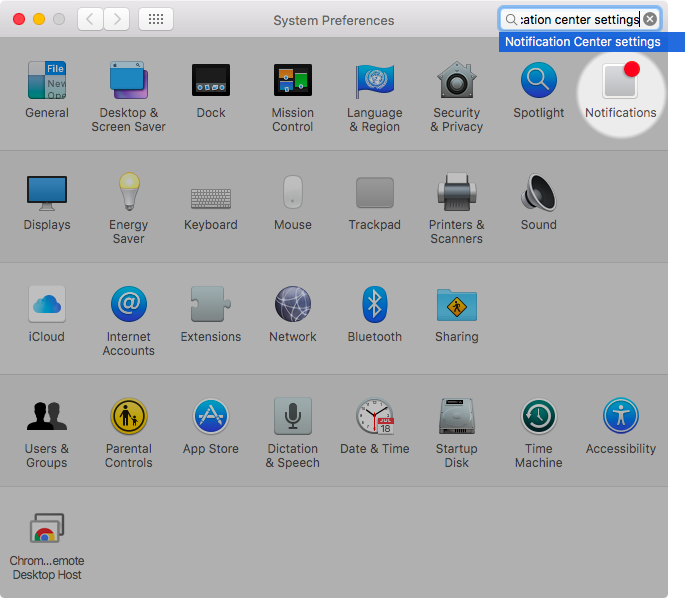
1) Open System Preferences on your Mac.
2) Click Notifications.
 3) Select Do Not Disturb on the left, then choose a schedule on the right.
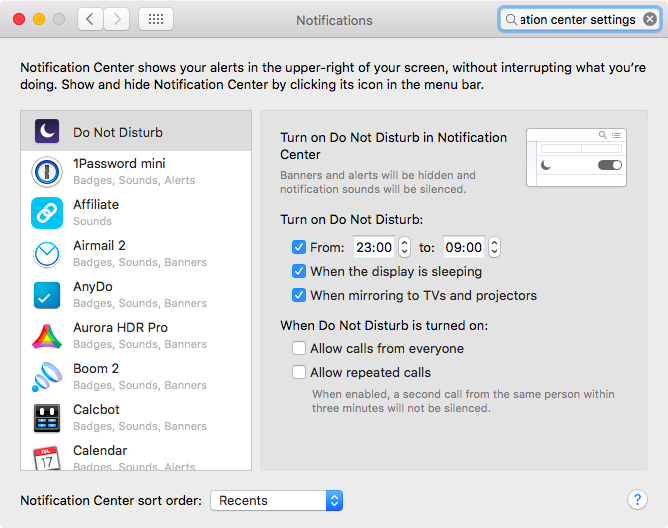
4) Optionally, set to receive call alerts even when Do Not Disturb is on:
- Allow calls from everyone: All calls on this Mac are enabled and won’t be silenced.
- Allow repeated calls: A second call from the same person within three minutes will go through and will not be silenced.
That’s it. From now on, Do Not Disturb will pause all notifications at your custom times, each and every day. As a nice bonus, notifications on your Mac stop when the display is in sleep or when you’re projecting the screen.
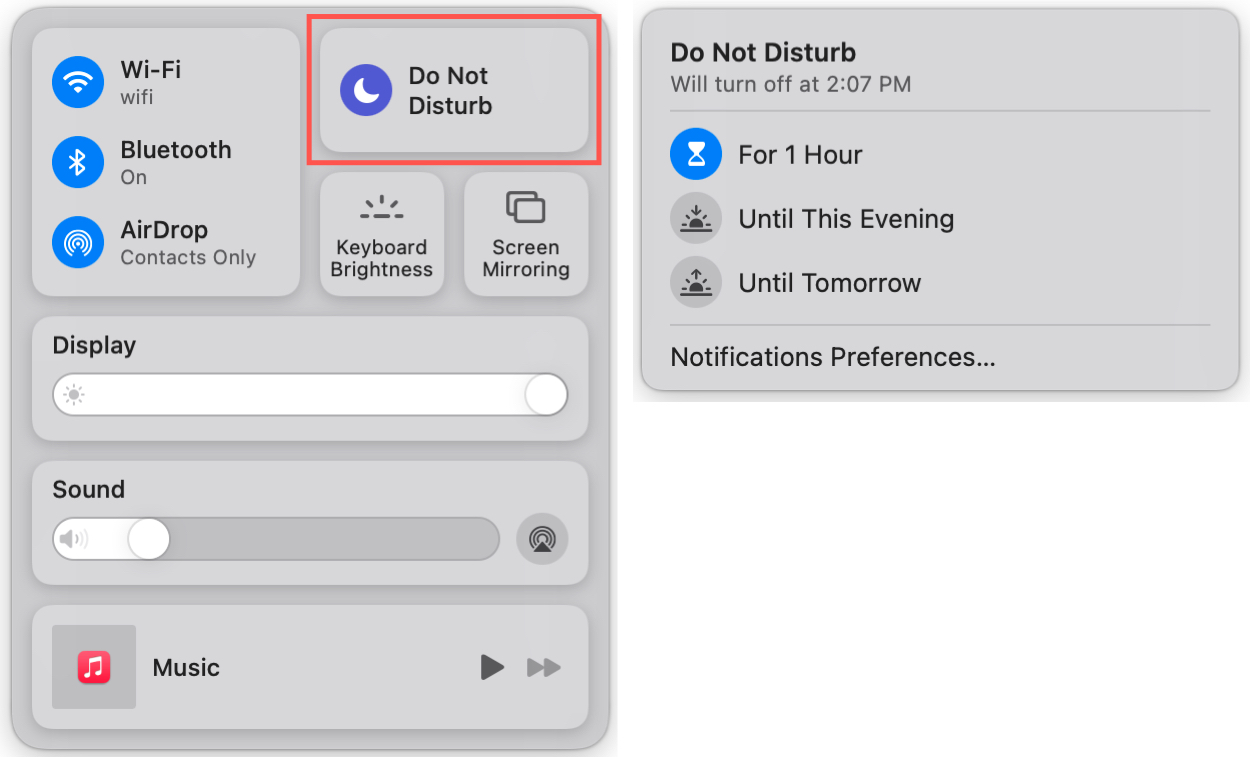
To manually enable Do Not Disturb mode, click the Do Not Disturb icon in the Control Center. You can also click the arrow next to Do Not Disturb to select a time.
 If the date and time you click to access the Notification Center in your Mac’s menu bar are dimmed, you are in Do Not Disturb mode, as depicted by the screenshot below.
![]()

Leave a Reply