How to scan documents in iOS 11 Notes app
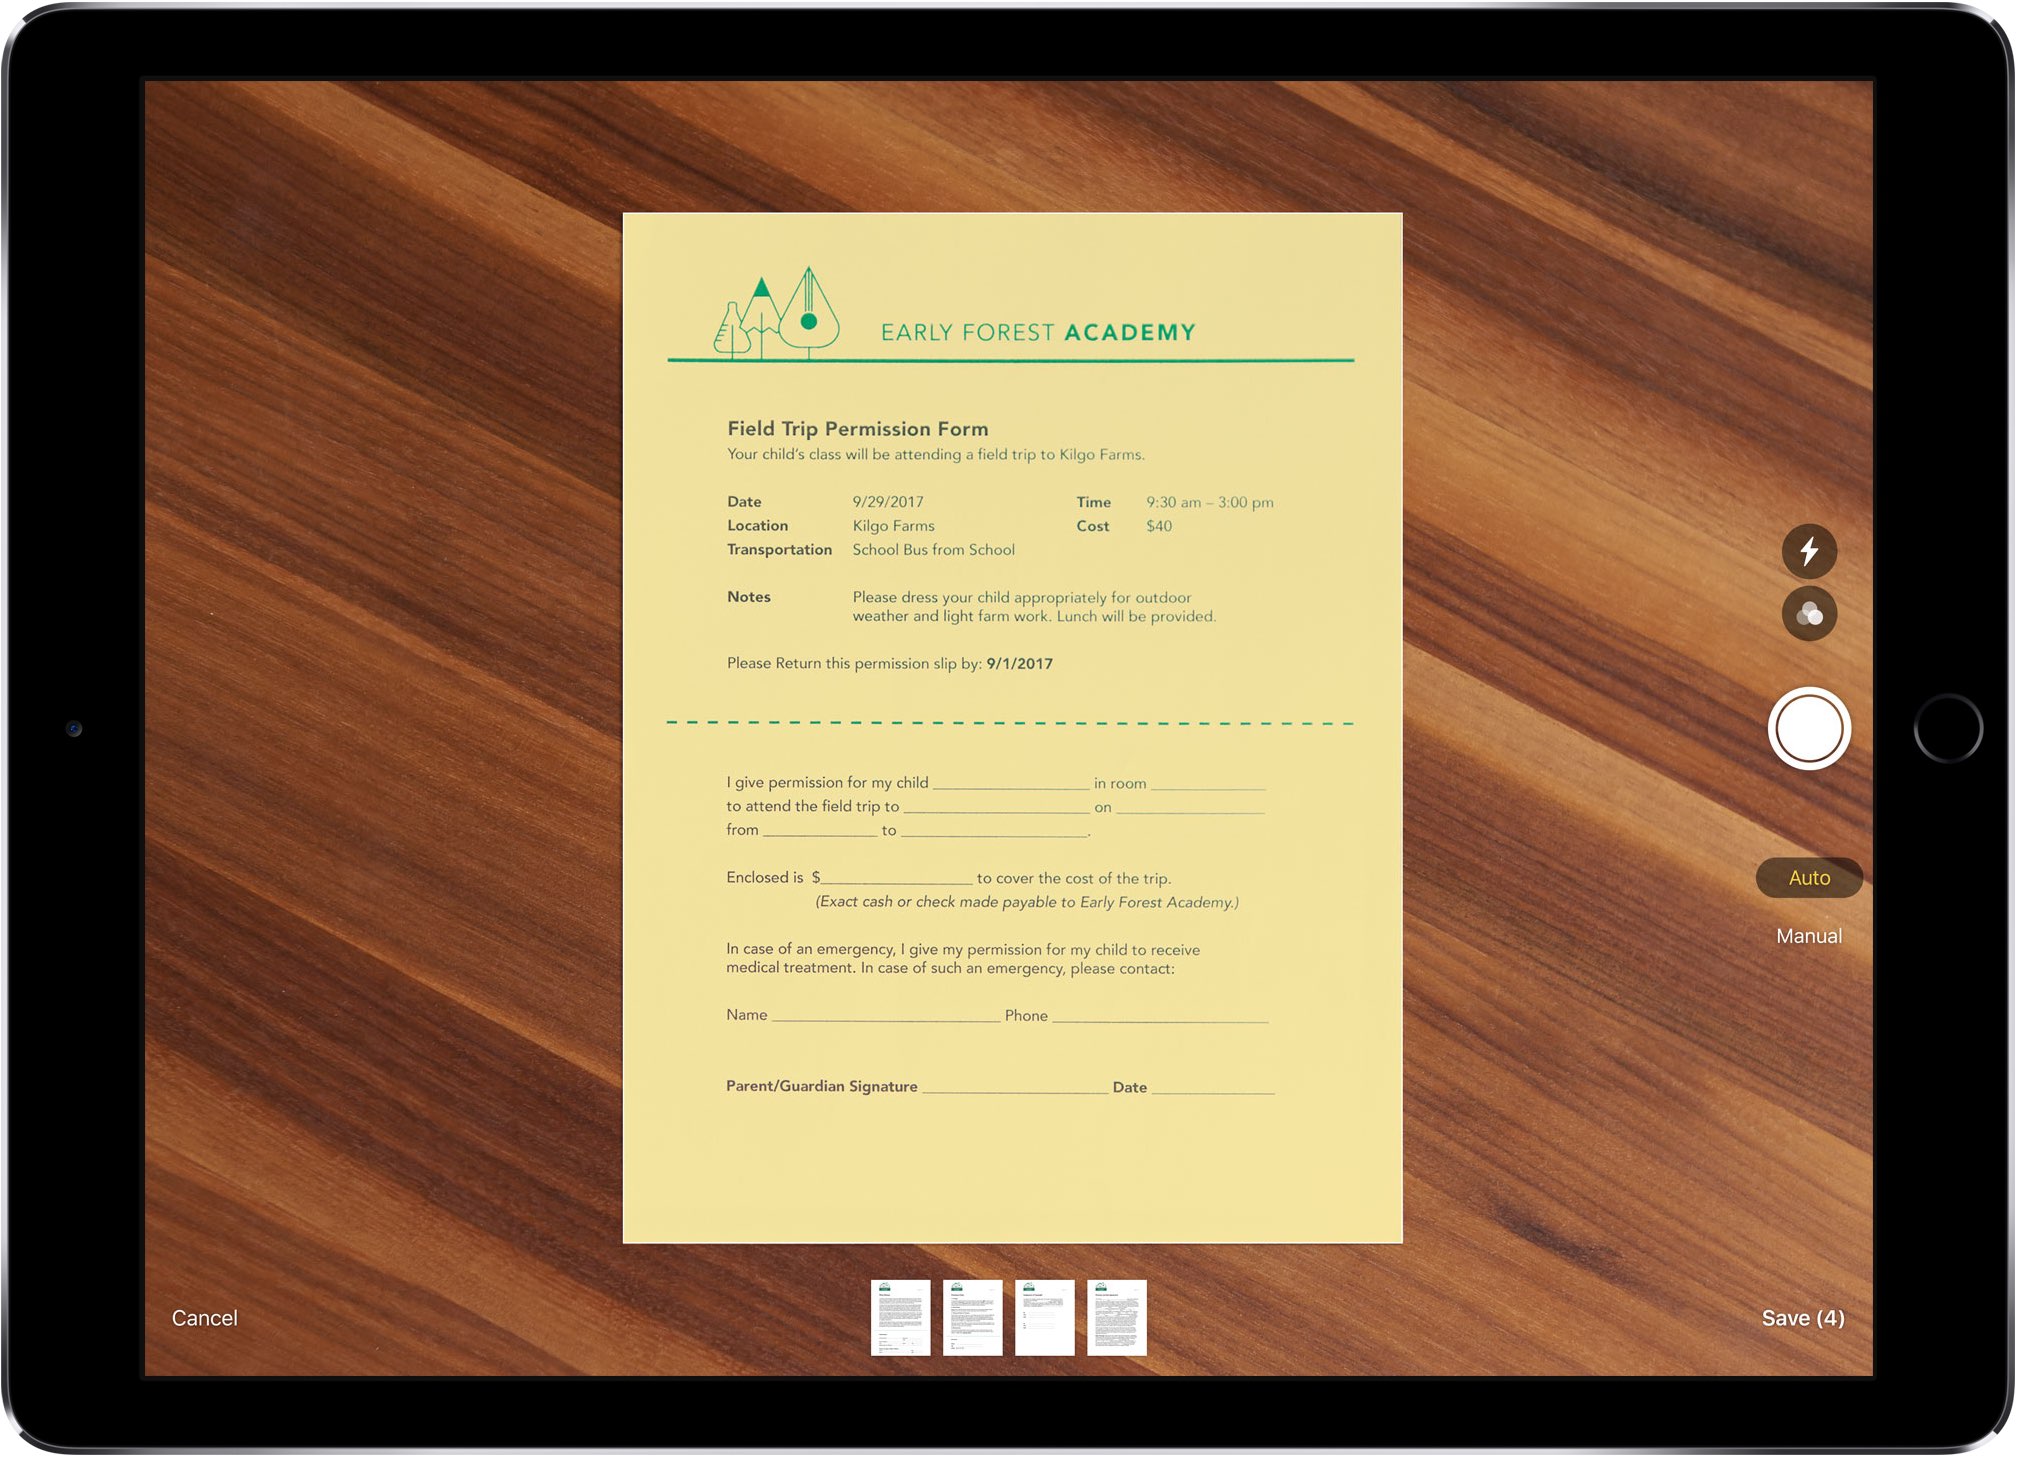
One of the best new features in iOS 11 is the built-in document scanner within the Notes app that lets you scan receipts, invoices, business cards, photographs, sheets of paper, etc.
In a true Apple fashion, it takes full advantage of computer vision and ARKit to sense a document in your camera feed, crop and straighten the edges, un-skew the perspective and remove any tilt or glare—all automatically with just a tap of the shutter button.
All that’s left for you to do is fill in the blanks and sign the scan with your finger or Apple Pencil before you share the document or send it to your favorite app for further editing. In this tutorial, we’ll teach you how to scan single sheets of paper as well as multi-page documents using the Notes scanner, as well as annotate your scans, apply various to them and much more.
Hands on with iOS 11 Notes document scanner
The Notes scanner is a really, really compelling feature but don’t take my word for it—watch Andrew’s hands-on video embedded below and marvel at the Notes scanner.
Subscribe to iDownloadBlog on YouTube
As mentioned, the Notes scanner includes powerful features such as automatic edge detection, a set of filter presets, cropping, rotation and sharing, all built-in and just a tap away. You can view your scans, annotate them and perform other edits once you’ve saved them to the app.
And with iCloud, your scans sync seamlessly across all your devices.
Requirements
The ability for Notes to scan documents requires iOS 11 or later. iOS 11 requires a 64-bit iOS device, meaning older devices such as iPhone 5 and iPhone 5c are out.
Scanning documents is currently unsupported in Notes for Mac but we’ll be making sure to update this tutorial if and when Apple chooses to bring it to macOS.
Although Notes syncs data via iCloud across your iPhone, iPad and Mac devices, your scans are only viewable on iOS 11. Attempting to view a scanned document in Notes on older iOS versions yields a warning message, saying “Upgrade iOS to view this attachment”.
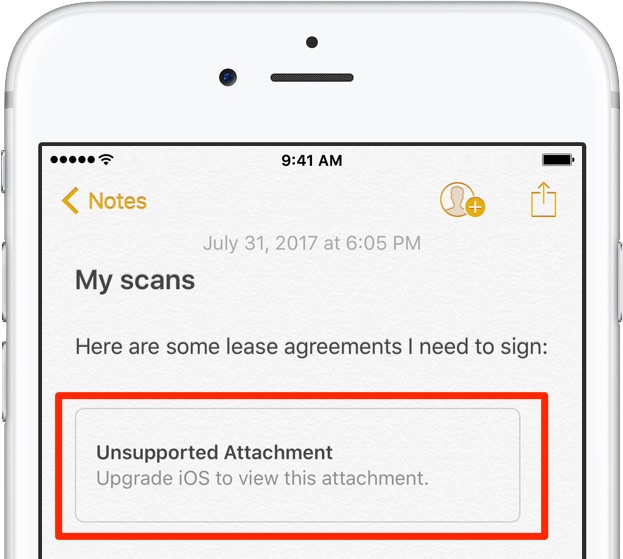
Viewing scanned documents in Notes requires iOS 11 or later.
And one last thing before we get to it: in its current incarnation, Notes does not apply handwriting recognition to your scans like it does to your scribblings, meaning you cannot search text in scanned documents.
How to scan anything in Notes for iPhone & iPad
Scanning sheets of paper with Notes works as advertised—you just position the document in view, without making much effort to line things up, and hit the shutter button.
The handy auto-shutter mode lets you keep going until you have scanned all the pages you need. Your scans are saved in Notes as Markup-friendly, exportable JPG attachments.
1) Launch the Notes app on your iOS device.
2) Create a new note or open an existing one.
3) Tap the “+” icon at the bottom and choose Scan Document from the menu.
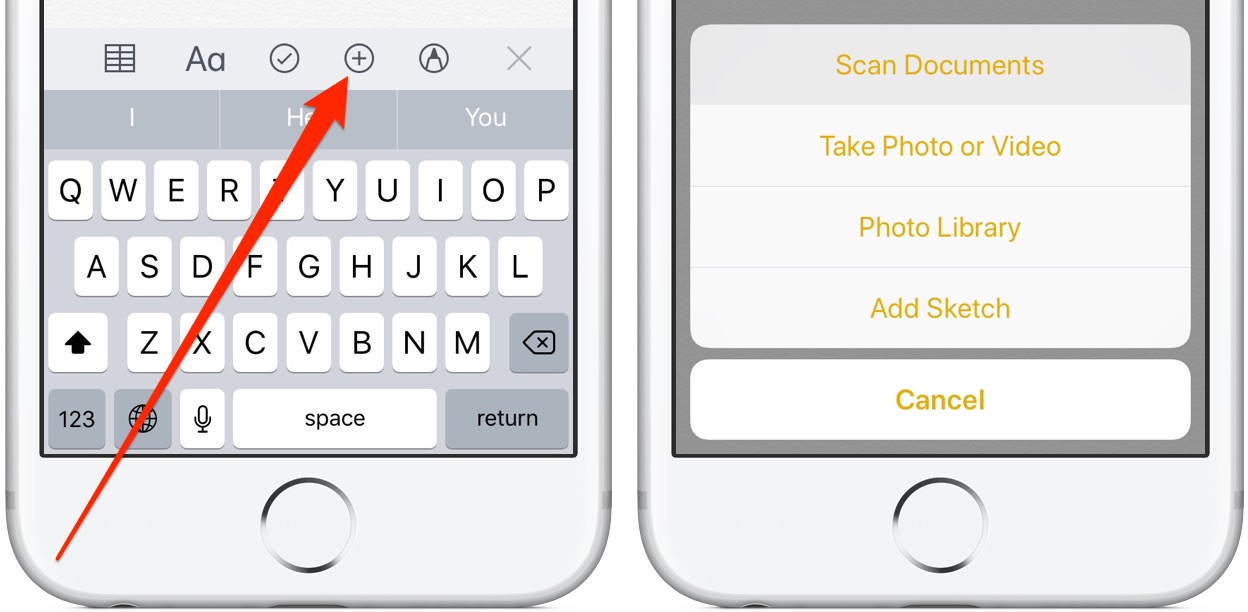
The Plus button reveals the Notes scanner feature.
4) Place a sheet of paper on a flat surface and point the camera at it.
The app uses computer vision and the ARKit framework, allowing you to point the camera at an angle rather than line it up perfectly, which is very helpful when scanning multi-page documents.
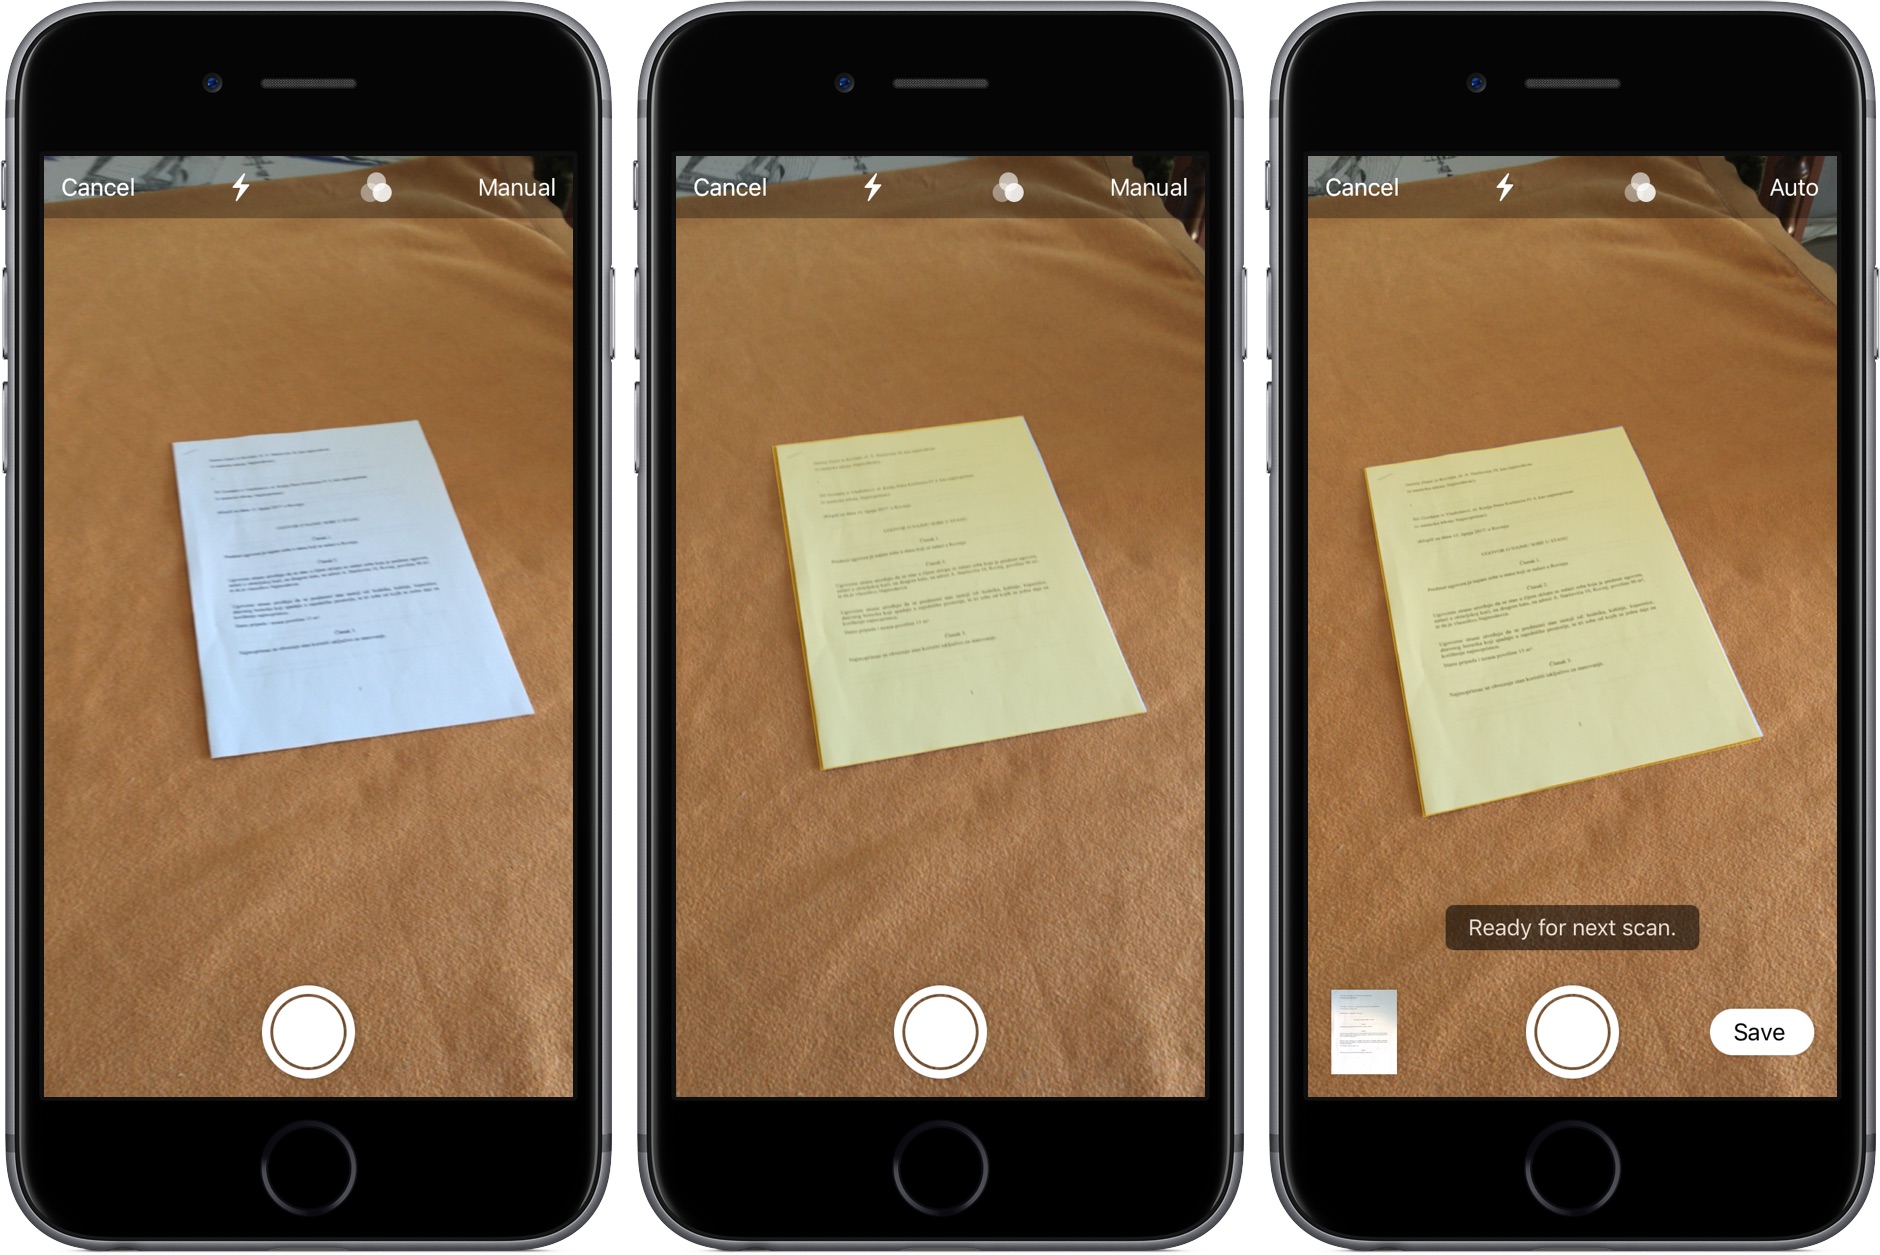
Manual shutter mode, when you need complete control.
As soon as the scanner detects edges of the paper, it will apply a semi-translucent yellowish overlay on top of the document and keep adjusting it in real time and—dare I say?—augmented reality.

Automatic shutter mode is great for multi-page scans.
You can adjust corners of the scan with drag points, but that won’t be necessary in most cases because Notes just does the right thing, automagically. Additional in-camera controls let you enable the flash or apply image filters on the fly.
Manual and automatic scanning
You can scan in either manual or automatic shutter mode:
- Manual shutter mode—In this mode, you must tap the on-screen shutter button (or press the volume button) to capture the scan. To enable the mode, tap Manual at the top of the Notes camera.
- Automatic shutter mode—Use this mode when you’d like to scan several documents at once. To turn the auto-shutter feature on, tap Auto at the top of the Notes camera.
Switch between automatic and manual shutter modes by tapping Auto or Manual.

Manual and automatic shutter modes are a tap away.
Manual shutter is great when you’d like to adjust corners of the document right after pressing the shutter button. But—again—manual shutter makes sense for those rare times when the edge-detection feature didn’t get it quite right.
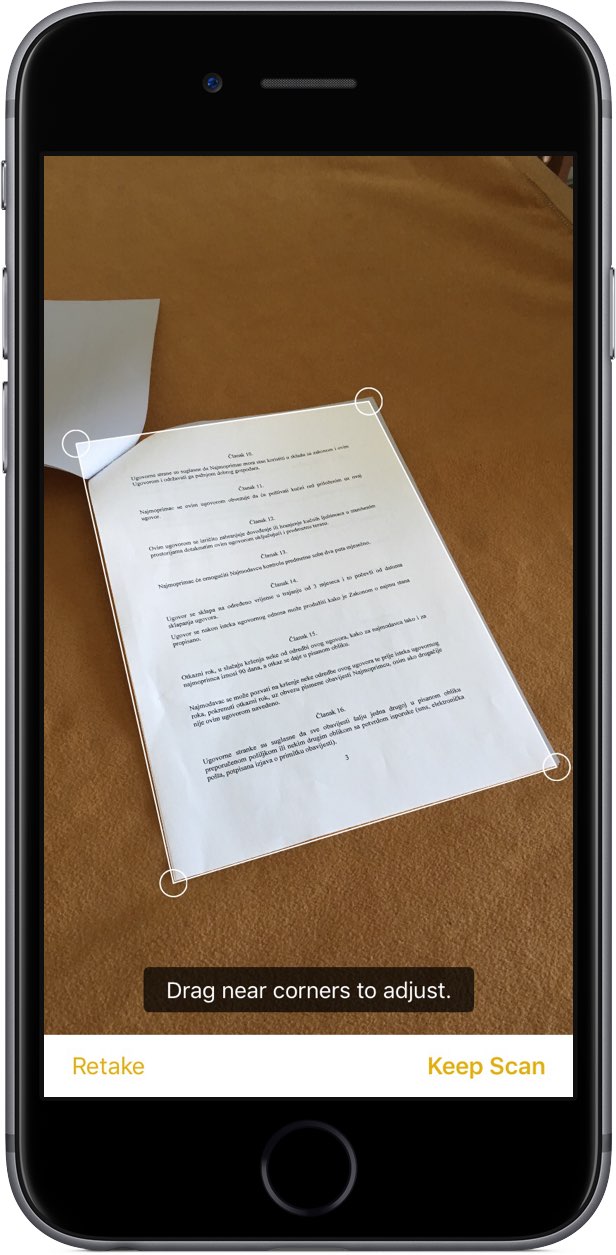
You can always drag the corners if edge-detection messes it up.
You don’t get that option in auto-shutter mode, but don’t worry—scans can be cropped after the fact so this shouldn’t be an issue. Regardless of your chosen mode, Notes always applies perspective correction to un-skew the scans.
Scanning presets
Image filters apply various adjustments to make different types of scans legible. Choose a wrong filter and you scan may look garbage. Thankfully, you can apply filters to your scans after the fact.
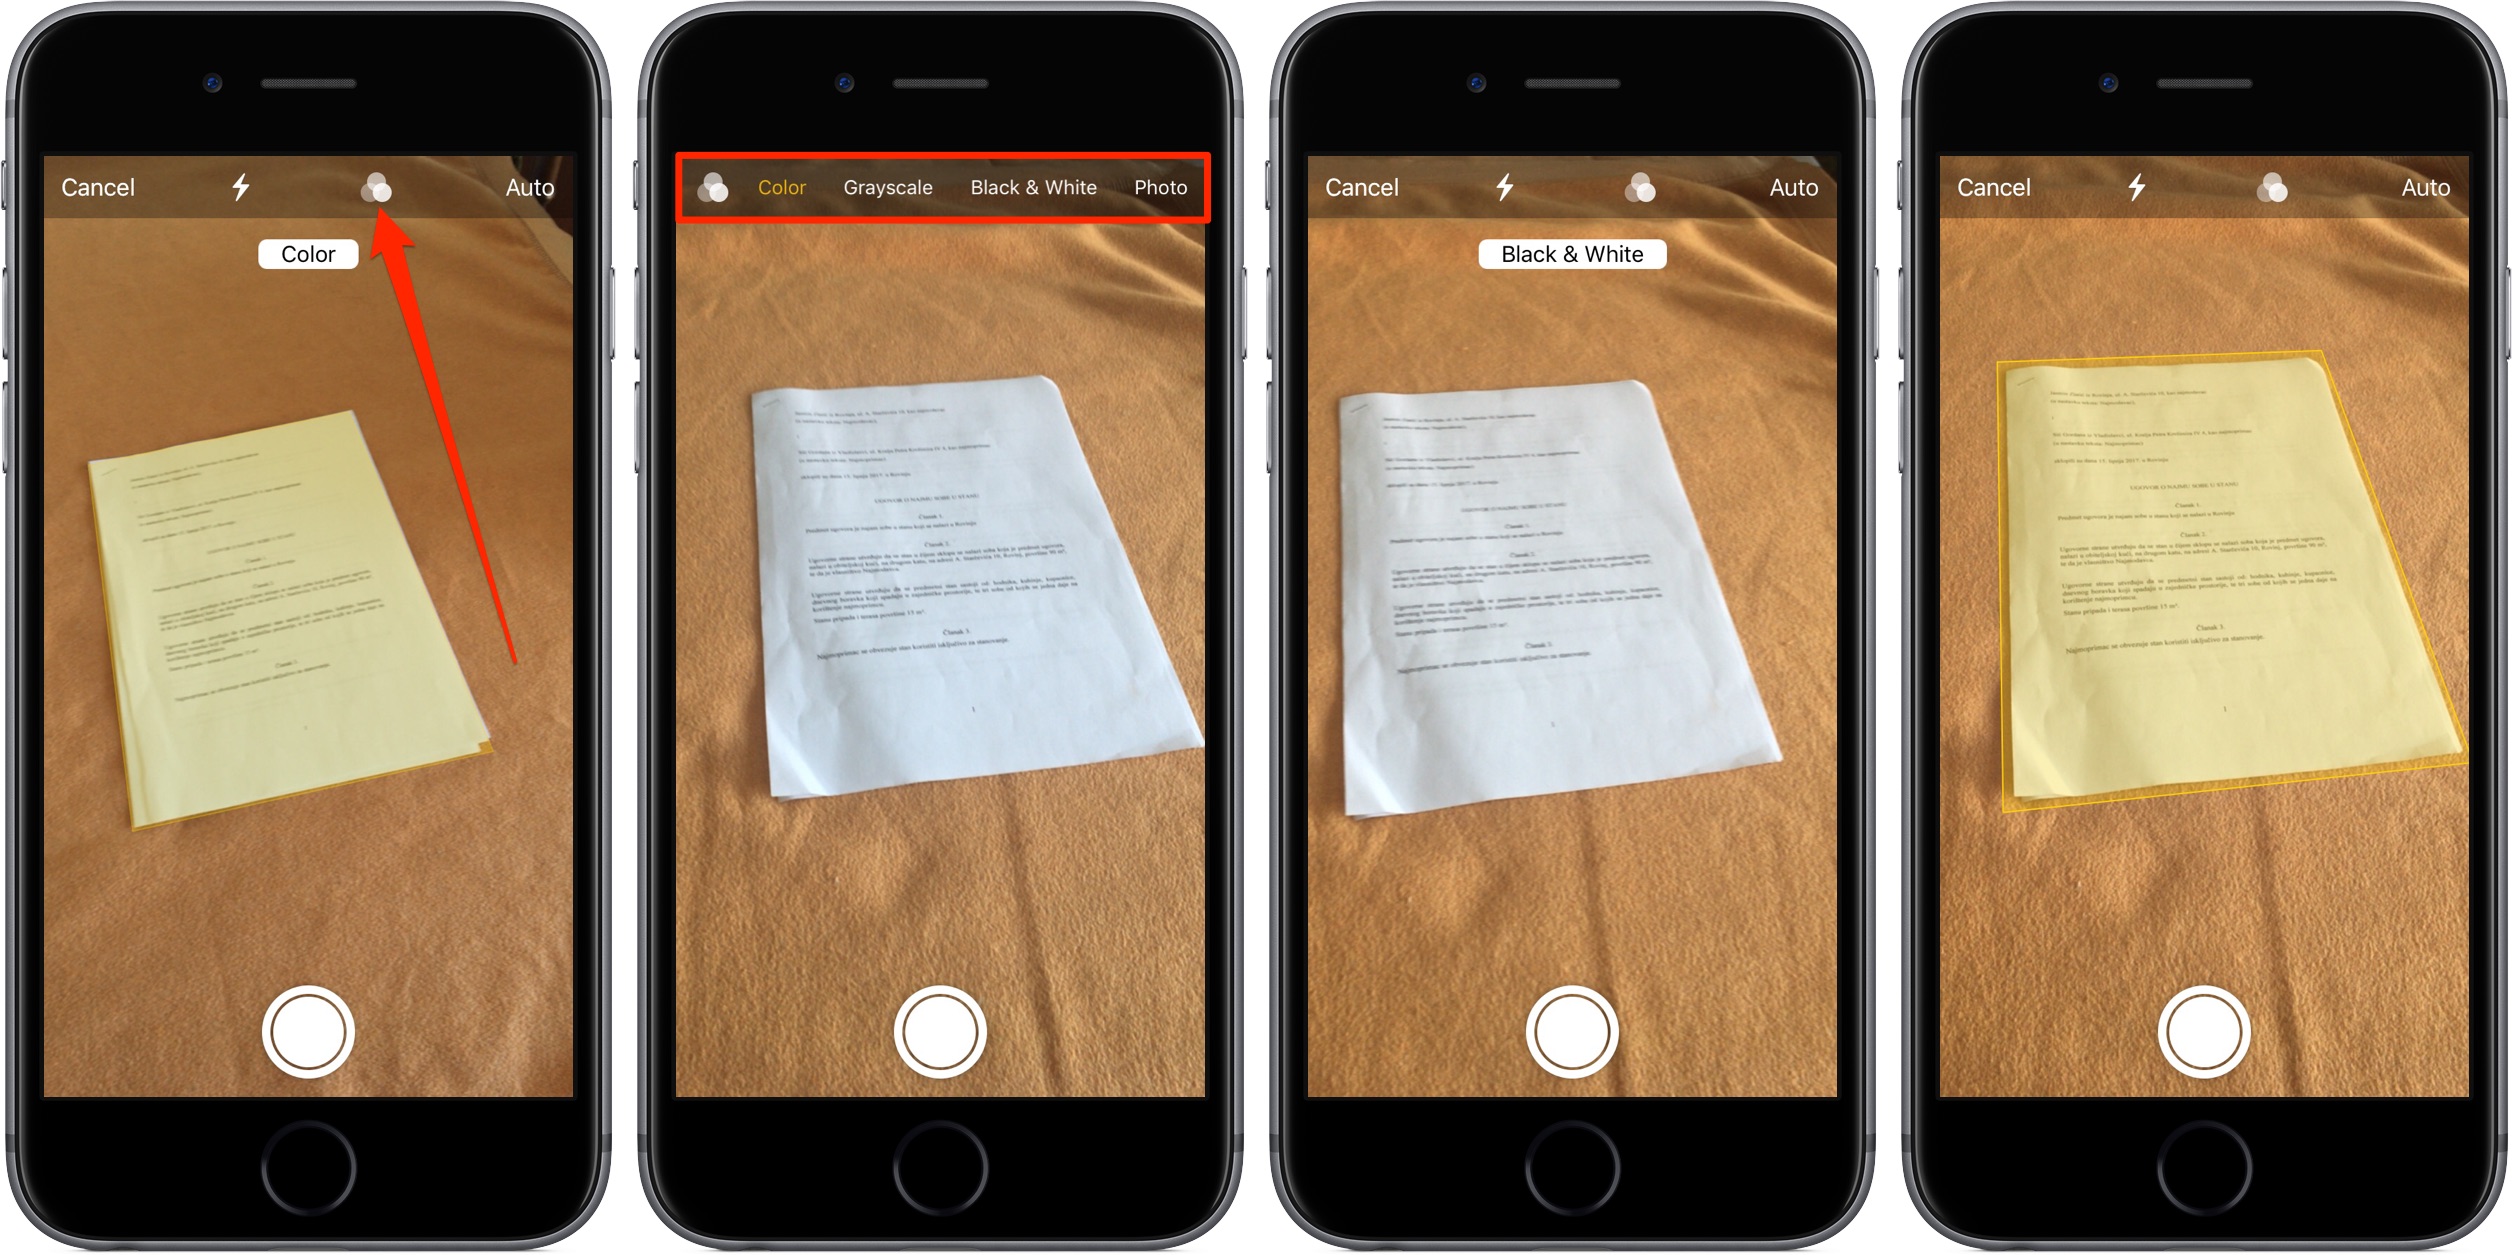
For best results, use built-in filters to let Notes know what type of document you’re scanning.
Whenever possible, choose an appropriate preset in-camera to let Notes immediately know what type of document you’re about to scan. To use presets, tap an icon at the top of the camera that looks like three overlapping circles.
The following presets are at your disposal:
- Color—Use this preset to scan magazine articles and other graphics-rich documents
- Grayscale—If you’d like to turn colors into shades of gray
- Black & White—For most paper scans, this preset yields best results
- Photo—For digitizing photographs
Your scans are saved as image attachments to the Notes app. You can easily annotate them, export them as PDF files, shared them with friends or family, send them to other apps using iOS’s multipurpose Share sheet and more.
5) Tap Save in the lower-right corner to save the scan(s) in Notes.
After each press of the shutter button in manual mode, Notes will ask you if you’d like to save the scan or discard it and start over. Saving a scan produces a single attachment. Scanning multiple sheets of paper attaches them to the selected note as a multi-page scan bundle.
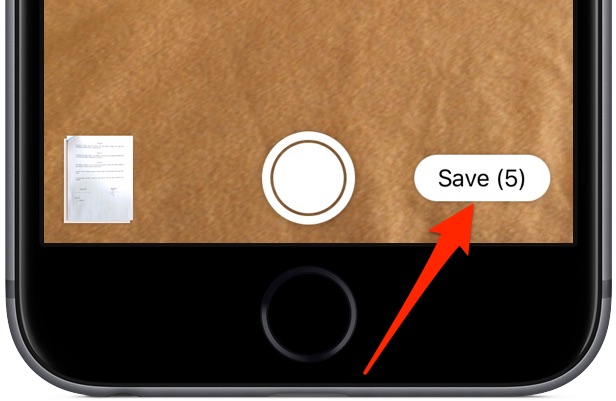
Scanning multiple documents creates a multi-page attachment.
By contrast, automatic shutter mode just keeps going until you’ve scanned all the documents you need. It’s handy that the Save button tells you how many individual scans you’ve taken so far.

In manual mode, each scan can be dismisses or retaken.
To abort scanning, hit Cancel in the upper-left corner.
As mentioned, scanned documents are saved as native Notes attachments viewable on iPhone or iPad with iOS 11 or later and your Macs with macOS High Sierra or later. Thankfully, you can export scanned attachments as PDF files, save them as JPGs to your Camera roll and more.
How to edit your scans
The Notes app comes with a useful built-in editor that contains all the tools you need to edit scans to your liking. You can add scans to an existing attachment, rotate them, crop the edges, change the filter and more, no third-party app required.
1) Launch the Notes app and select a note containing the scanned documents.
2) Tap the attachment embedded in the note or press it firmly with 3D Touch.
TIP: You don’t even have to exit the camera to edit the scan. For on-the-fly editing, tap a thumbnail in the lower-left corner to perform a few quick touch-ups before proceeding to the next sheet of paper.
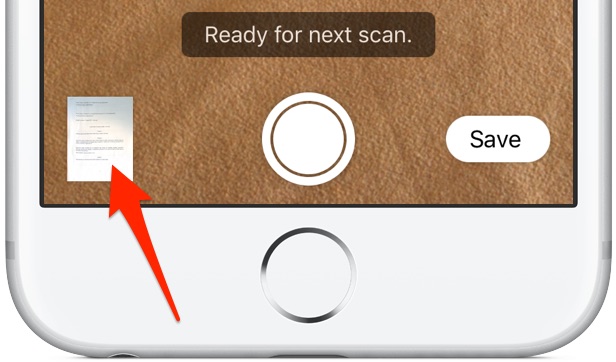
In-camera editing tools let you touch up the scan without leaving the scanner.
3) Choose among the editing tools at the bottom of the screen, from left to right:
- Add Scan—Tap “+” to scan a new document into the existing bundle
- Crop—Adjust the corners of the scan
- Filters—Choose a filter that matches the type of your scan
- Rotate—Rotate the scan counterclockwise by 90 degrees
- Delete—Delete the selected scan
Reordering scans
Not unlike the stock Photos app, Notes’ built-in viewer lines up thumbnails of your scans across the bottom of the screen. You can tap a thumbnail to instantly select the scan or swipe horizontally to quickly cycle through your scans.
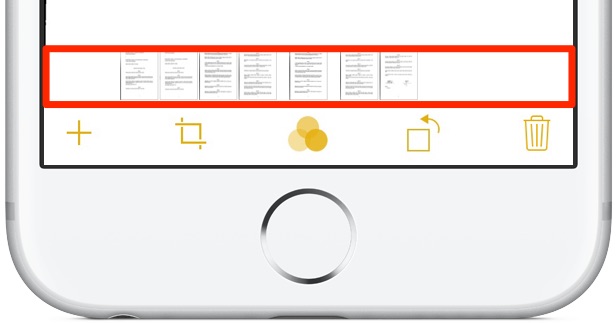
Use the scrubber to cycle between scanned pages like a pro.
The scrubber also makes it easy to reorder your scans. Tap and hold a thumbnail for a moment, then drag it horizontally and let go to drop the page into place.
TIP: Tap and hold a thumbnail in the scrubber for quick options: Copy, Delete and Share.
Adjusting the size of scan previews
To reduce the clutter, you can change the size of scan previews at will.
1) Tap a note containing your scans.
2) Tap and hold a thumbnail, then choose a preview size from the pop-up menu:
- Large Image—Make the attachment thumbnail full width
- Small Image—Make the attachment thumbnail smaller
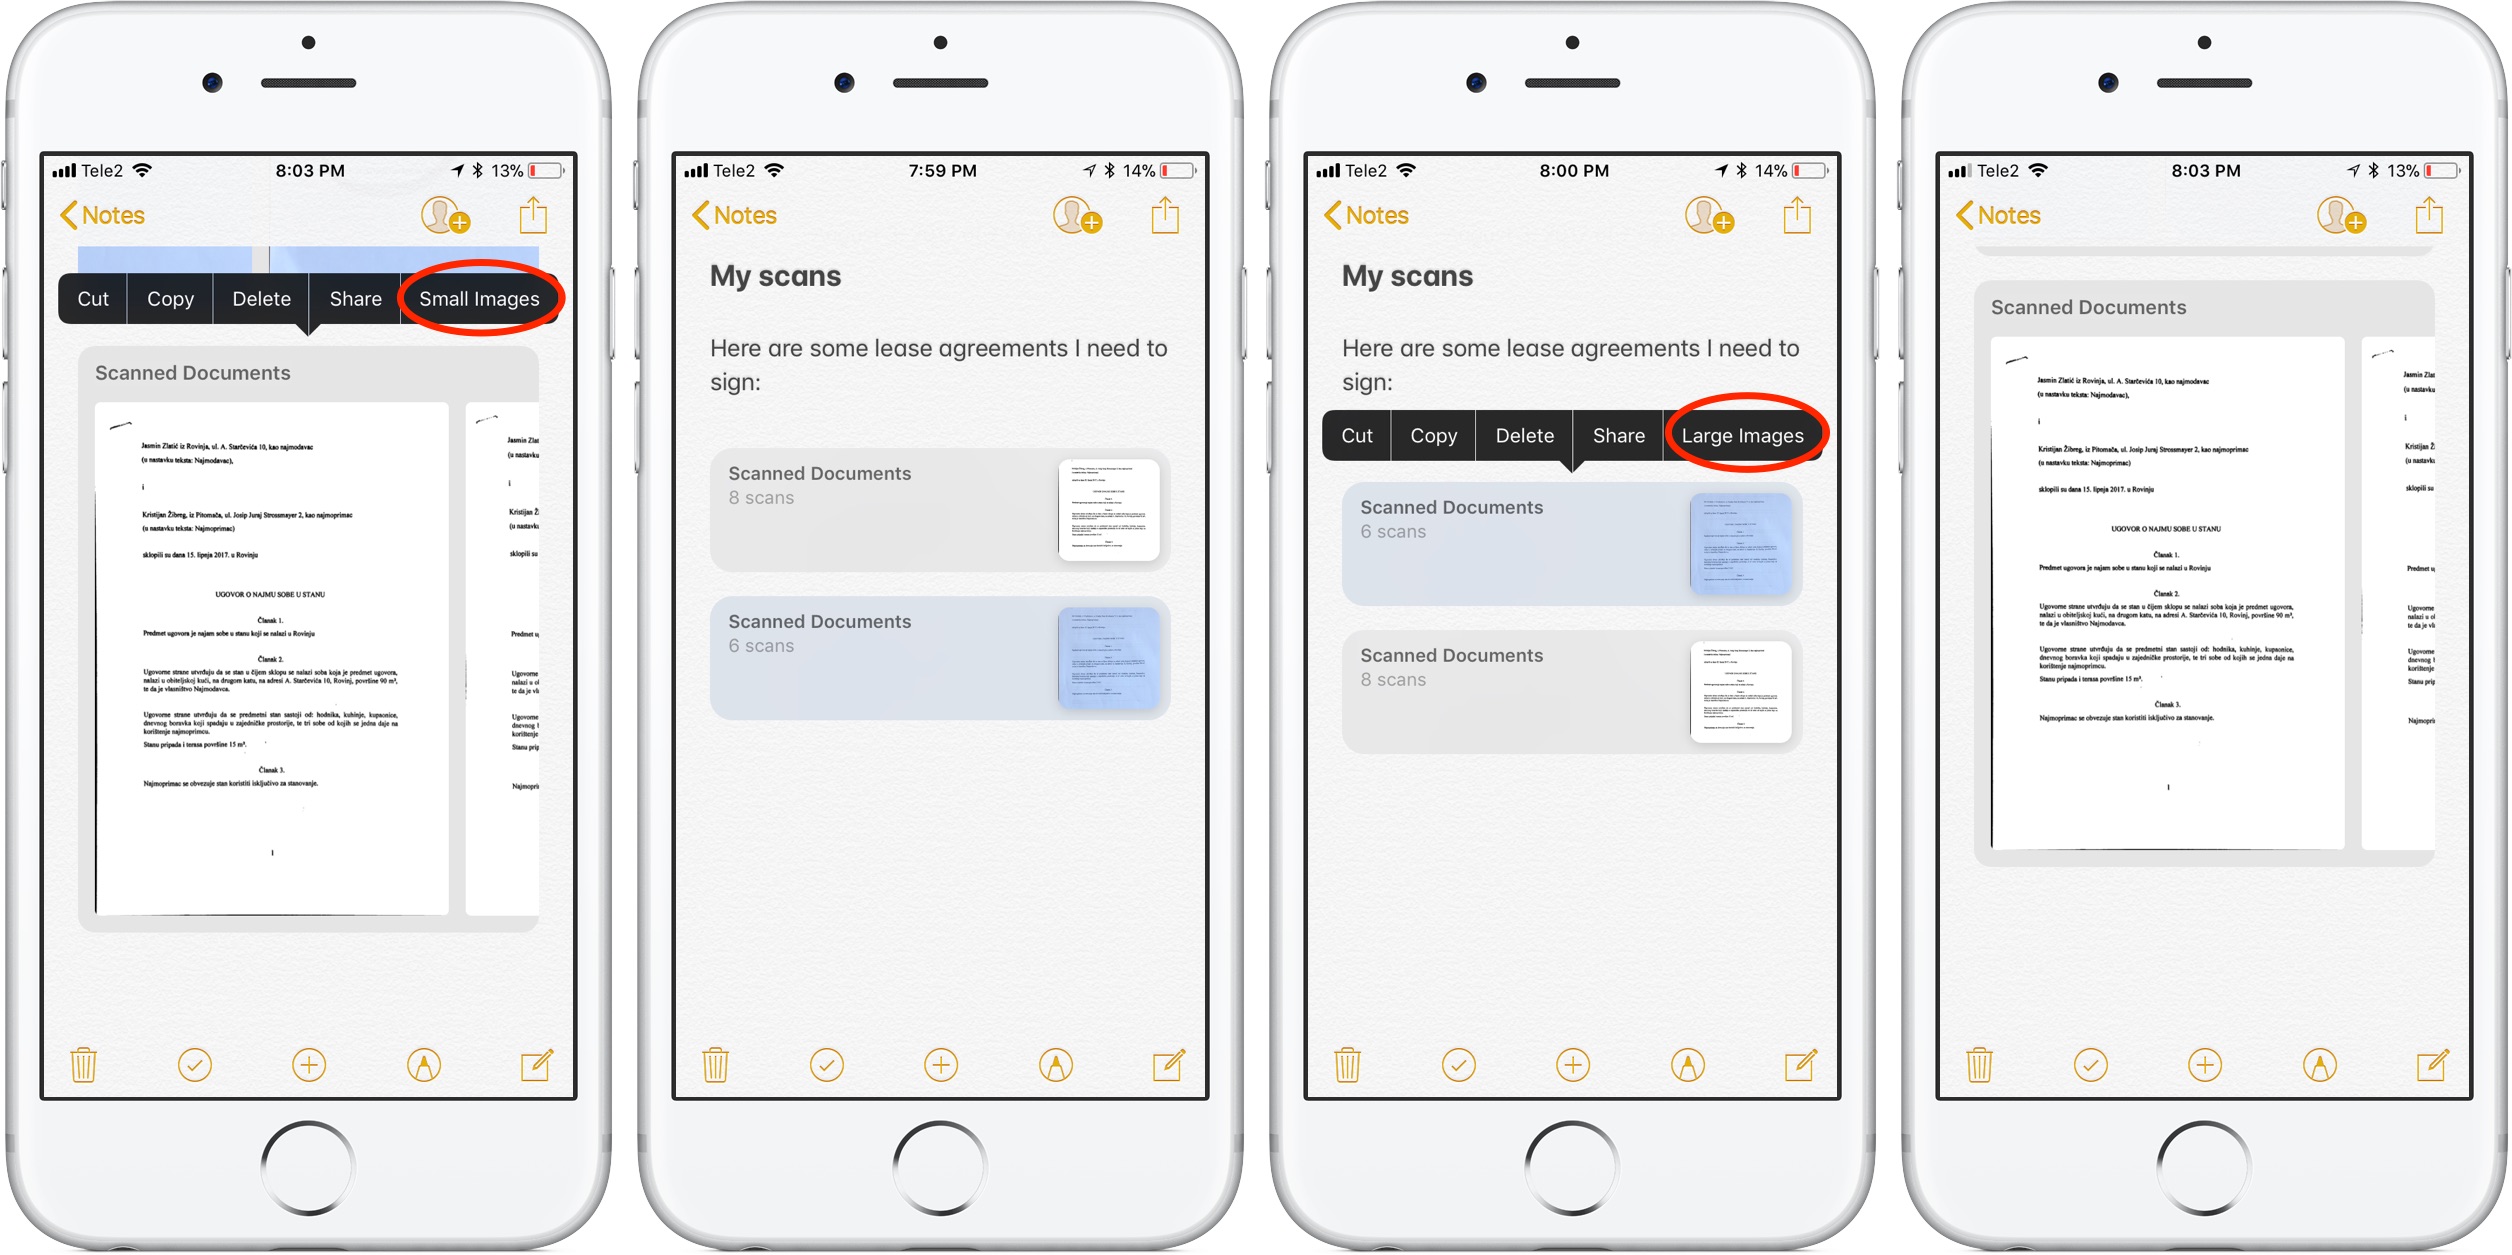
If a note contains multiple scans, using smaller thumbnails reduces clutter.
The size of attachment previews can be changed individually. You can have multiple scan bundles in a note, one using the large preview size to stand out from the others rendered as small thumbnails. Also, you can do this with any attachment type in Notes, not just scans.
Adding scans to existing bundle
To scan more documents into an existing bundle, do the following:
1) Tap a note with a scan bundle you wish to add to.
2) Tap the leftmost “+”icon at the bottom to instantly bring up the document scanner.
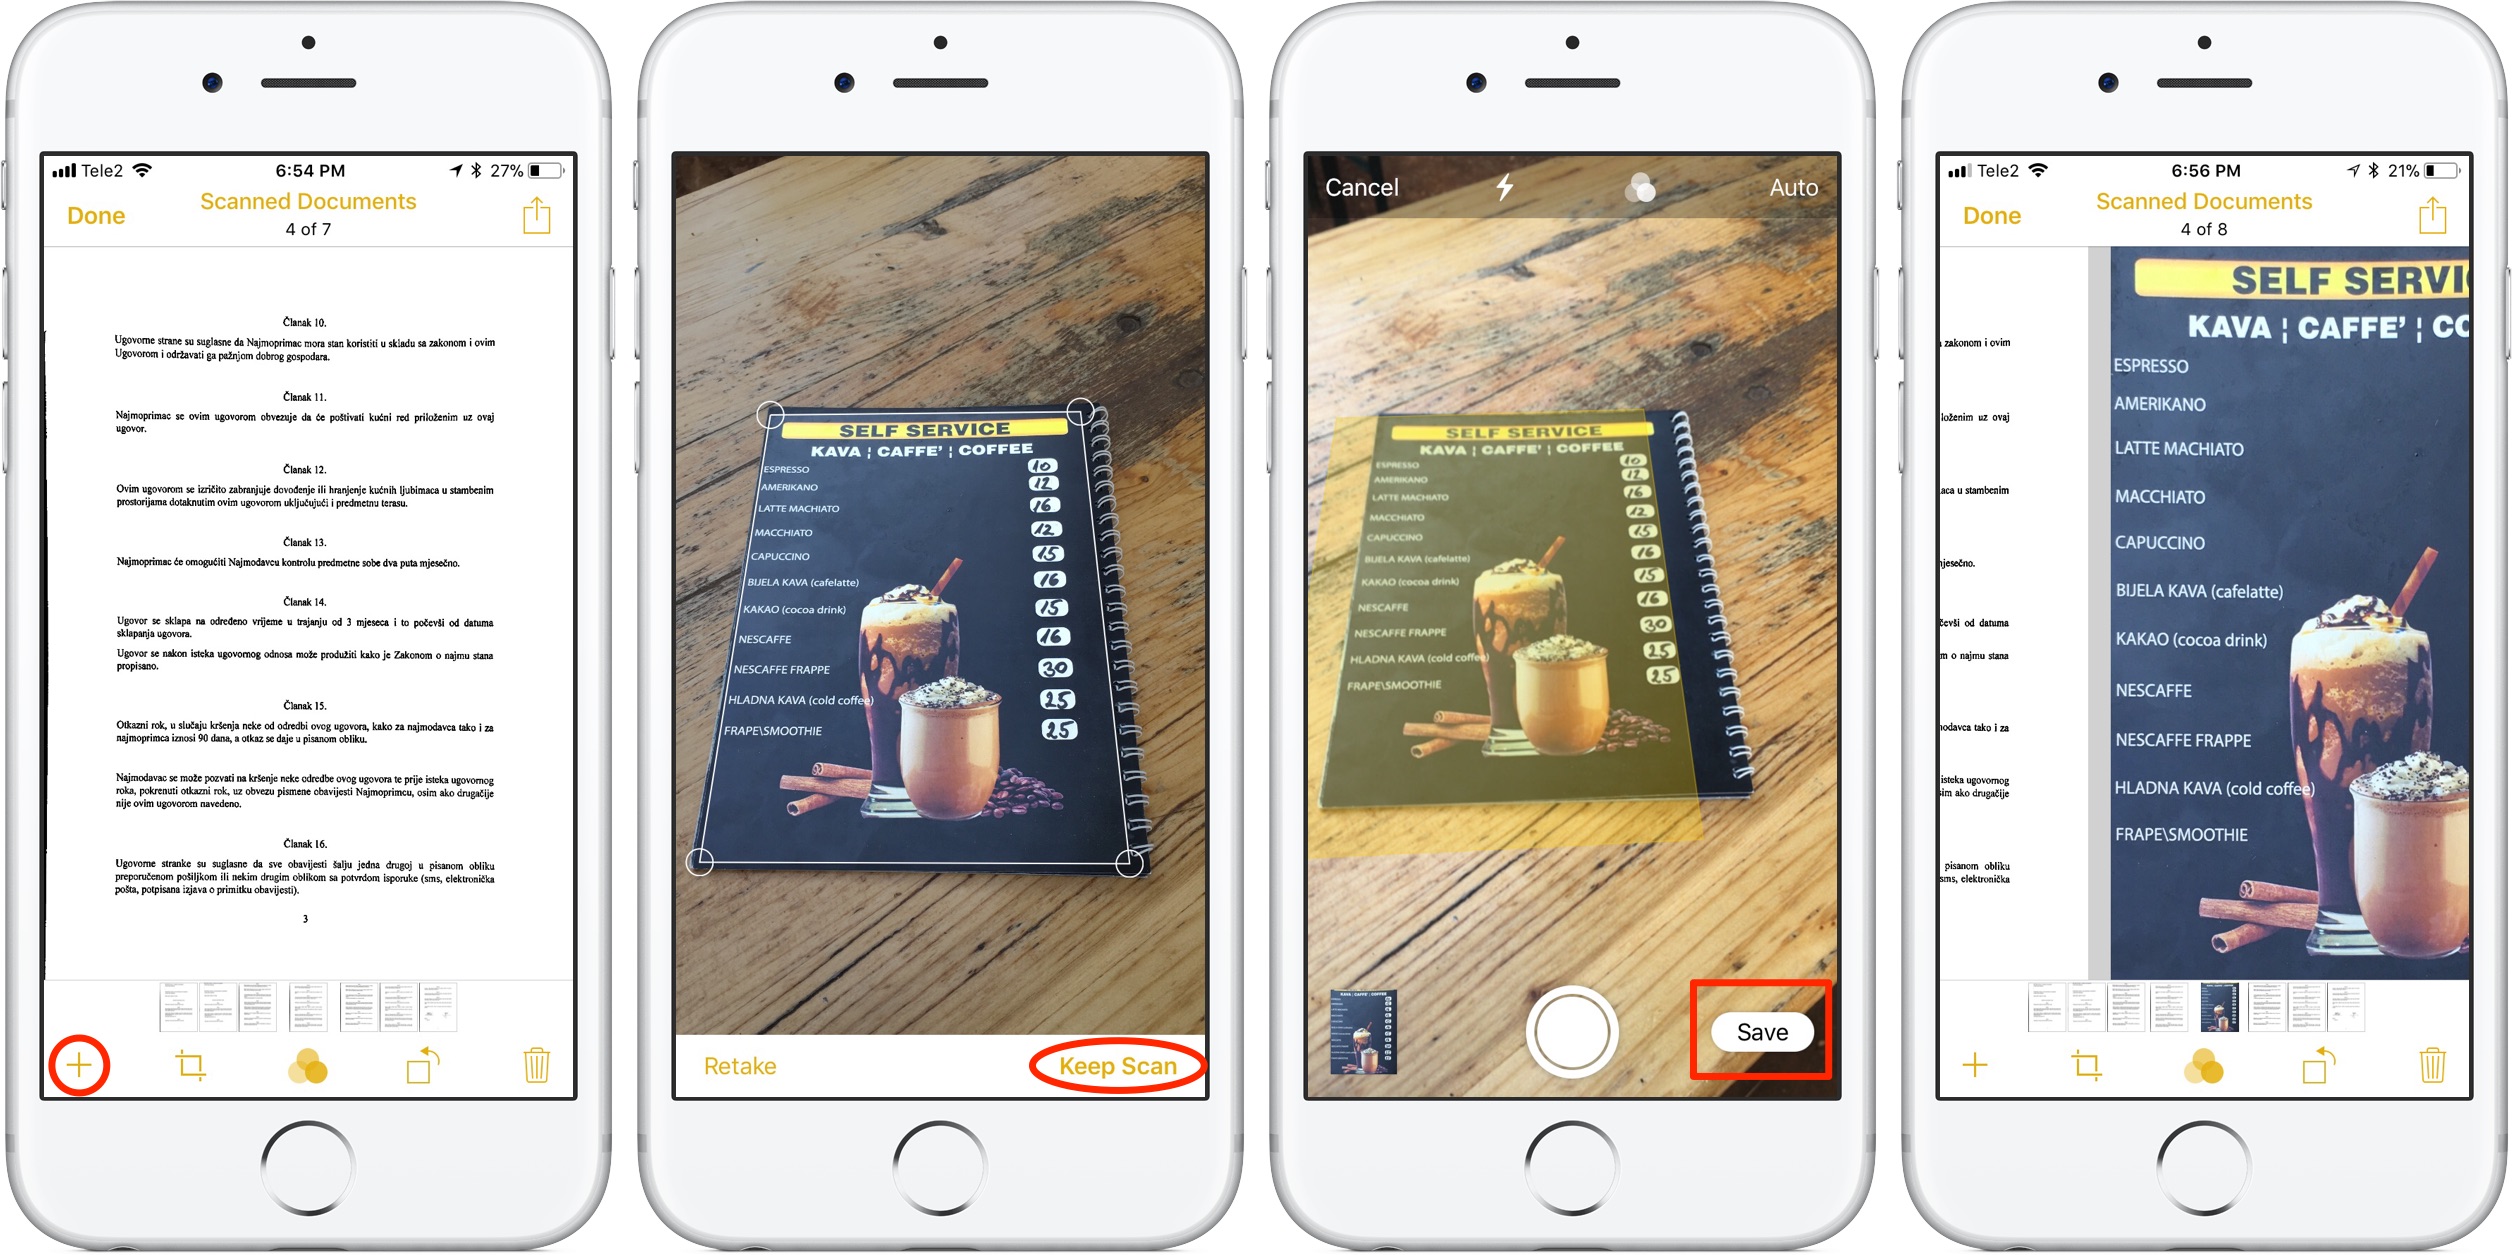
You can scan additional pages into an existing scan.
4) Scan to your heart’s desire and, when finished, tap Save to append the new scan at the end of the bundle.
Cropping scans
You can crop any scanned document after it has been saved in Notes to correct the perspective. Apple has cleverly designed Notes in such a way that every scan is saved as the full image with the unneeded areas masked out, allowing for post processing.
1) Tap a note containing the scan you wish to crop.
2) Tap a scan in the note.
3) Hit the Crop icon at the bottom (second from the left).
4) The inline scan will zoom out, in perspective, into its place in the originally image. It’s a wonderful effect that must be seen in action to be fully appreciated. You can now adjust the corners with your finger to crop out any unwanted stuff surround the edges.
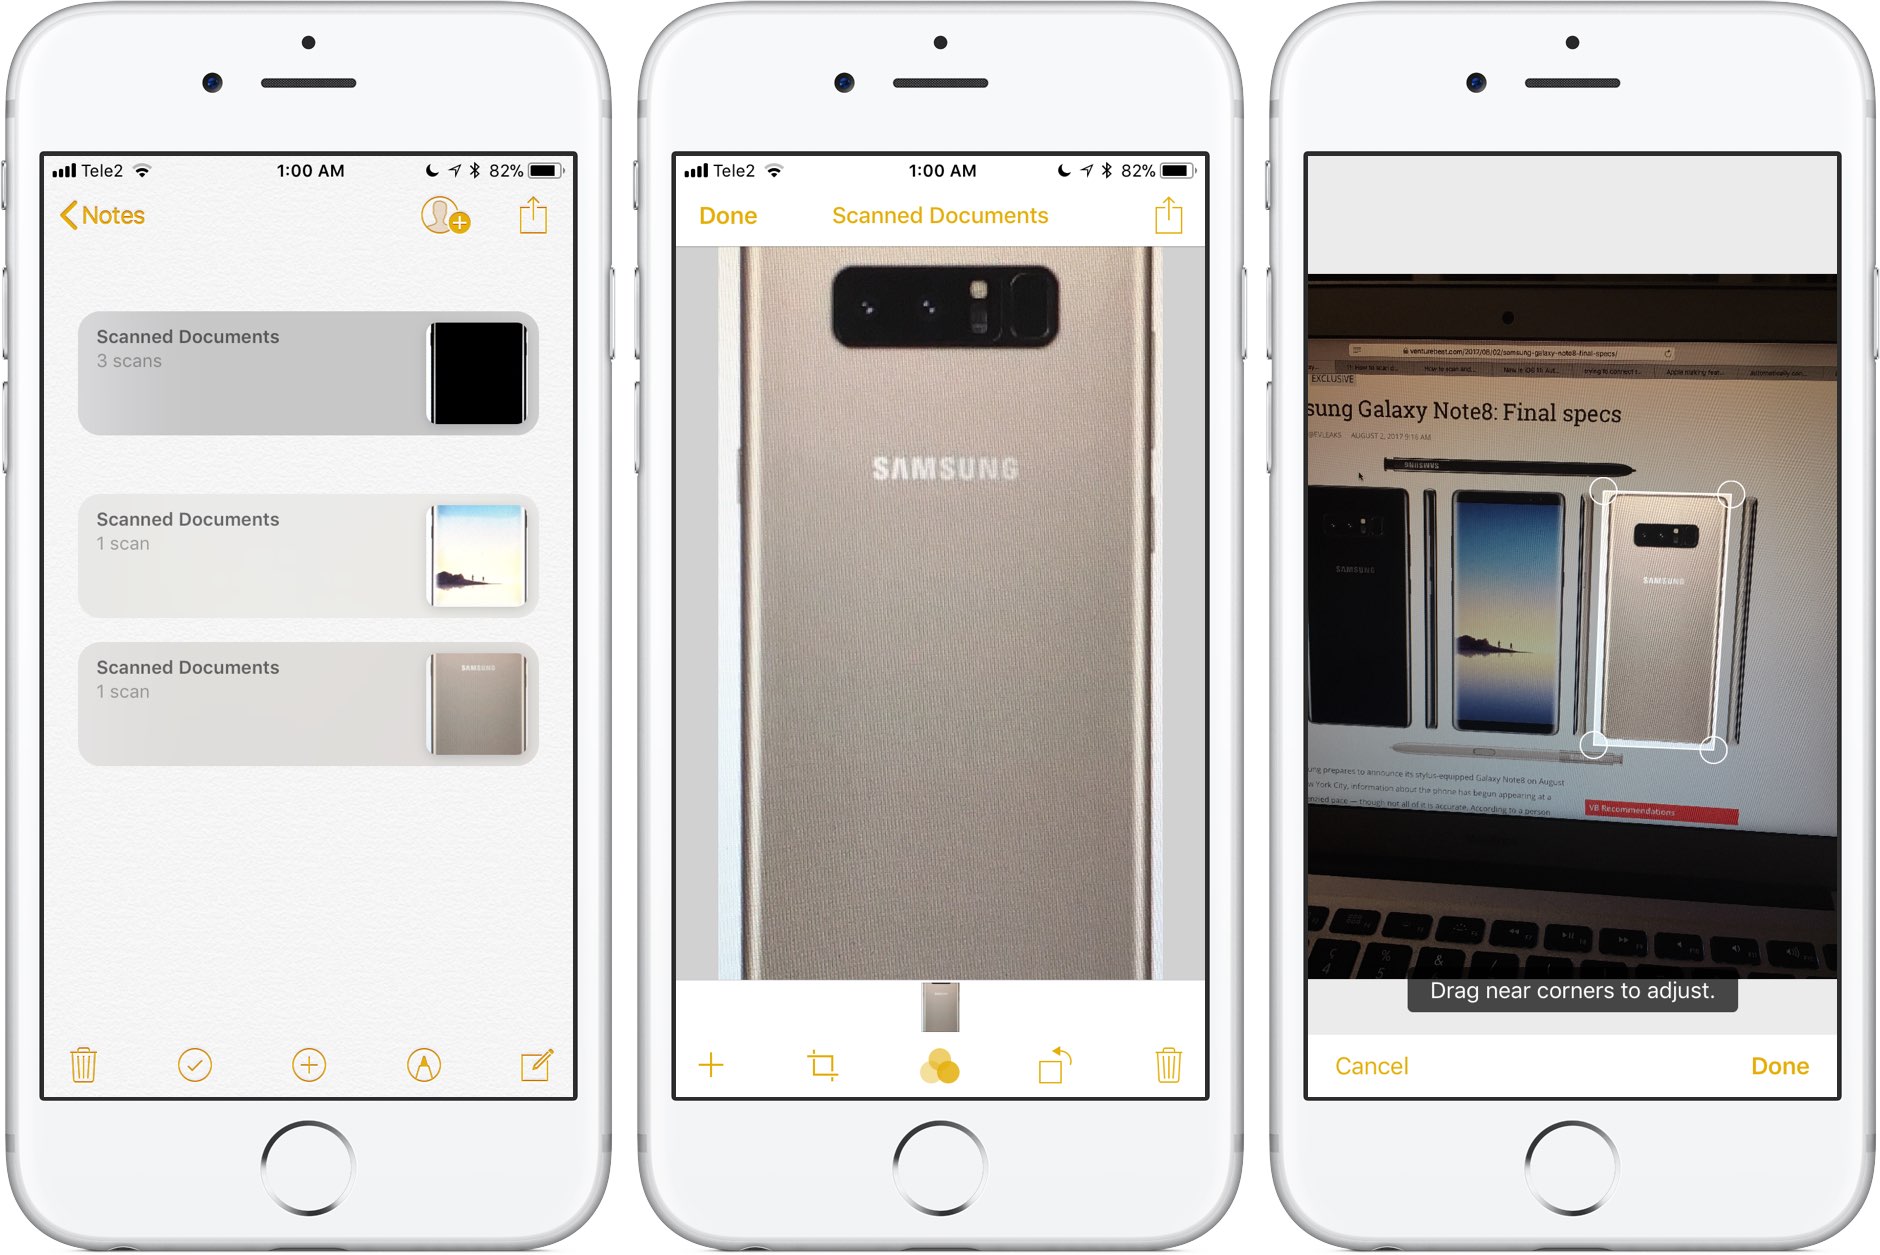
5) Hit Done to apply the new mask to the scan, the tap Done again to save the changes.
If you share the scan as a PDF to your favorite app, any masked out areas will be removed from the exported file to optimize file size.
Changing filters
Filters, or scanning presets, inform the Notes app about the type of paper document you’re scanning, which can make a big difference in terms of image quality and legibility. Have you accidentally chosen the wrong filter during scanning? No problem, you can apply the correct preset at any time without rescanning, here’s how.
1) Tap a note containing your scans.
2) Select a scanned attachment you’d like to fix.
3) Tap the Filters icon in the middle of the toolbar at the bottom, then choose a preset:
- Color—For magazine articles and other graphics-rich documents
- Grayscale—For scanning documents in up to 256 shades of gray
- Black & White—For invoices, contracts, agreements and other printed documents
- Photo—For digitizing photographs
4) Tap Done to finish making changes.
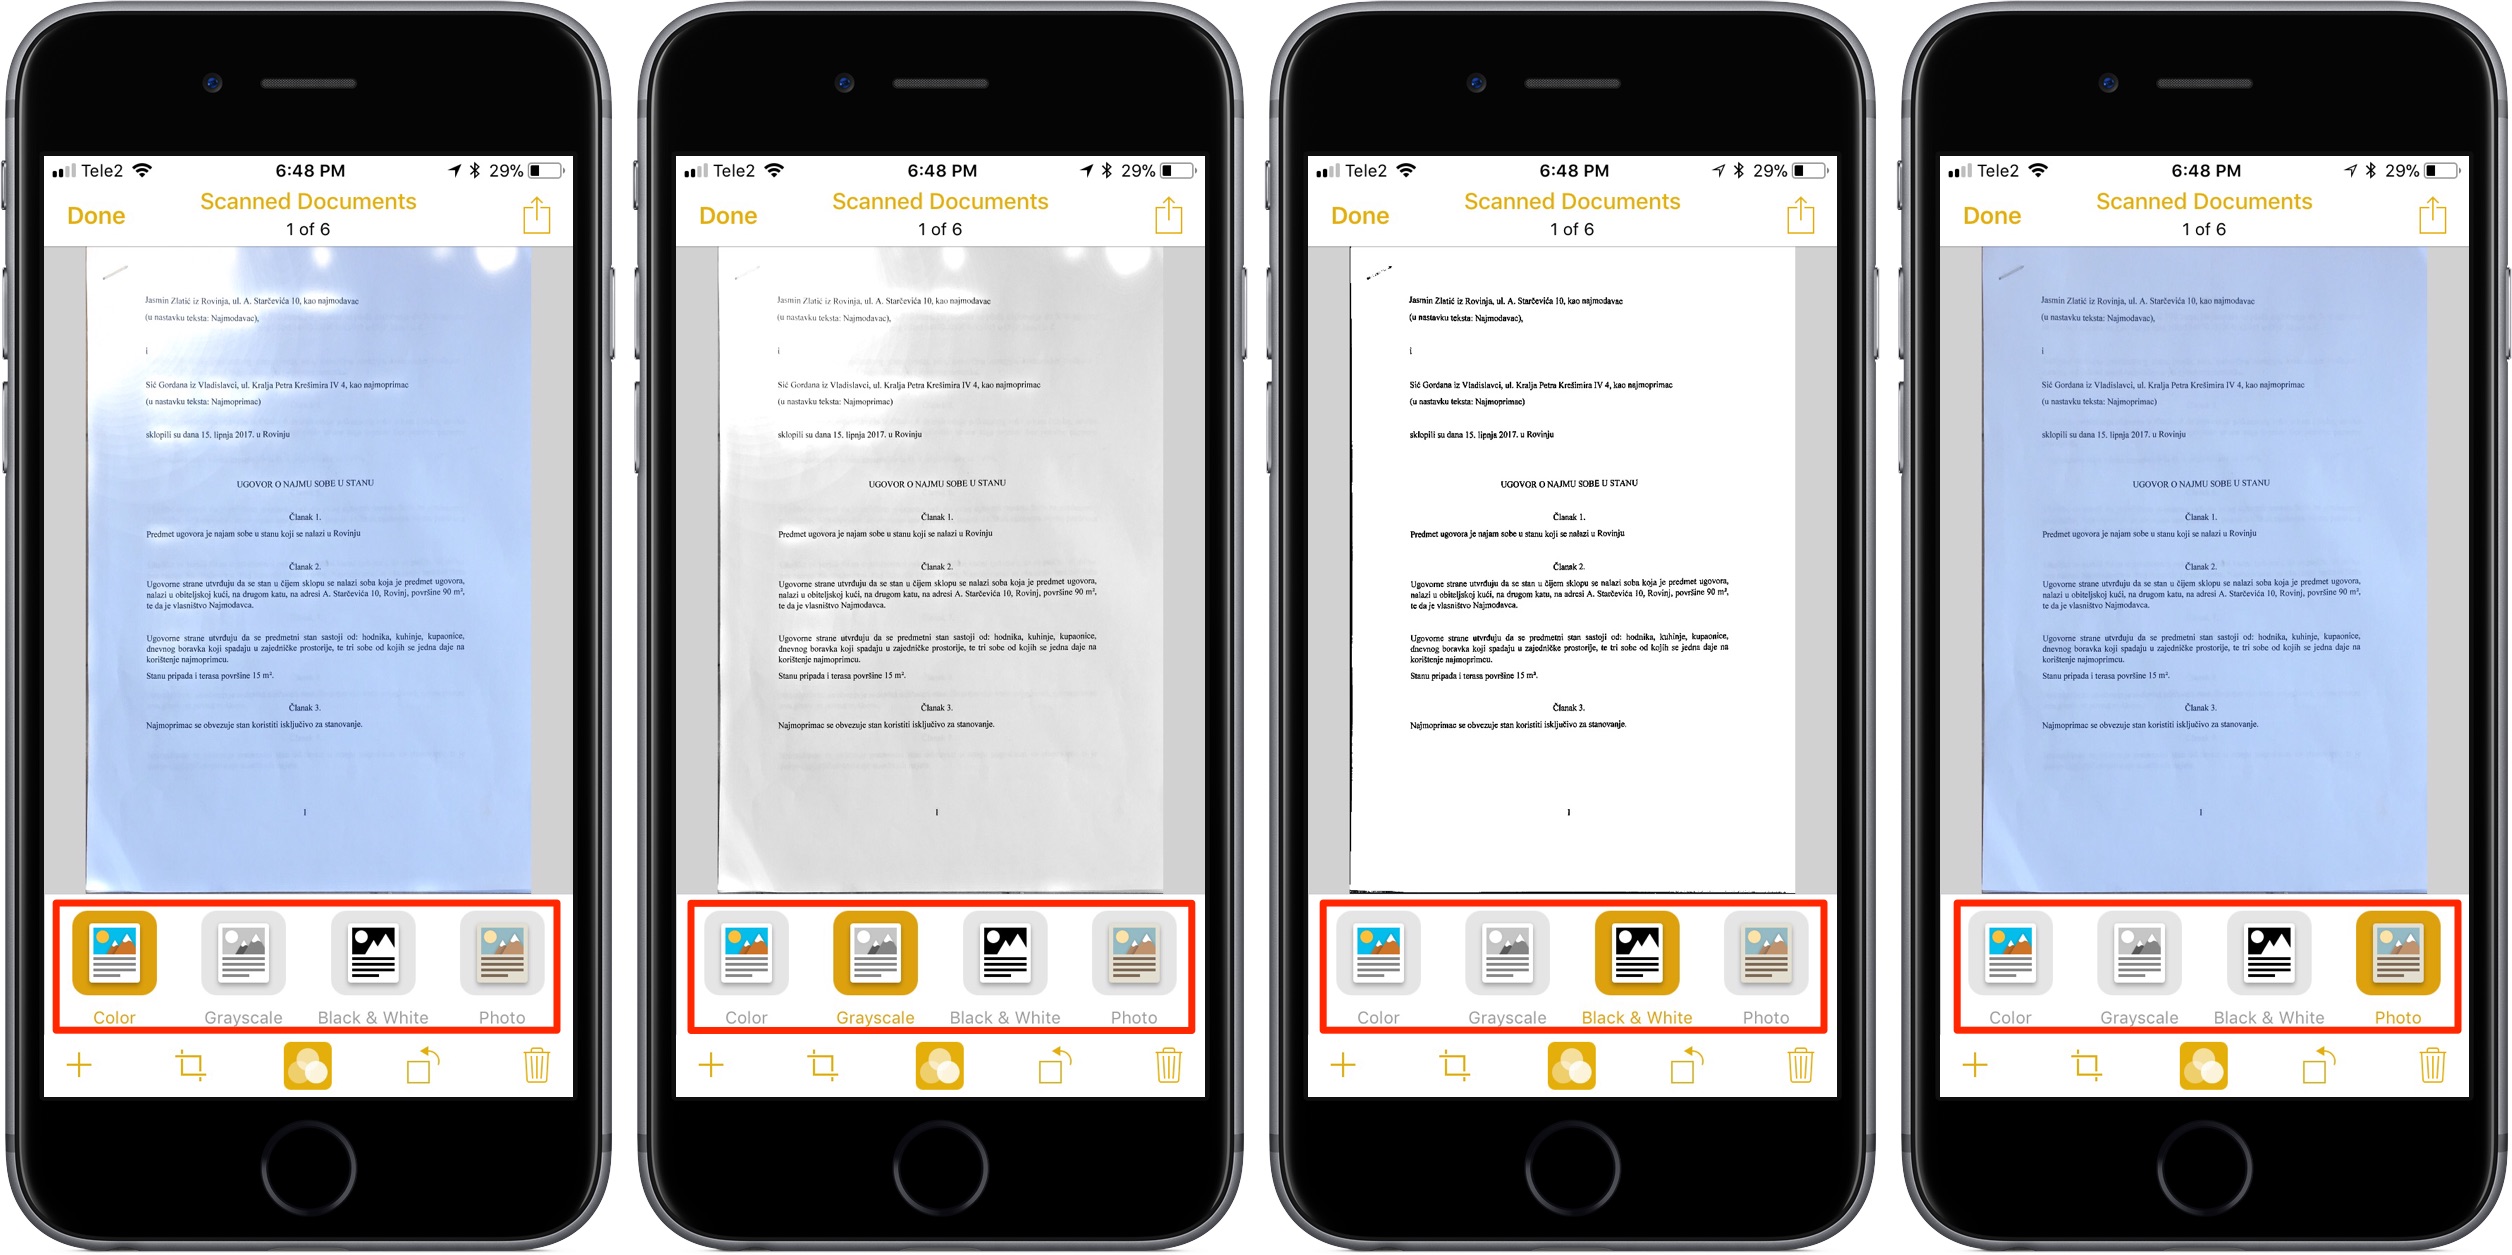
Not unlike image filters available in the Photos app, presets in the Notes app are non-destructible—your scans are always safely stored in their original form within Notes regardless of the applied filters and edits you make.
Rotating scans
If you’ve accidentally scanned something in the wrong orientation, don’t worry, Notes lets you easily rotate your scans. Here’s how.
1) Tap a note containing your scans.
2) Select a scanned attachment you’d like to fix.
3) Tap the second rightmost icon to rotate the scan by 90 degrees counterclockwise.
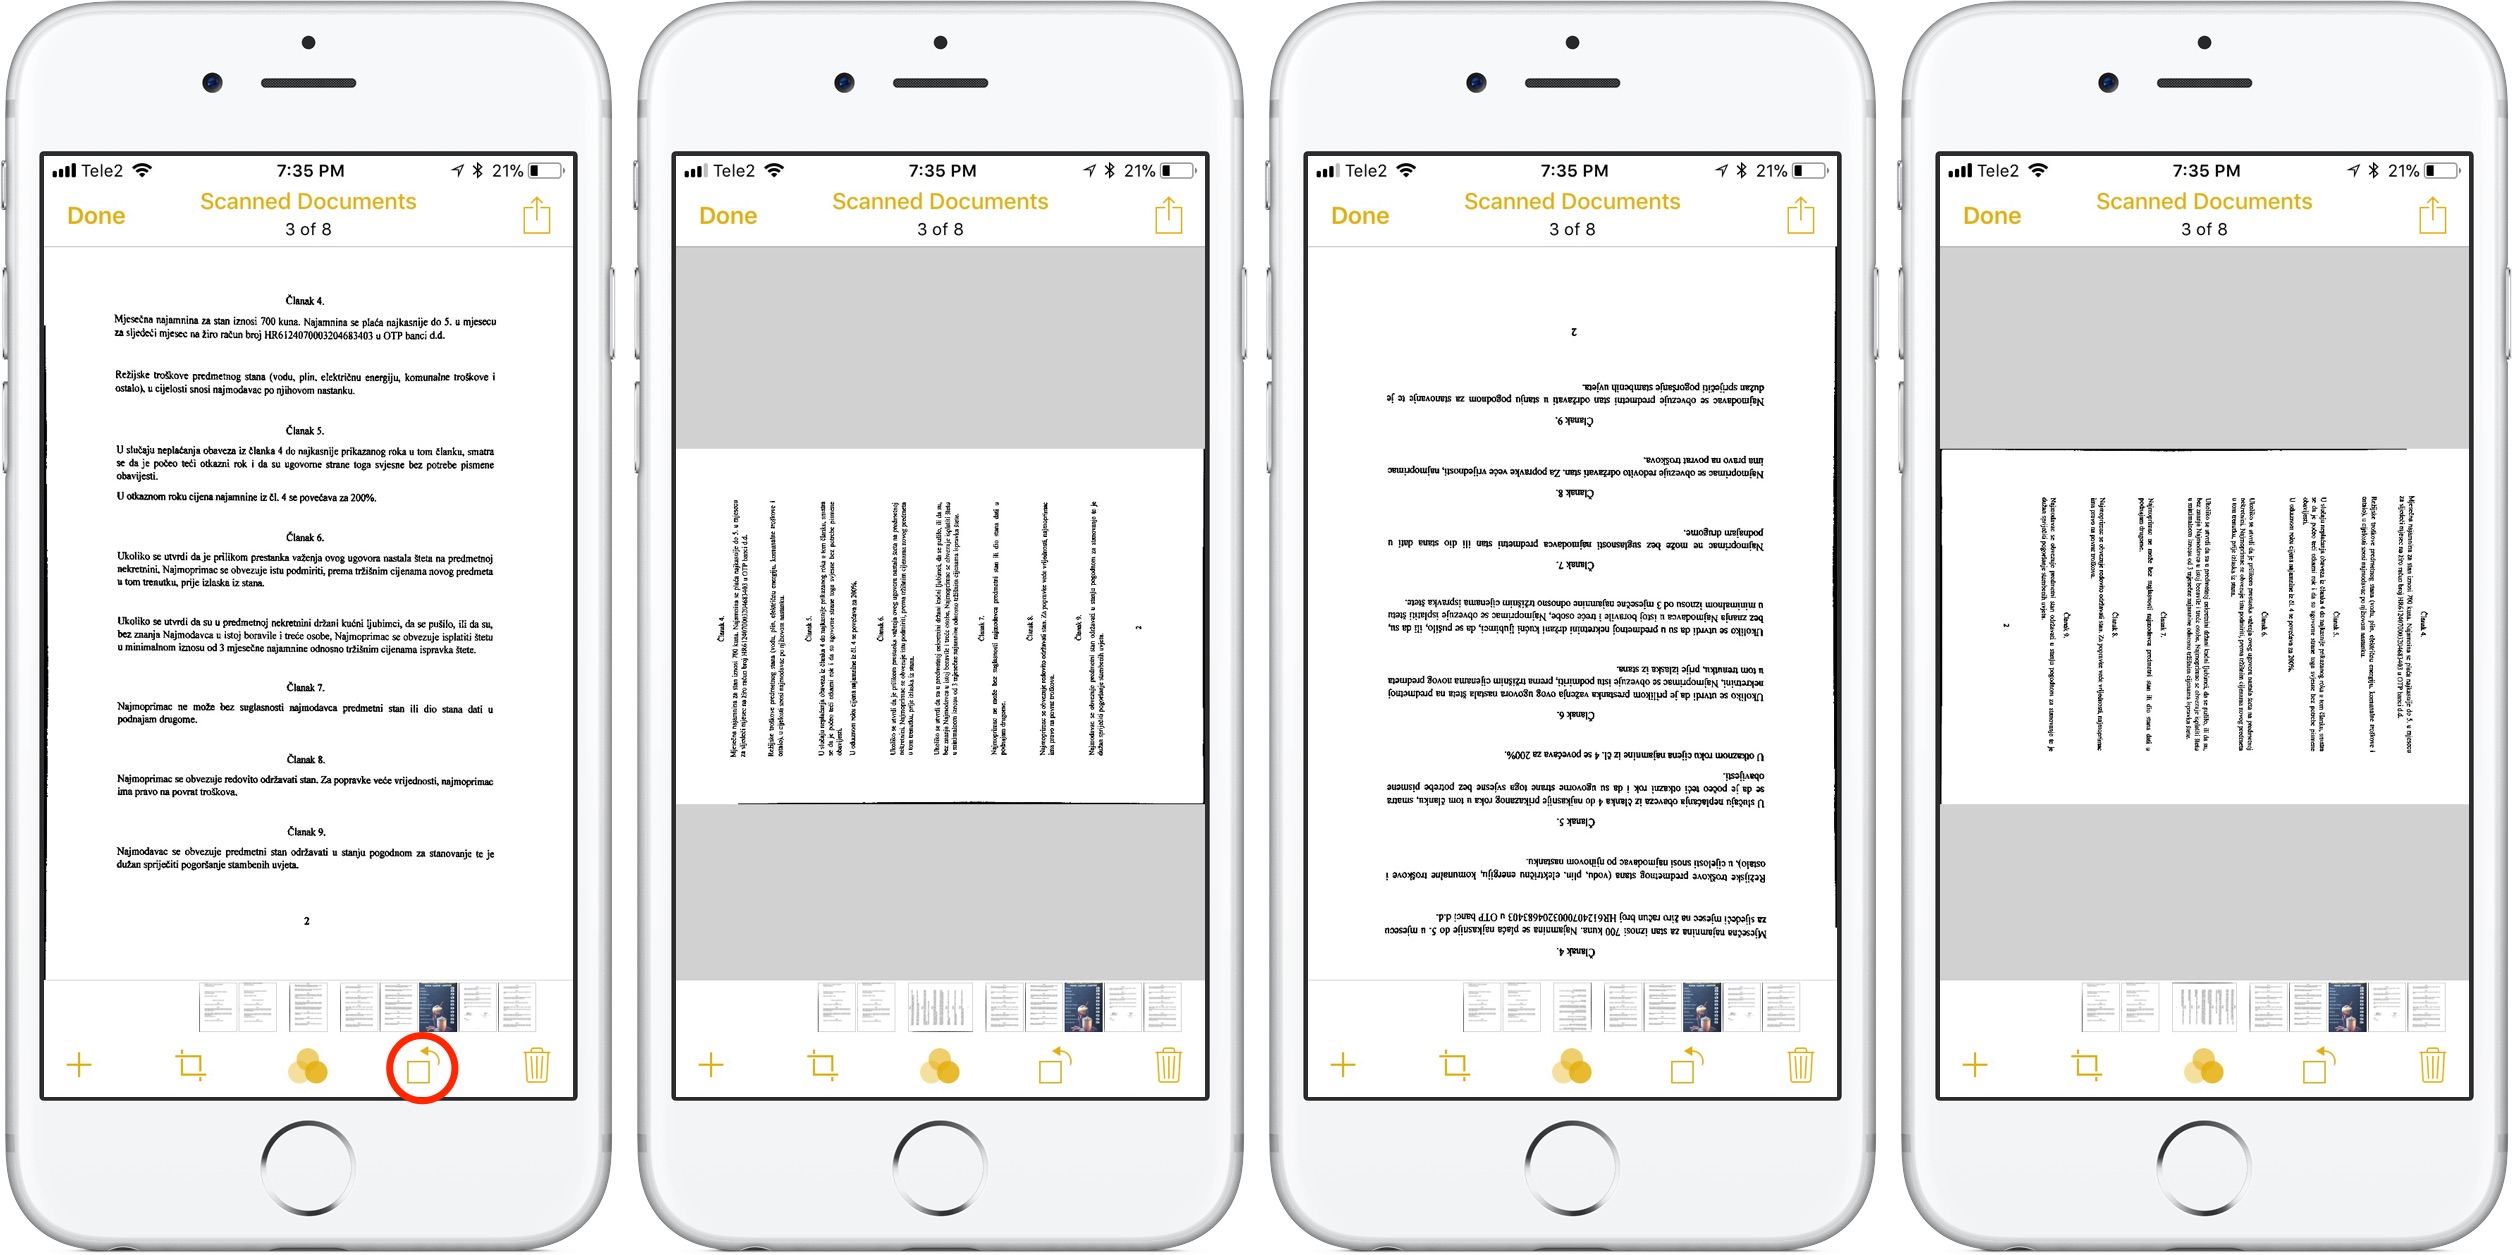
Documents scanned in the wrong orientation can be rotated later.
4) Tap the icon again to rotate the scan by another 90 degrees, and so forth.
If you tap the Rotate button four times in a row, the scan will rotate a full 360 degrees. Magic?
Deleting scans
A note may contain dozens and even hundreds of scanned document attachments. You can get rid of the ones you no longer need at any time or delete the whole bundle, here’s how.
Deleting individual pages:
1) In a note, open a scan bundle containing the page you’d like to delete.
2) Use the scrubber or swipe your way to the right page.
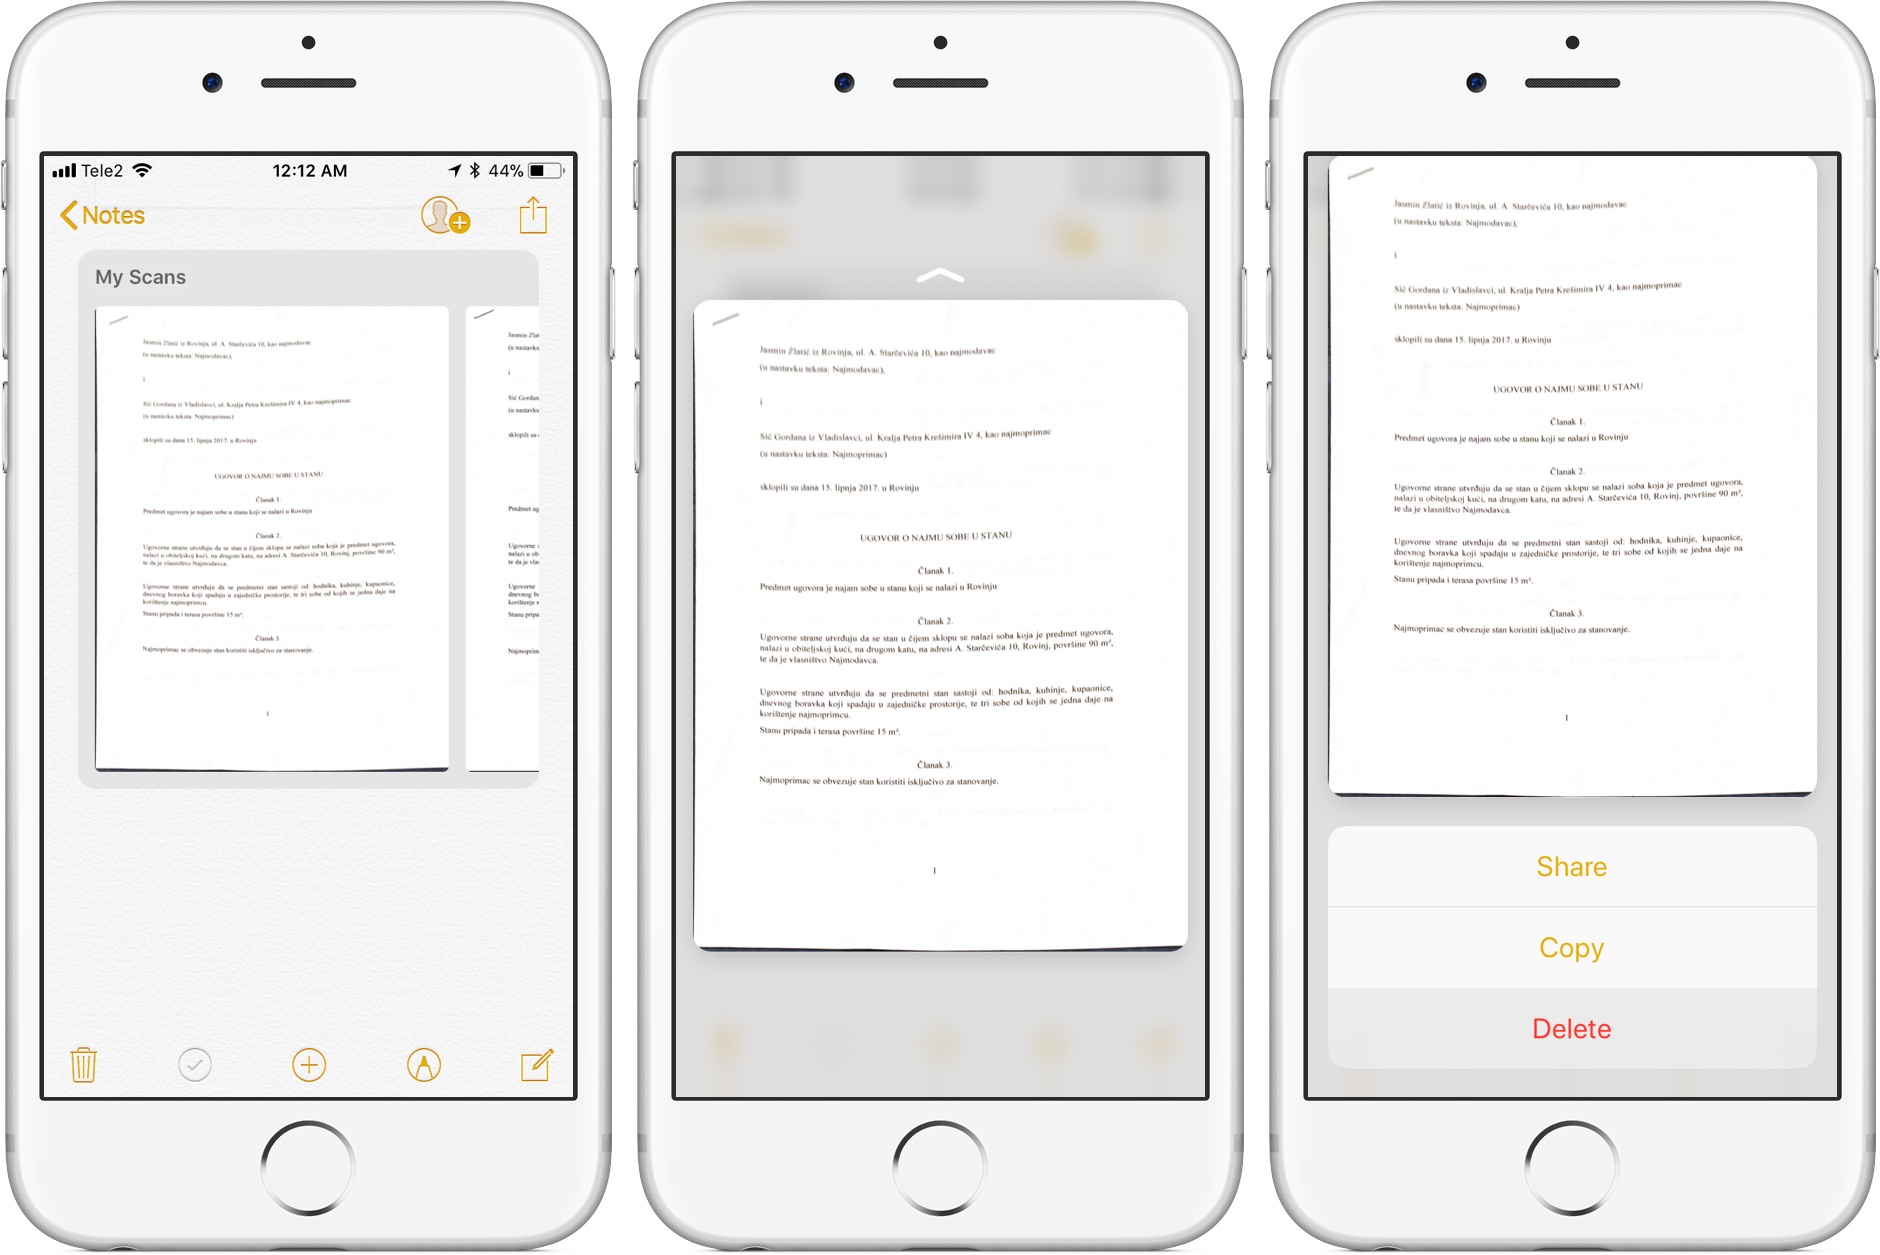
3) Tap and hold in the preview until the bubble menu appears, then choose Delete.
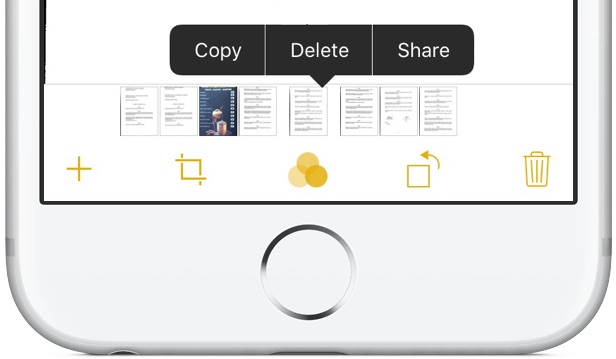
Tap and hold in the preview to bring up the bubble menu with quick options.
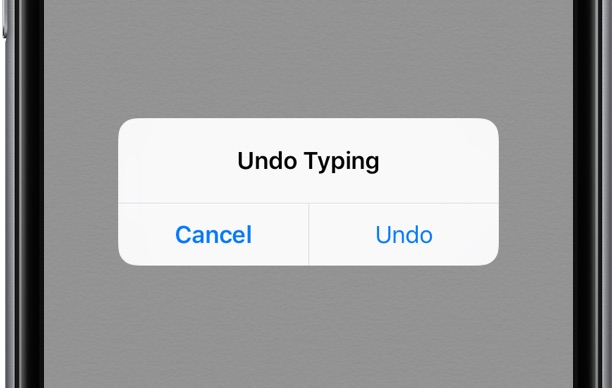
TIP: Unlike with notes, scanned attachments are not kept for up to 30 days in your Recently Deleted folder. Thankfully, you can quickly recover a deleted scan by shaking your device to bring up the Undo Delete Scan dialog, then choose the Undo action.
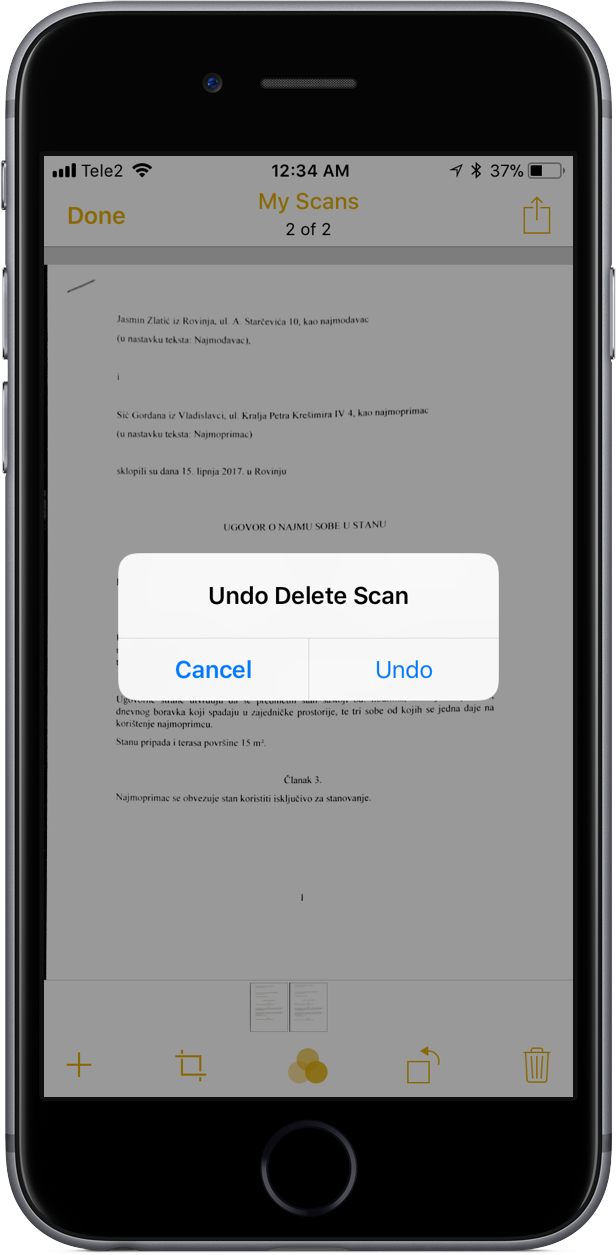
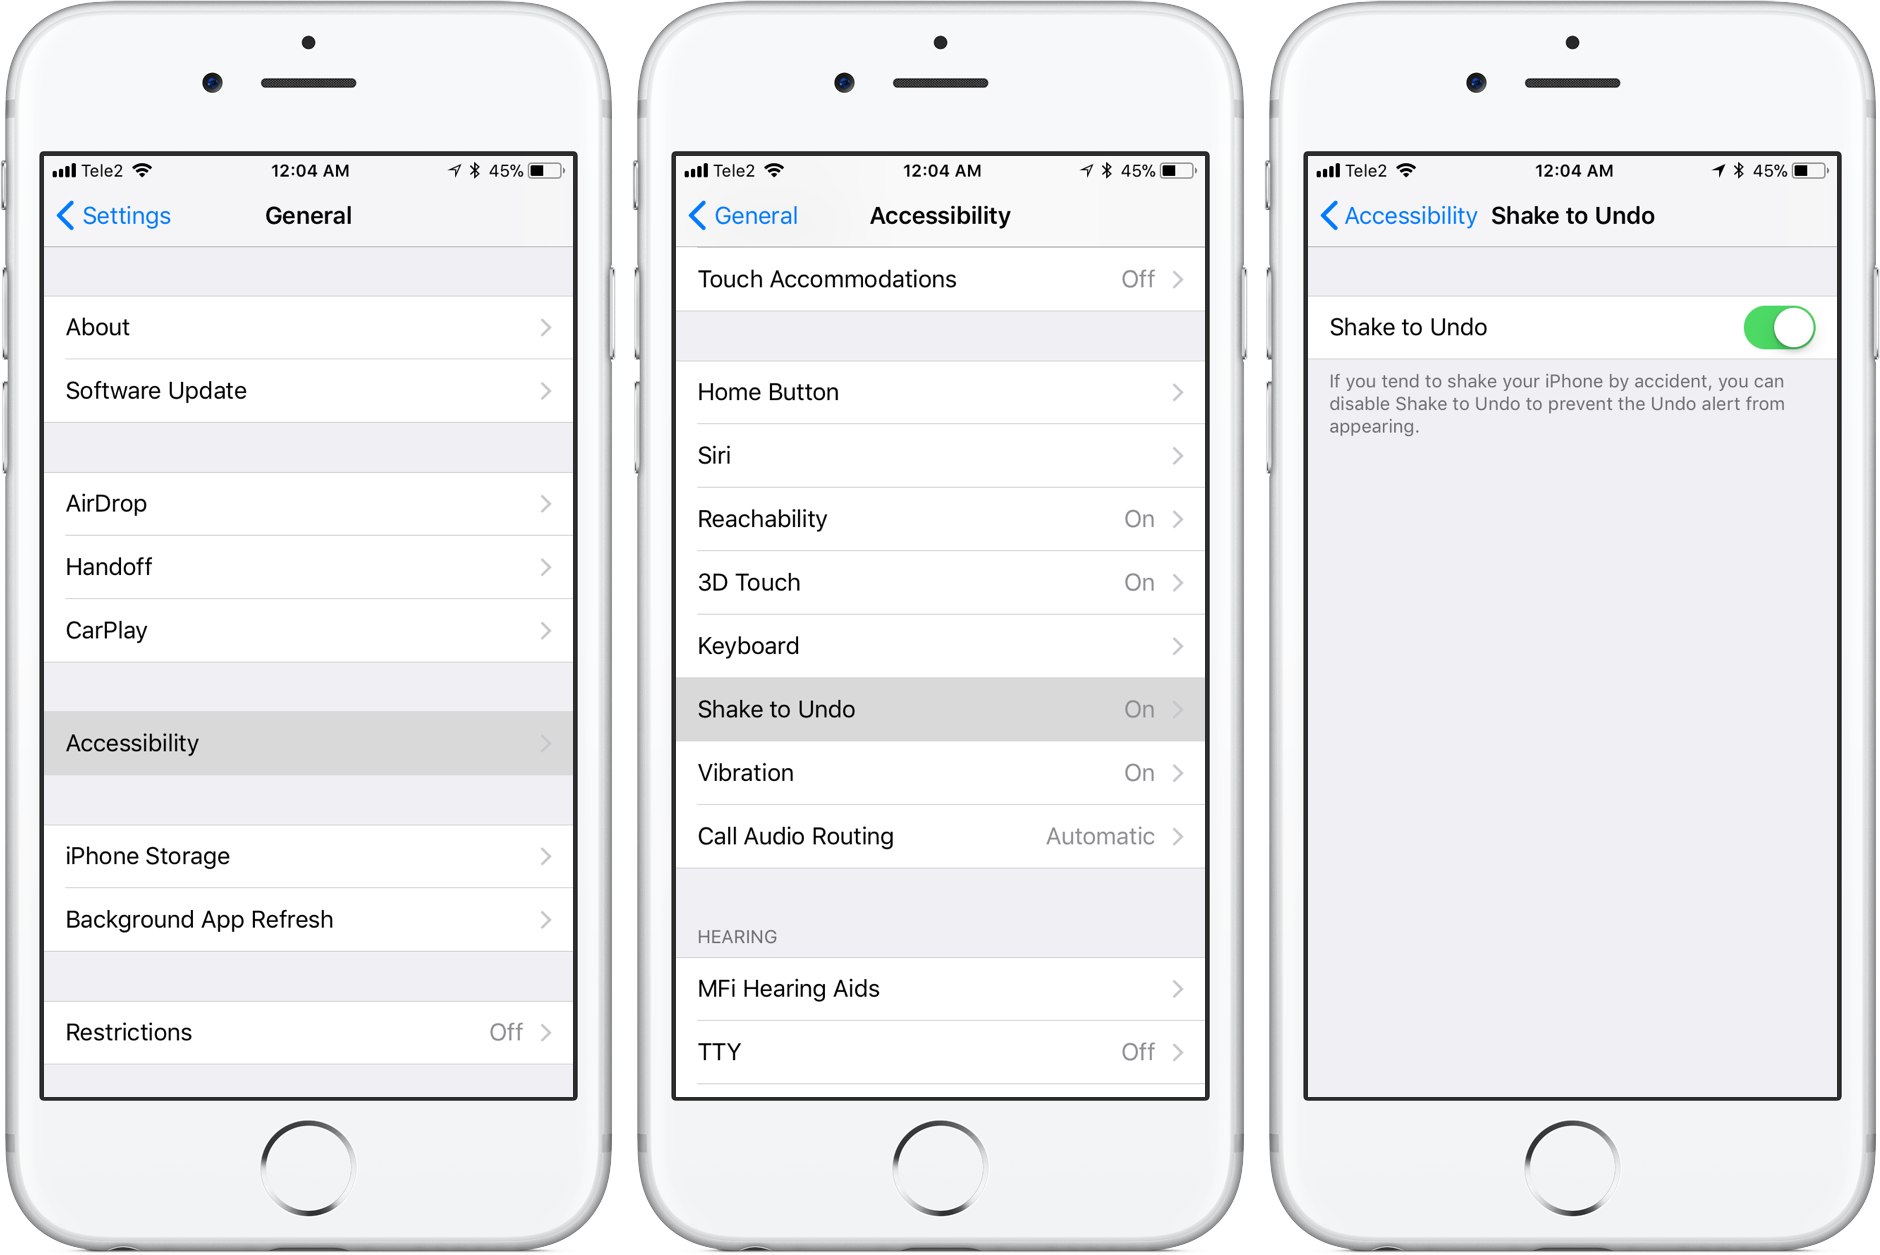
This feature requires that the Shake to Undo option be enabled in General → Accessibility.
Deleting scan bundles:
1) Tap a note containing your scans.
2) Tap and hold a scan bundle you’d like to delete until the bubble menu appears, then select Delete.
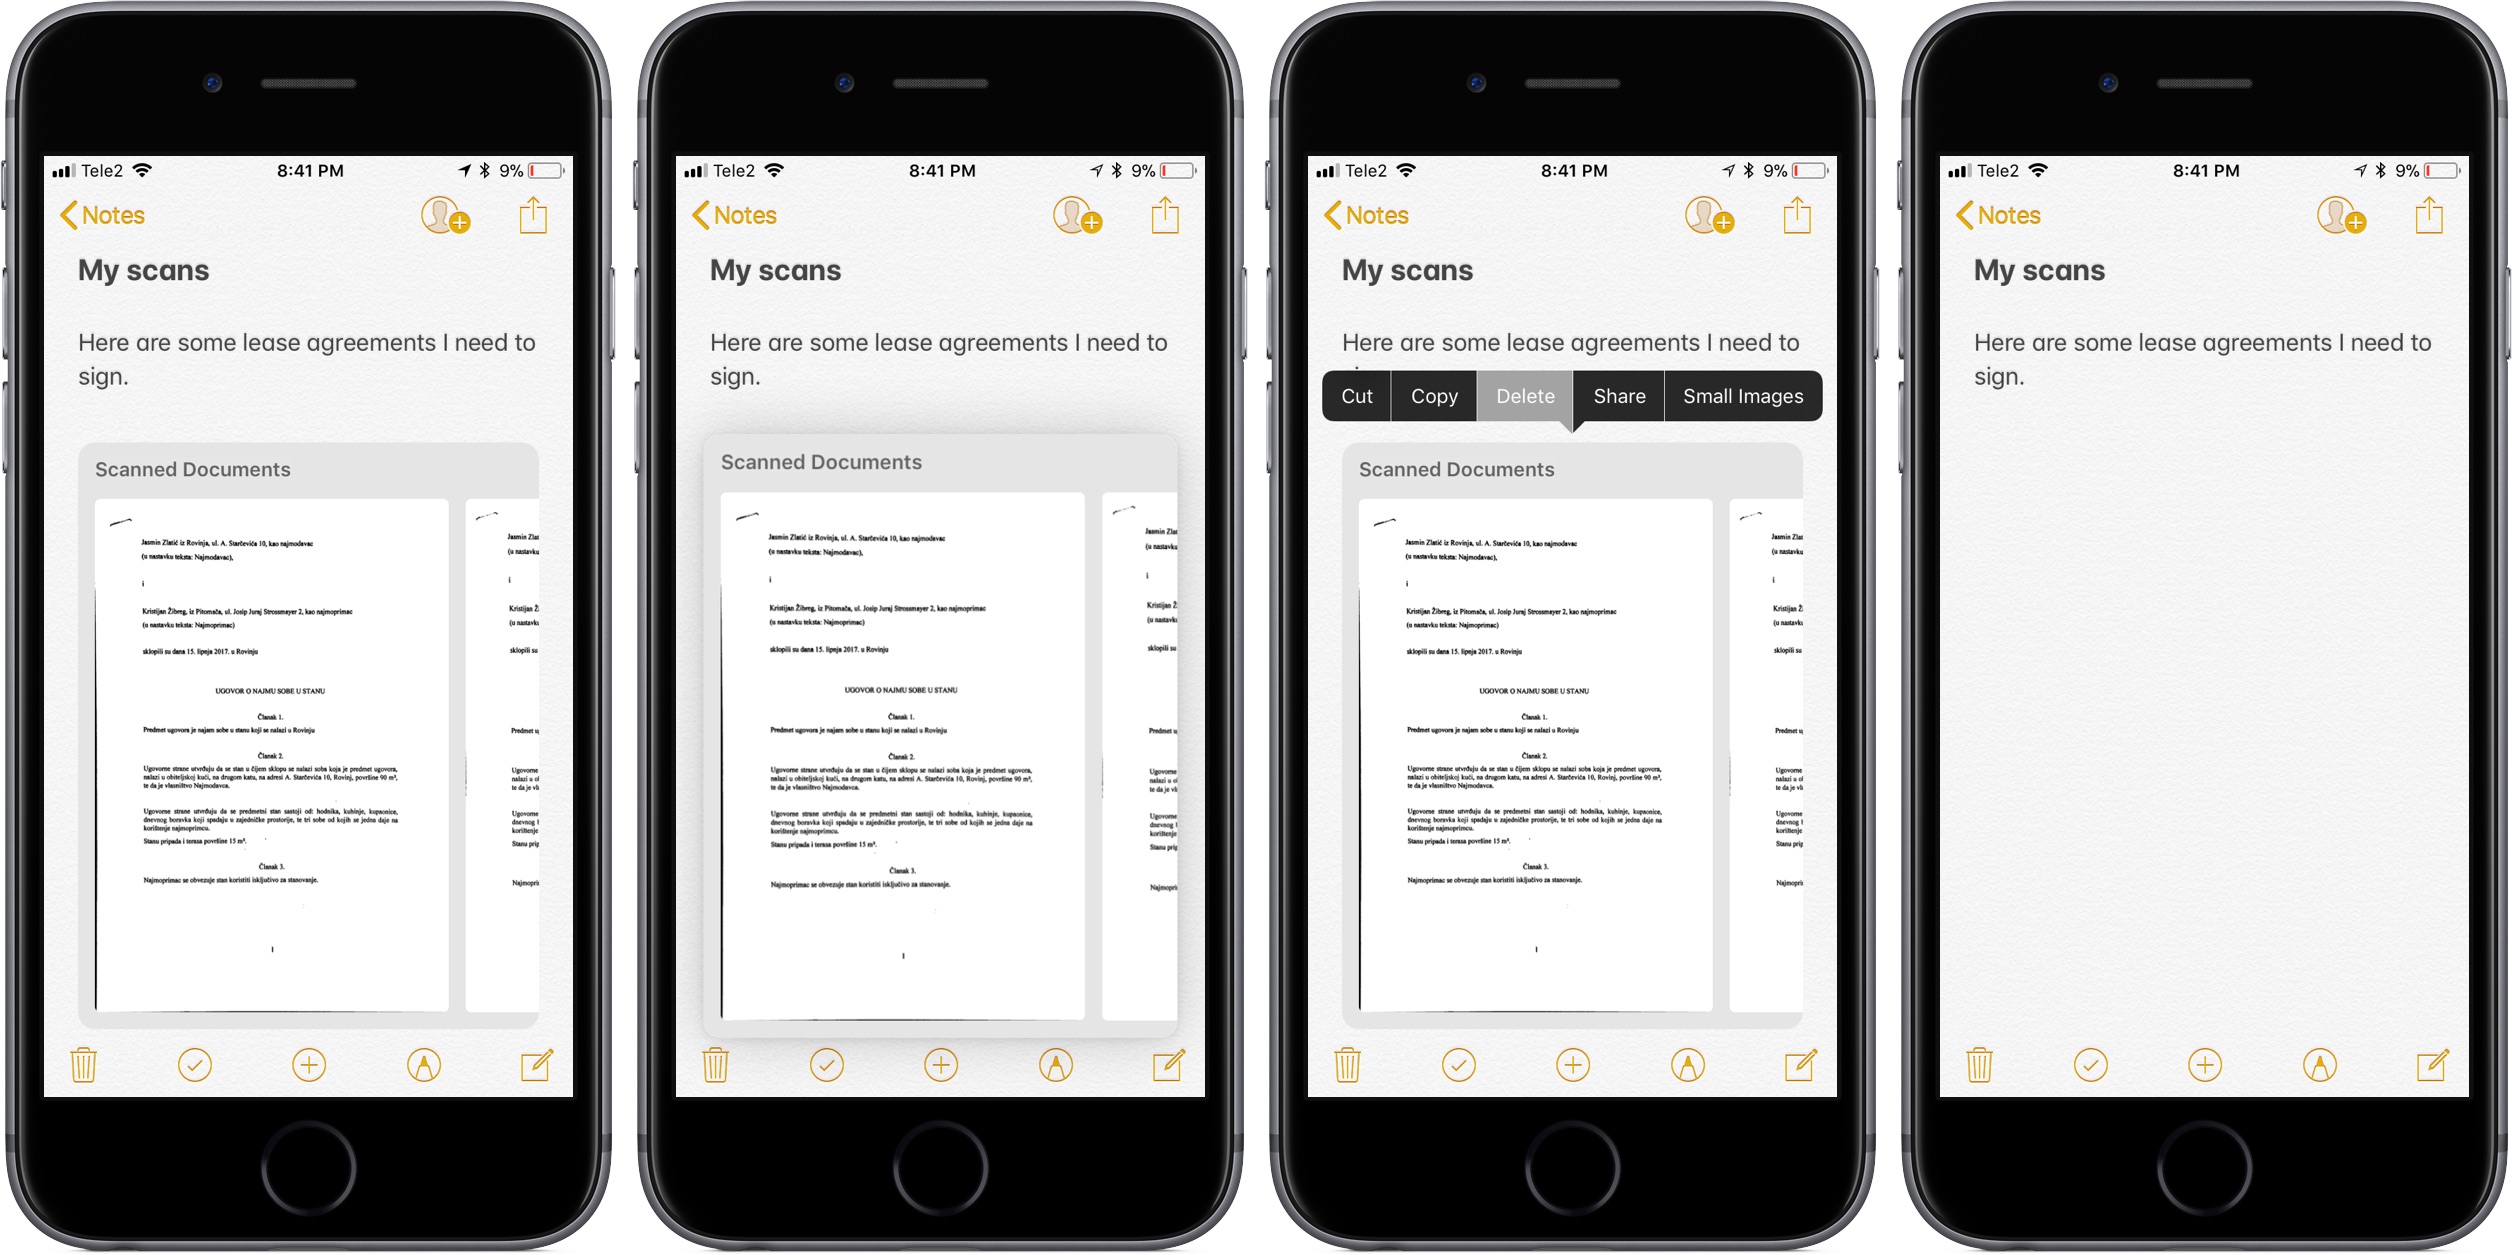
Proceed with caution because you won’t be asked to confirm the action.
TIP: If your device has 3D Touch, press the scan bundle within the note lightly, then swipe up to reveal the hidden menu and choose the Delete option.
Undeleting scan bundles:
Again, a deleted scan bundle is discarded immediately rather than kept for up to 30 days in the Recently Deleted folder. To recover the scan bundle after accidental deletion, shake the device to bring up the Undo Typing dialog, then choose the Undo action.
Be sure that the Shake to Undo option is enabled in Settings → General → Accessibility.
Recovering deleted scans
While deleting attachments trashes them permanently, you can always bring back the whole note containing scans you wish to recover. The Notes app includes a special Recently Deleted folder where your deleted notes are available for 30 days before being nuked from orbit.
To recover a deleted scan, do the following:
1) Open the Recently Deleted folder in Notes
2) Tap the note containing the scan you’d like to keep.
3) Tap in the note, then choose Recover from the popup menu.
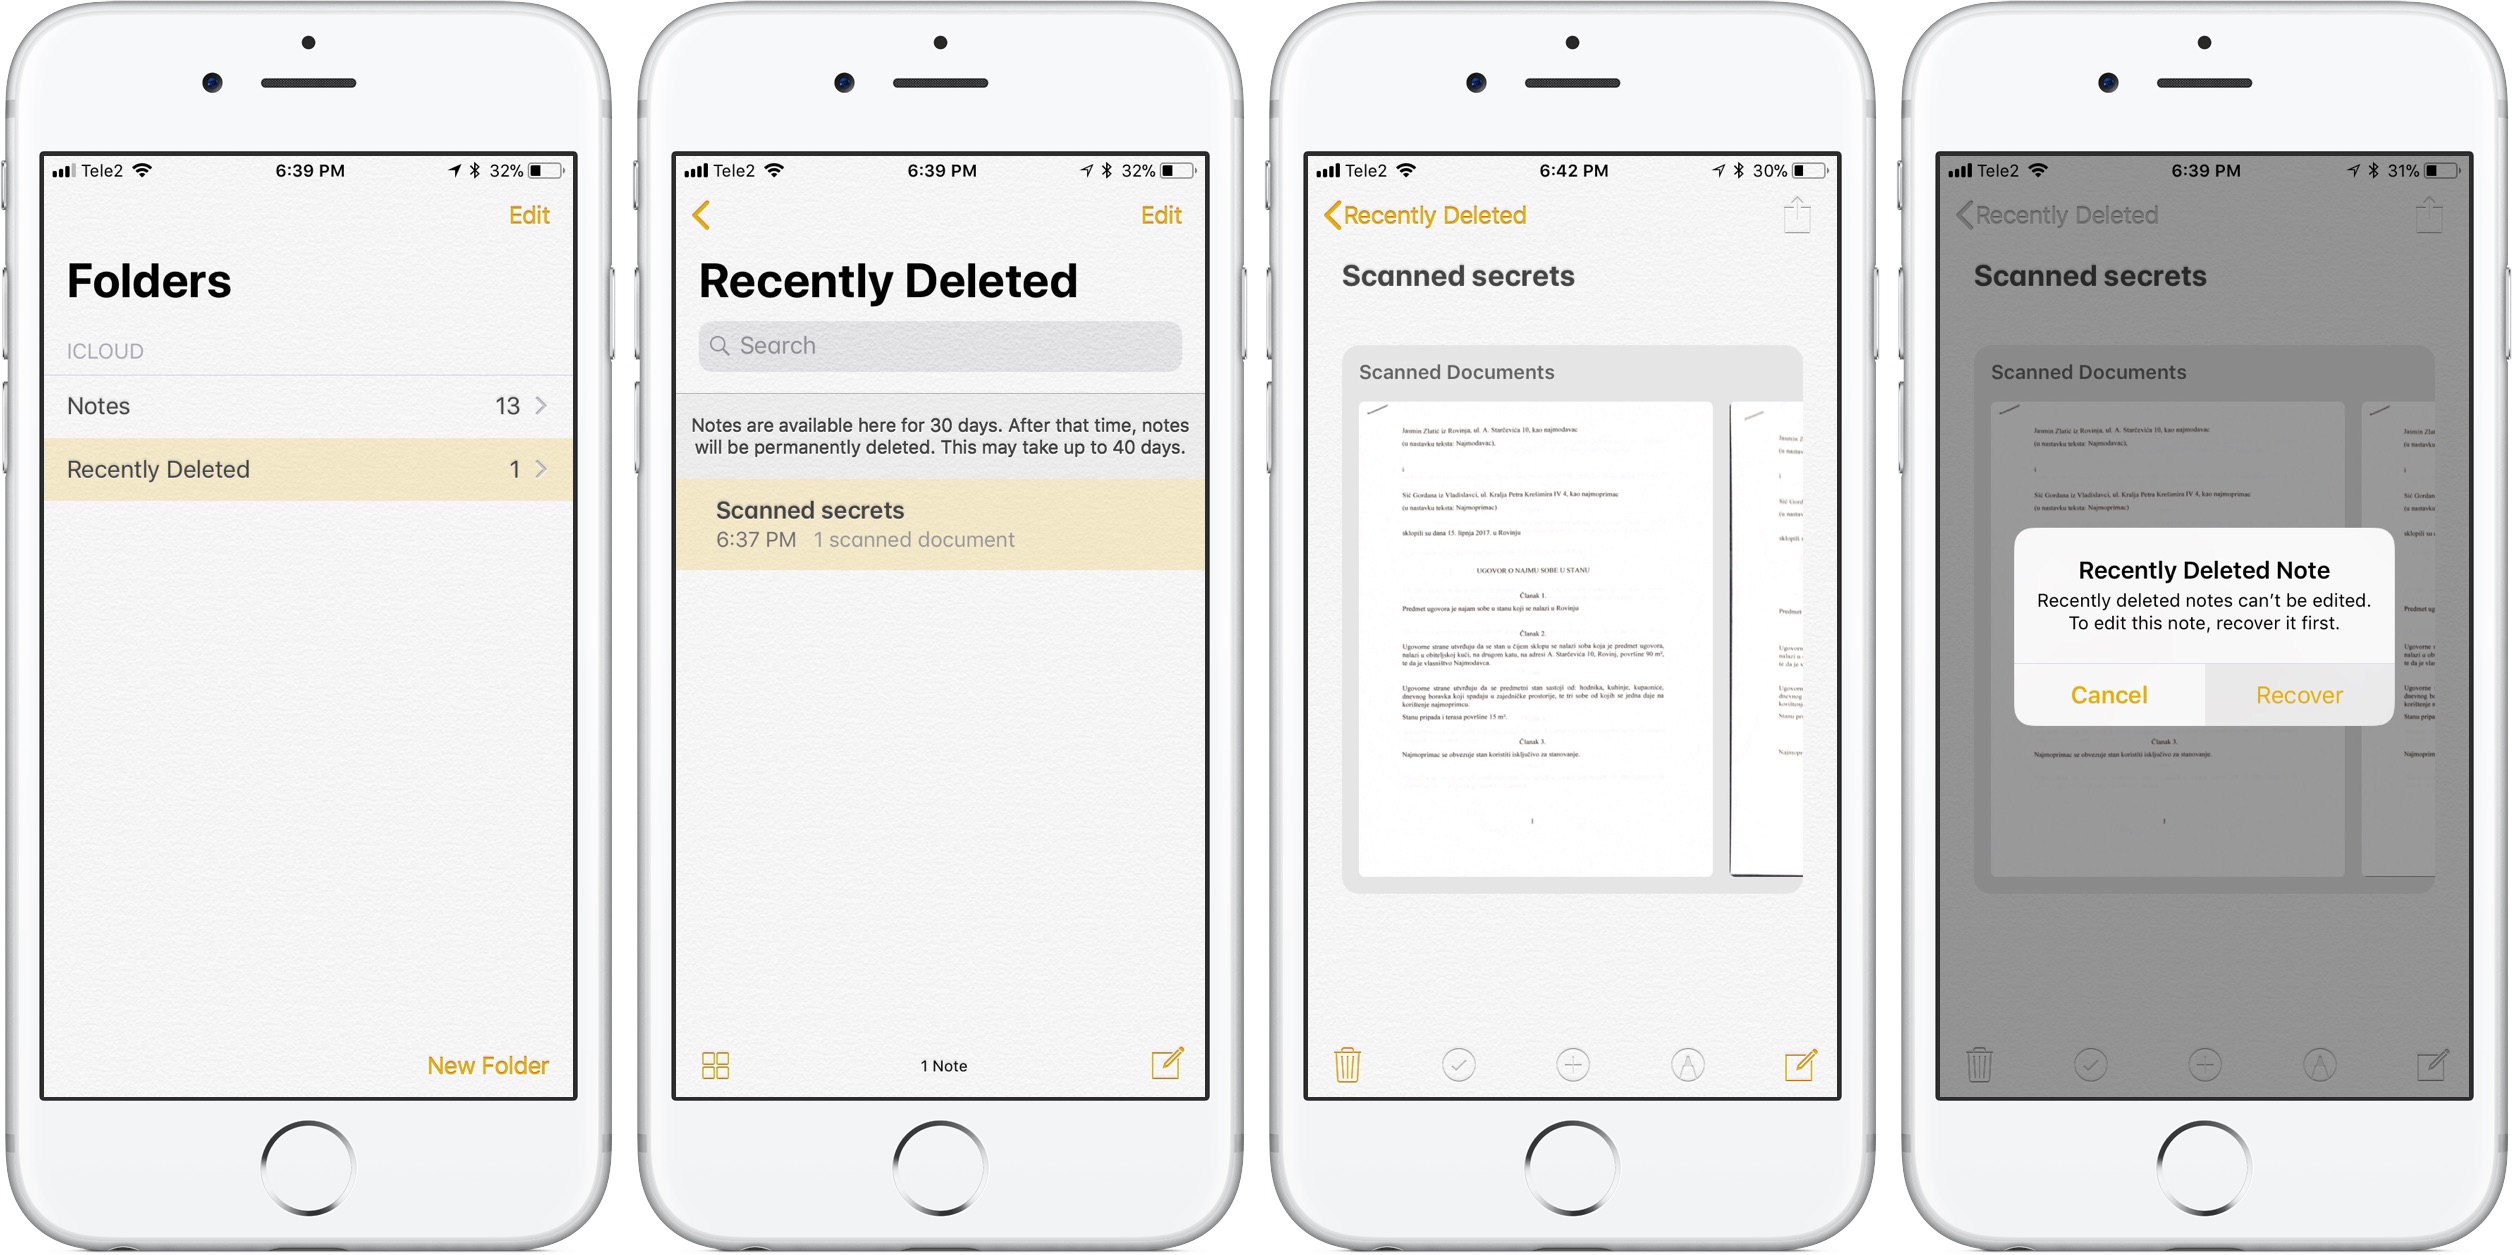
You can recover any note for up to 30 days after it was deleted.
This will undelete the note, move it to your default account and put the note in edit mode.
Renaming scan bundles
Your scans are stored with the default “Scanned Documents” title, but you can choose a different title to help distinguish between multiple bundles, here’s how.
1) Tap a note containing your scanned documents.
2) Tap a scan you wish to rename
3) Tap the default “Scanned Documents” tittle at the top.
4) Enter a new name for the scan, then tap Save.
5) Tap Done to finish making changes.
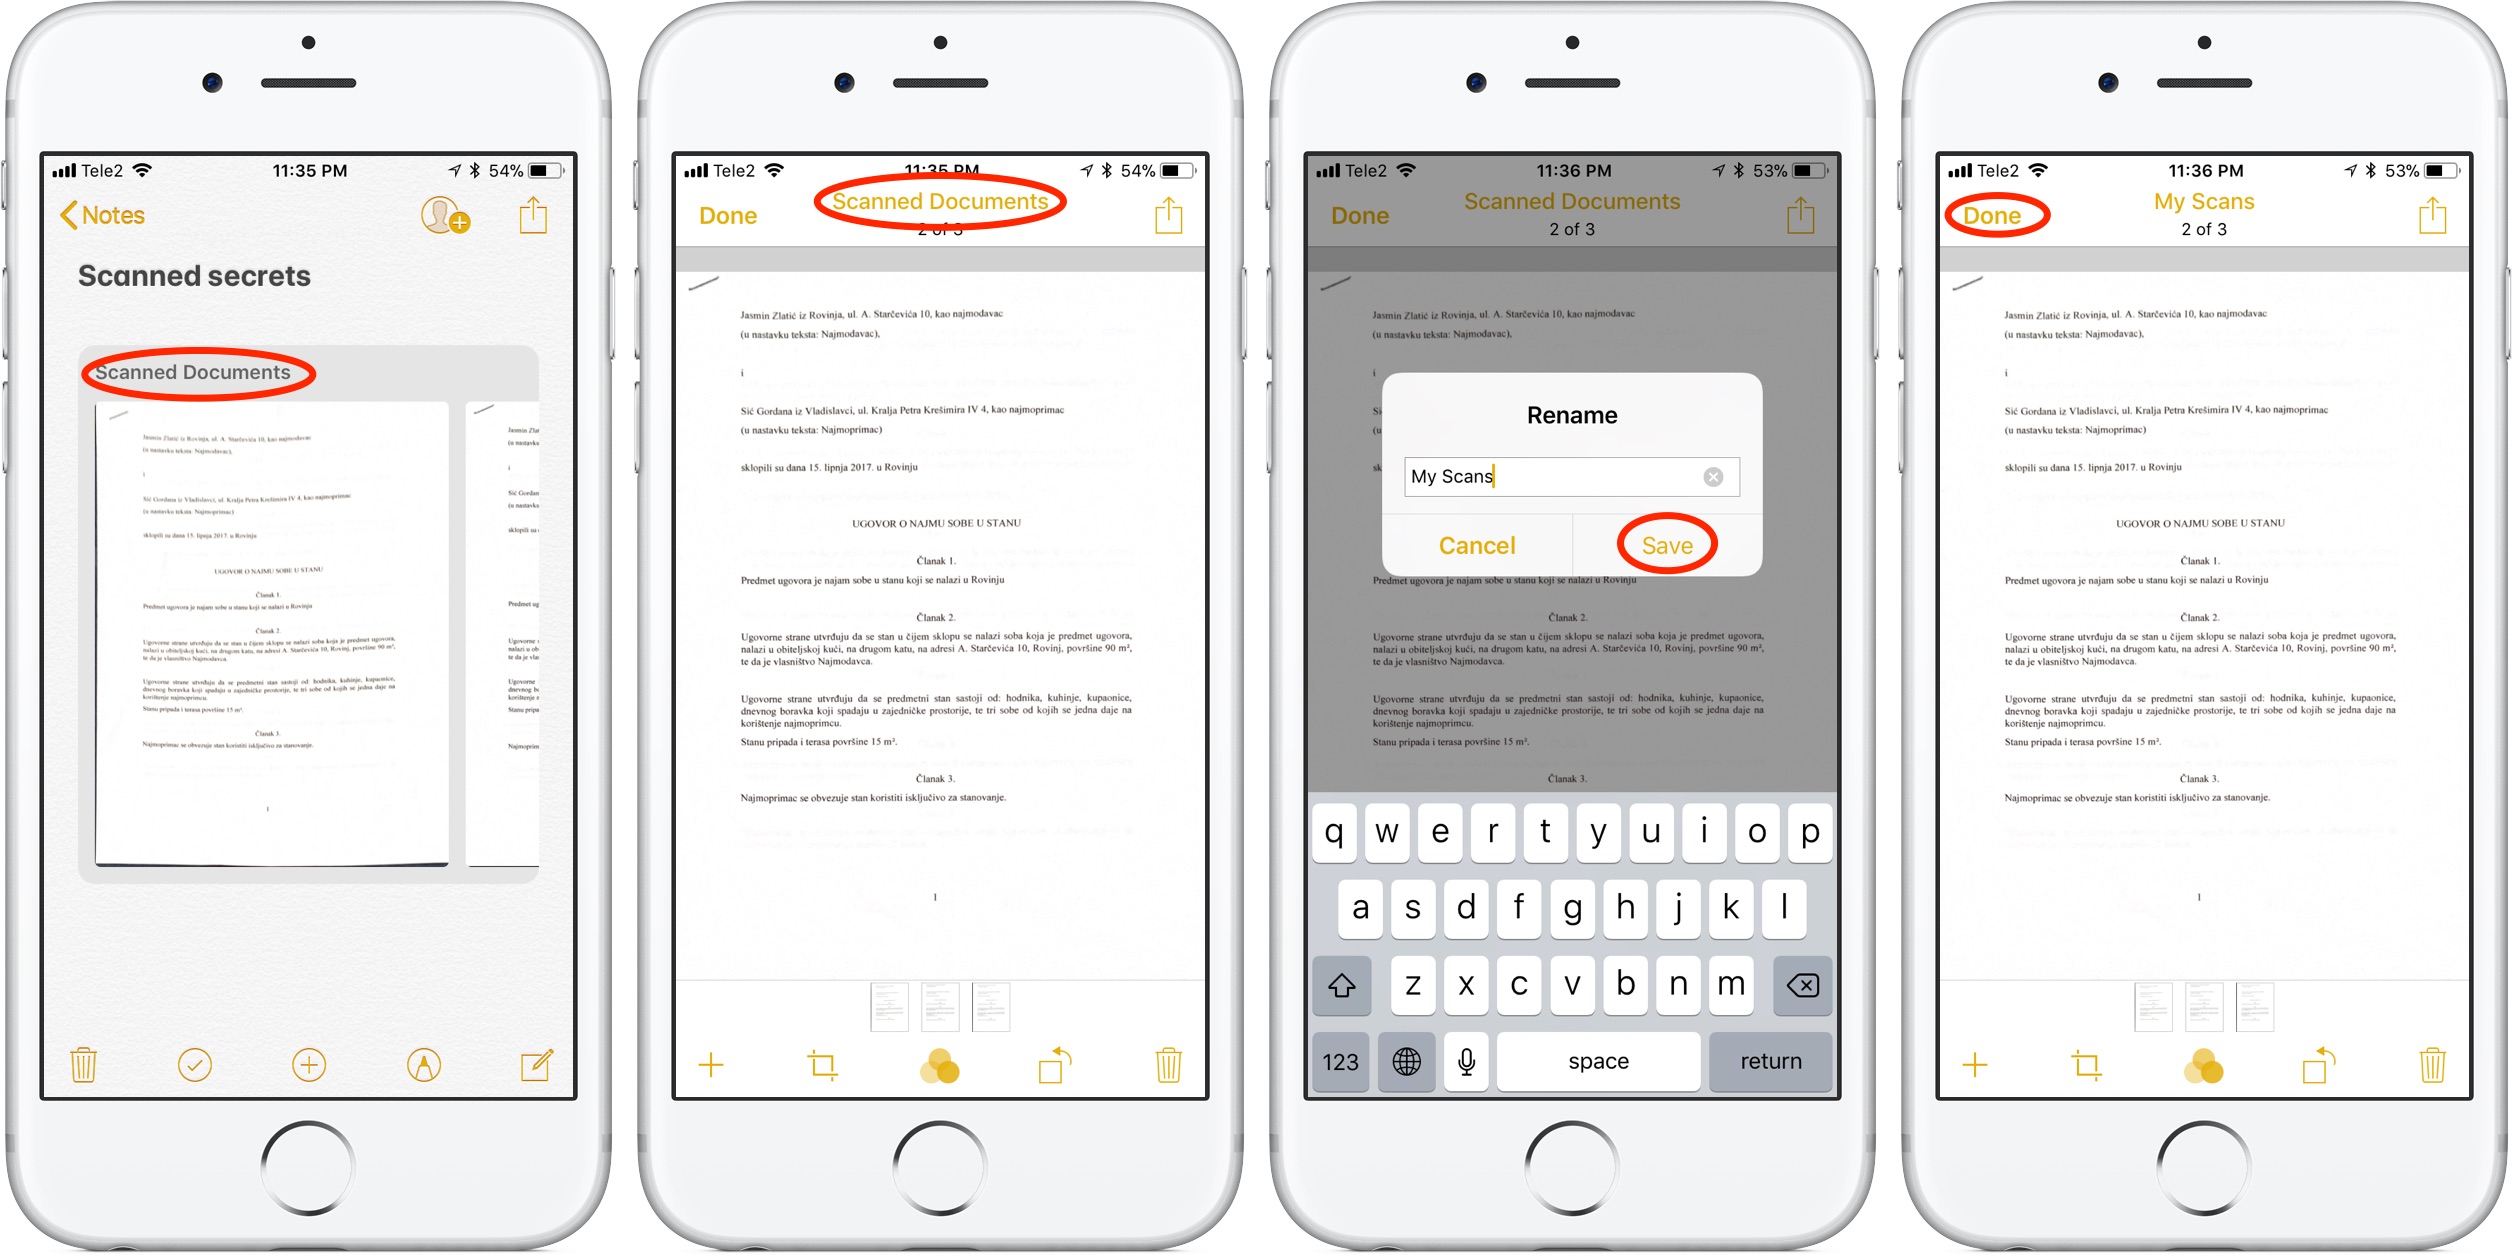
Scans can be given custom, more descriptive names.
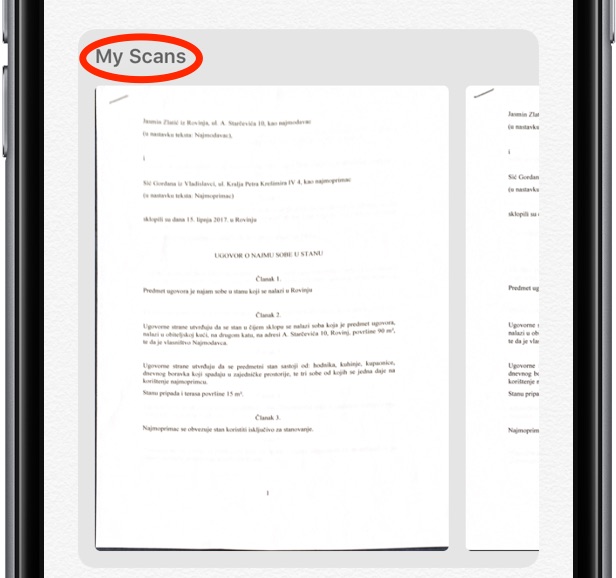
The scan’s new title will be instantly reflected at the top.
Sharing individual pages from a scan bundle
You can share a single page from a scan bundle and send it to another app:
1) Tap a note containing your scanned documents.
2) Tap a scan bundle you wish to extract pages from.
3) Scroll to the page you’d like to share, but don’t tap the Share menu. Instead, tap and hold on the page until the bubble menu appears, then choose the Share action from there. This will share only the current page, not the whole bundle.
Protecting your scans from the prying eyes
To keep your scanned documents safe, you must protect its note.
Simply swipe on a note in the Notes list to reveal options, then choose the Lock icon. You’ll be asked to use Touch ID or a custom password to lock this note. From now on, tapping a note will put up a Touch ID/password dialog before it’s fully revealed.
How to annotate your scans
Your scanned documents are Markup-friendly. And with Apple Pencil and iPad Pro, you just touch a scan with the stylus to enter Markup mode.
1) Tap a note containing your scanned documents.
2) Tap a scan you wish to mark up.
3) Tap the Share menu, then choose the Markup action from the menu
4) You can now use the Markup tools at the bottom of the screen to sign a document, draw shapes and lines, add some text, draw arbitrary shapes using various pens and brushes, change the color and more.
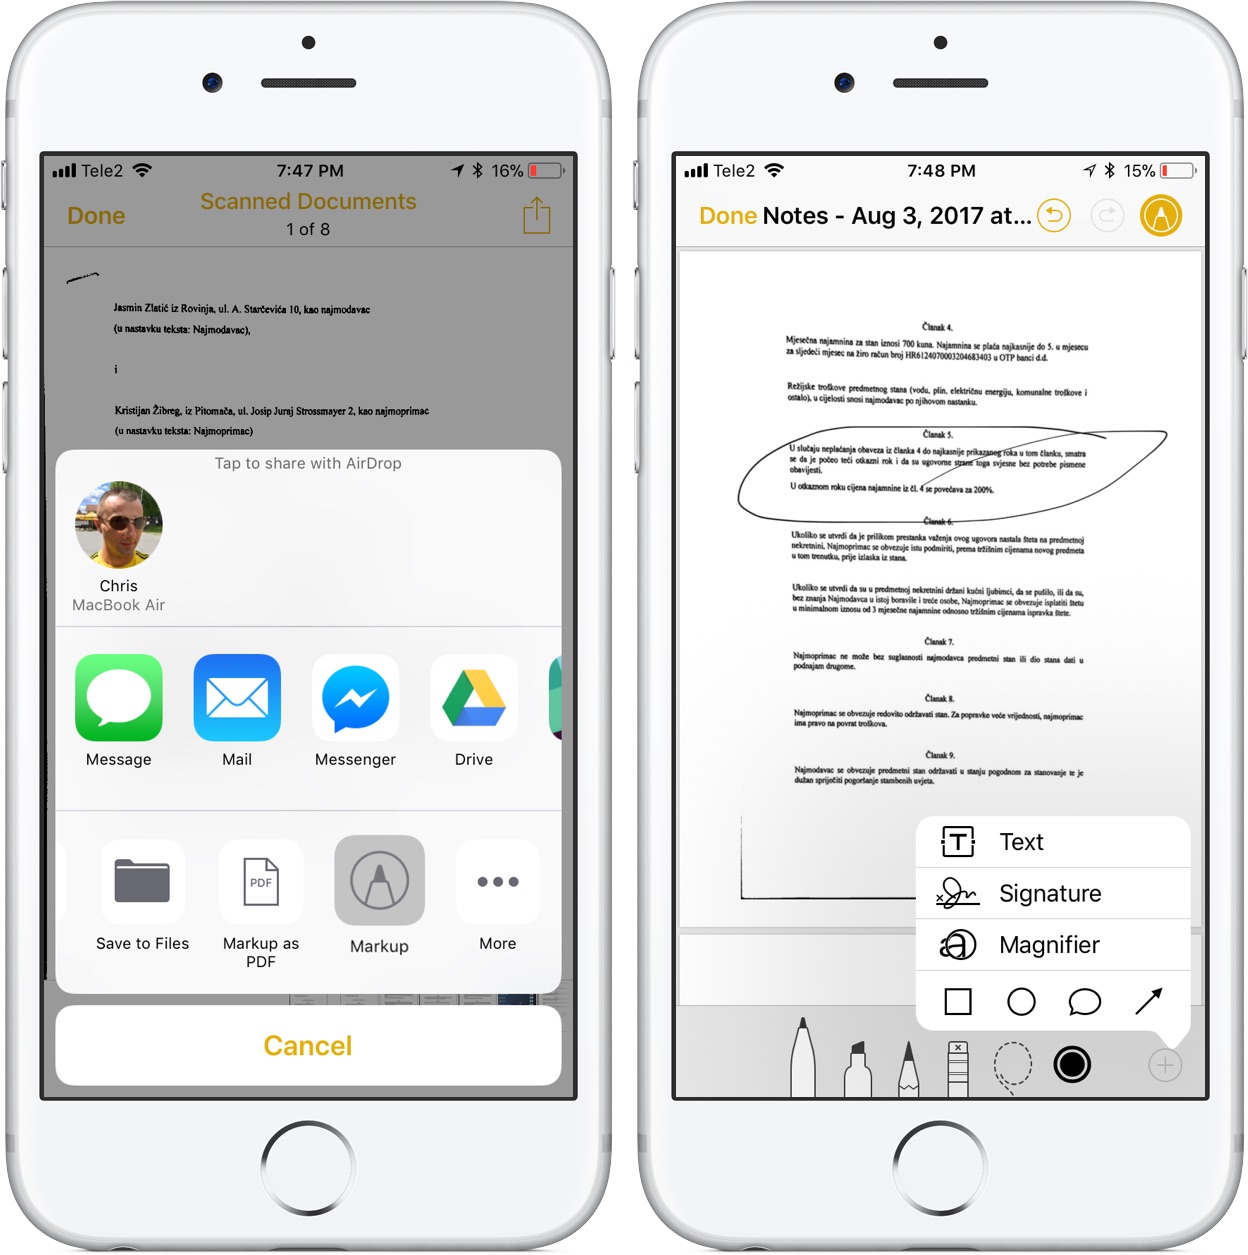
Draw on scans, annotate and more using Markup.
TIP: If you’re marking up a multi-page scan, you cannot swipe to scroll through pages. To get to another page, deselect the Markup icon in the top-right corner, swipe, then tap the icon again to re-enter Markup mode.
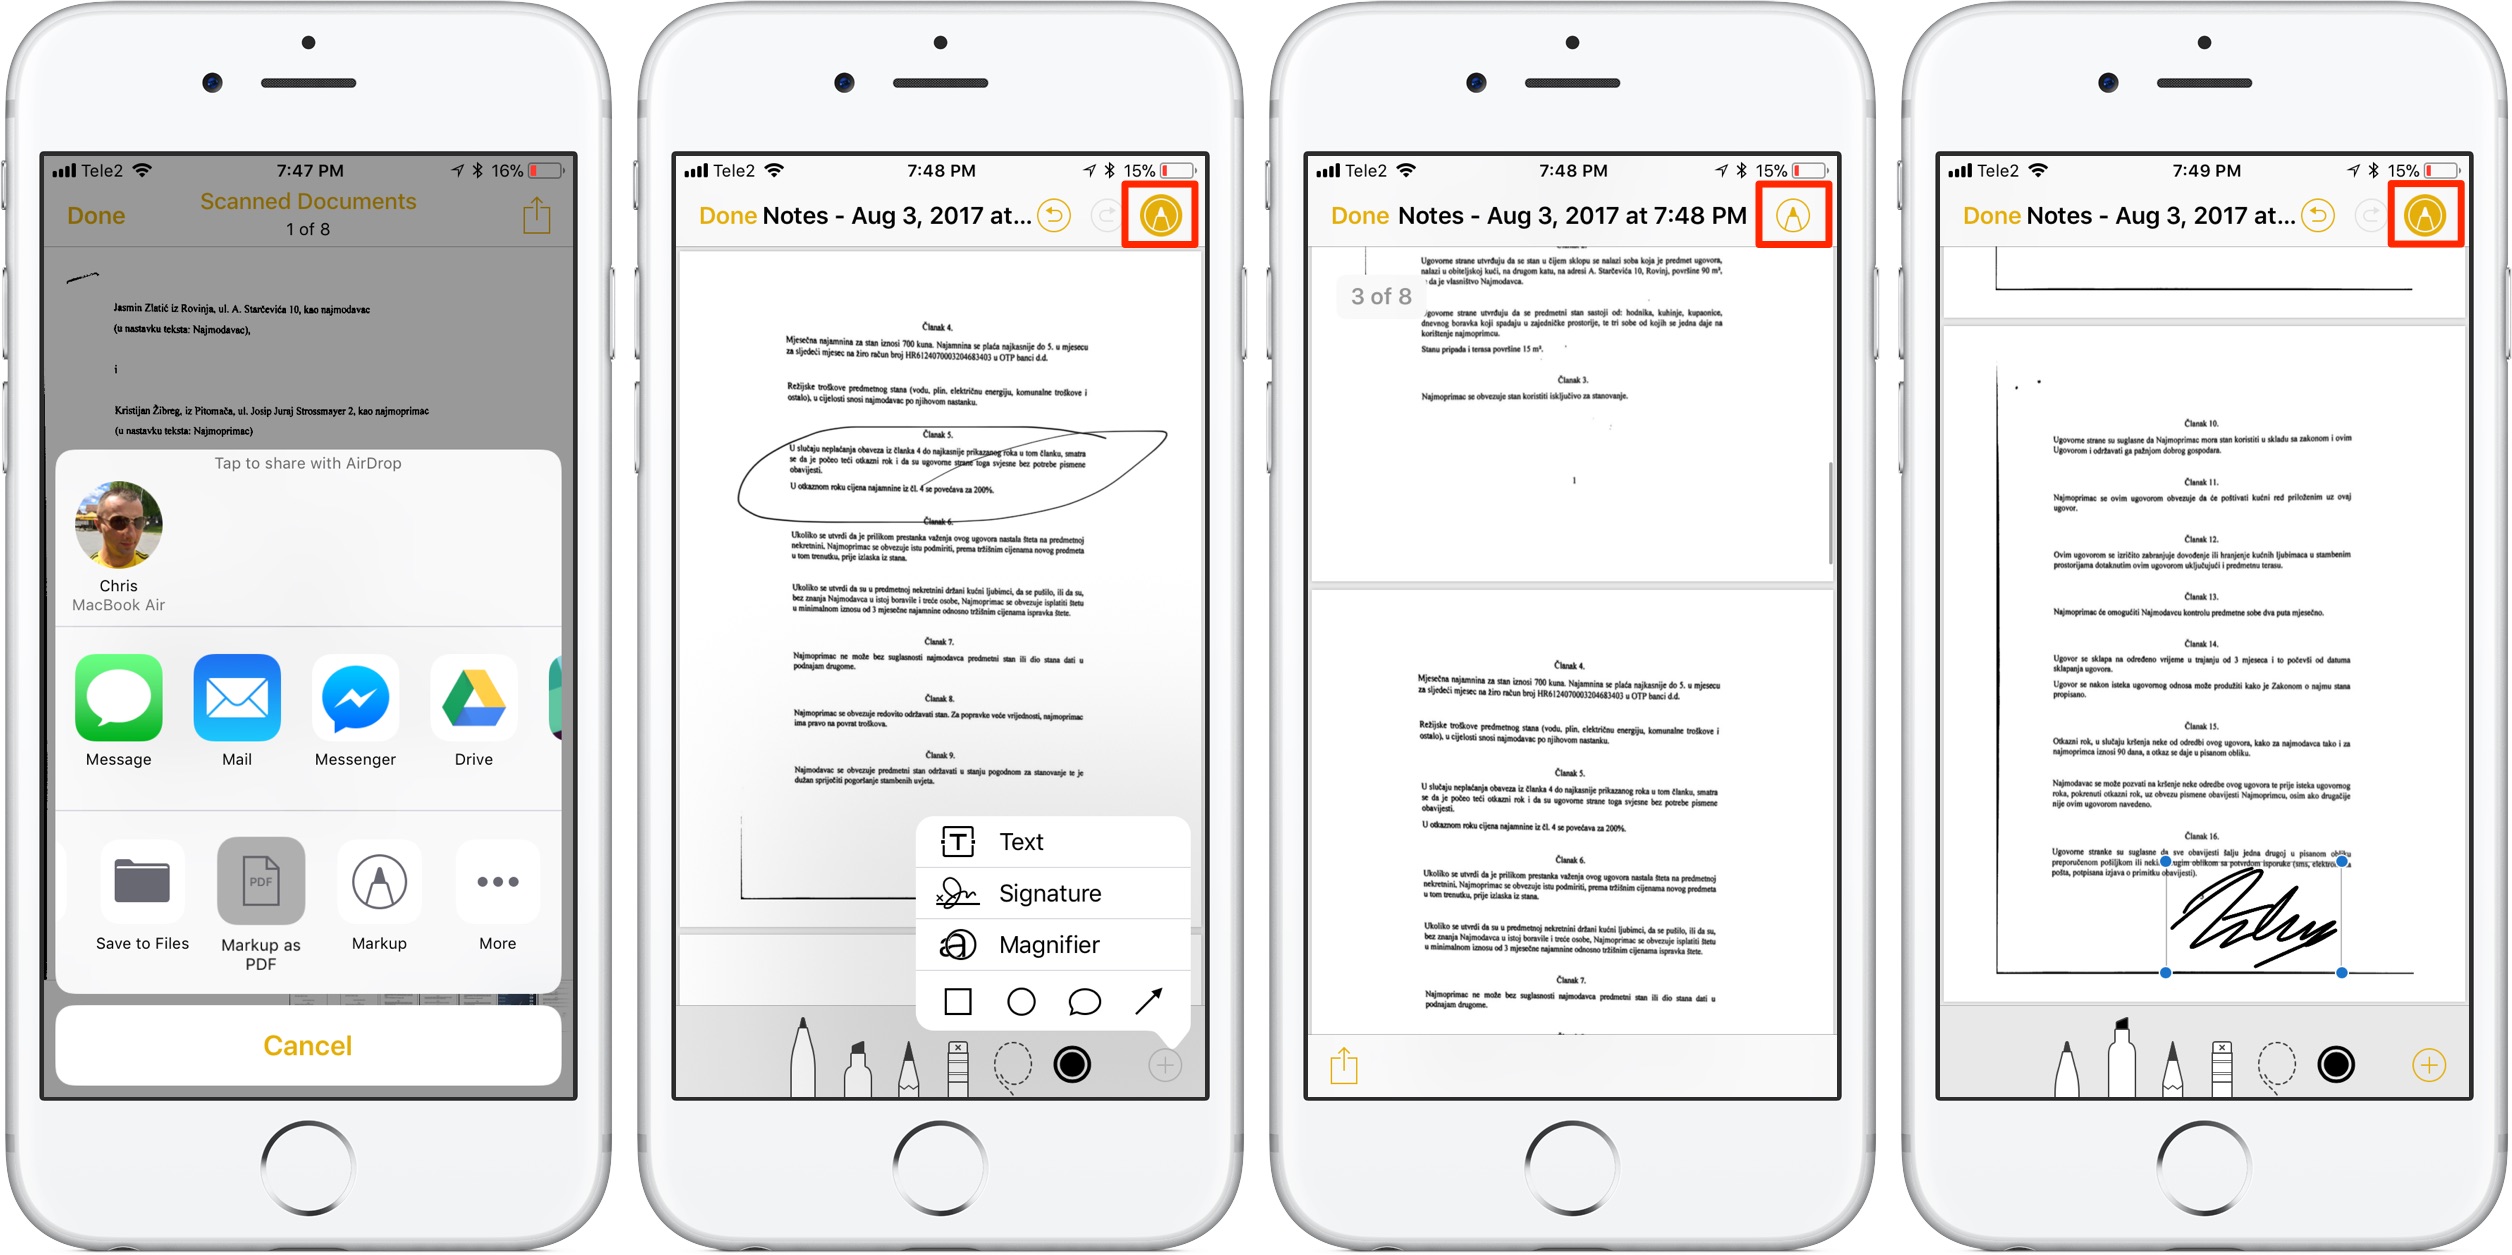
Choosing Markup as PDF saves your annotations as vector graphics.
5) To finish annotating the scan, tap Done.
6) Now tap Done to save your changes.
Converting scans into PDFs
You can convert a single or multi-page scan into a PDF document at any time for easy sharing via email or importing into many apps for further editing.
1) Tap a note containing your scanned documents.
2) Tap a scan you wish to mark up.
3) Tap the Share menu, then select Create PDF.
You’ll see a PDF preview in Notes. You can now annotate the PDF by tapping the Markup icon in top right-corner (your annotations will be saved as vectors), use the Share menu to send the file to AirPrint-comptabile printers, export it, save the PDF to the Files app, send it to another app and more.
4) Tap Done to exit the PDF preview.
You will be asked whether you’d like to save or discard the PDF:
- Save File To—Save the PDF in your iCloud Drive
- Delete PDF—Delete the PDF file (your scan remains intact)
- Cancel—Abort the operation
Saving the PDF in your iCloud Drive also reveals the “On My iPhone” location, allowing you to put the PDF inside an app-specific folder on the device. For instance, you could save the PDF into Pixelmator’s private documents folder to find it sitting right there every time you choose the Open command in Pixelmator.
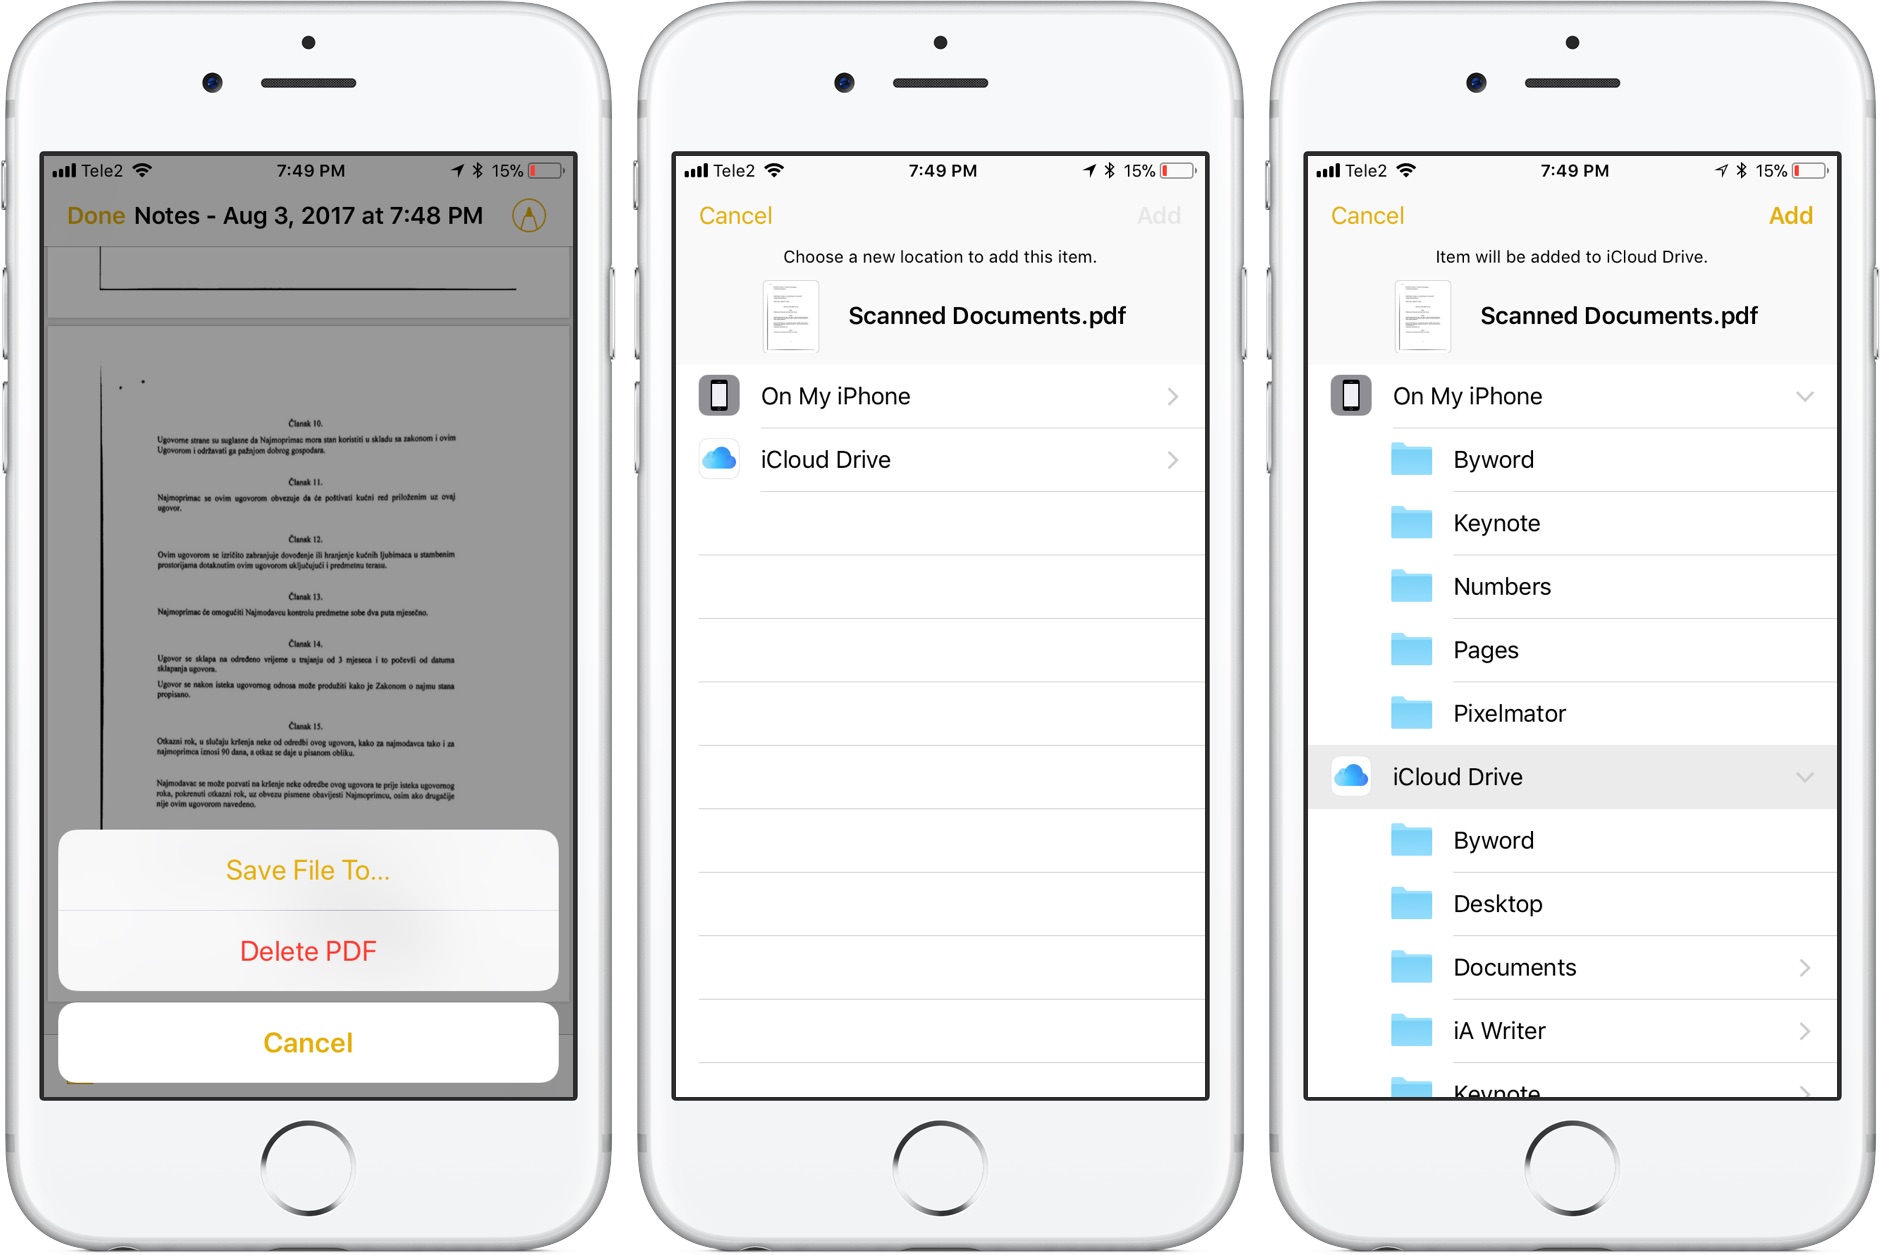
Saving PDFs to the Files app makes it easy to find all your stuff in one place.
How to share your scans
Once you’ve scanned your dead-tree documents and edited them to your liking using the built-in editor, you can export them using a plethora of options available in iOS’s multi-purpose Share menu. For instance, you could export a scan to the Files app or throw it over to Pixelmator for further editing.
1) Launch the Notes app and select a note containing your scanned documents.
2) Tap an attachment embedded in the note.
3) Tap the Share menu and make your selection.
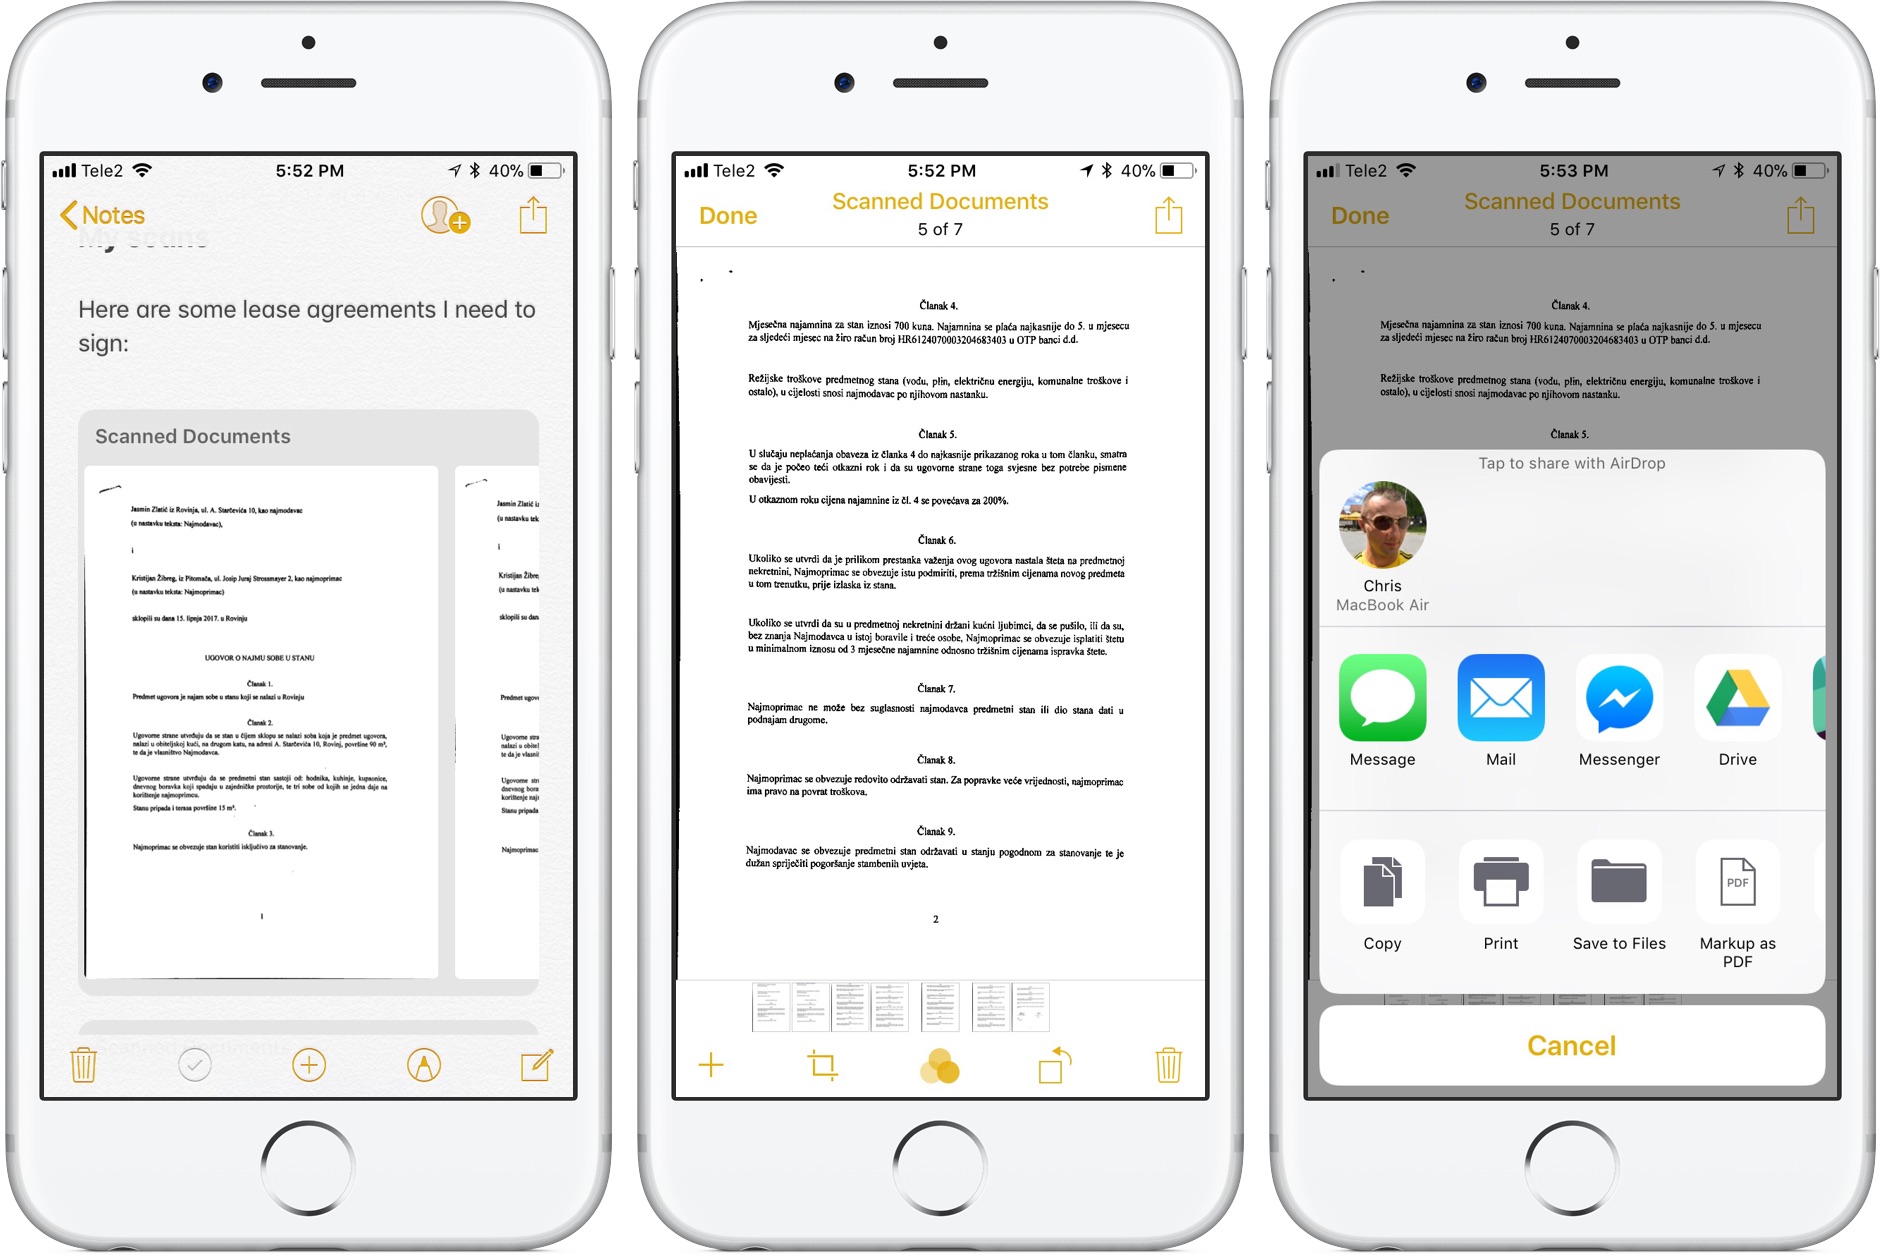
Your scans can be shared, exported for further editing or storage and more.
You can choose between these default options:
- AirDrop—Send the scan wirelessly to a nearby AirDrop device
- Message—Create a new iMessage from the scan
- Mail—Create a message in Mail from the scan
- Copy to iBooks—Send the scan as a PDF to the iBooks app
- Copy—Create a copy of the scan in the Notes app
- Print—Send the scan wirelessly to an AirPrint-compatible printer
- Save to Files—Save the scan to the Files app
- Markup/Markup as PDF—Annotate the scan as PDF
Other options will be available there, depending which of the apps on your device came with a Share sheet extension. For example, if the Google Drive and Dropbox apps are installed on your iPhone or iPad, those options will be provided in the Share sheet.
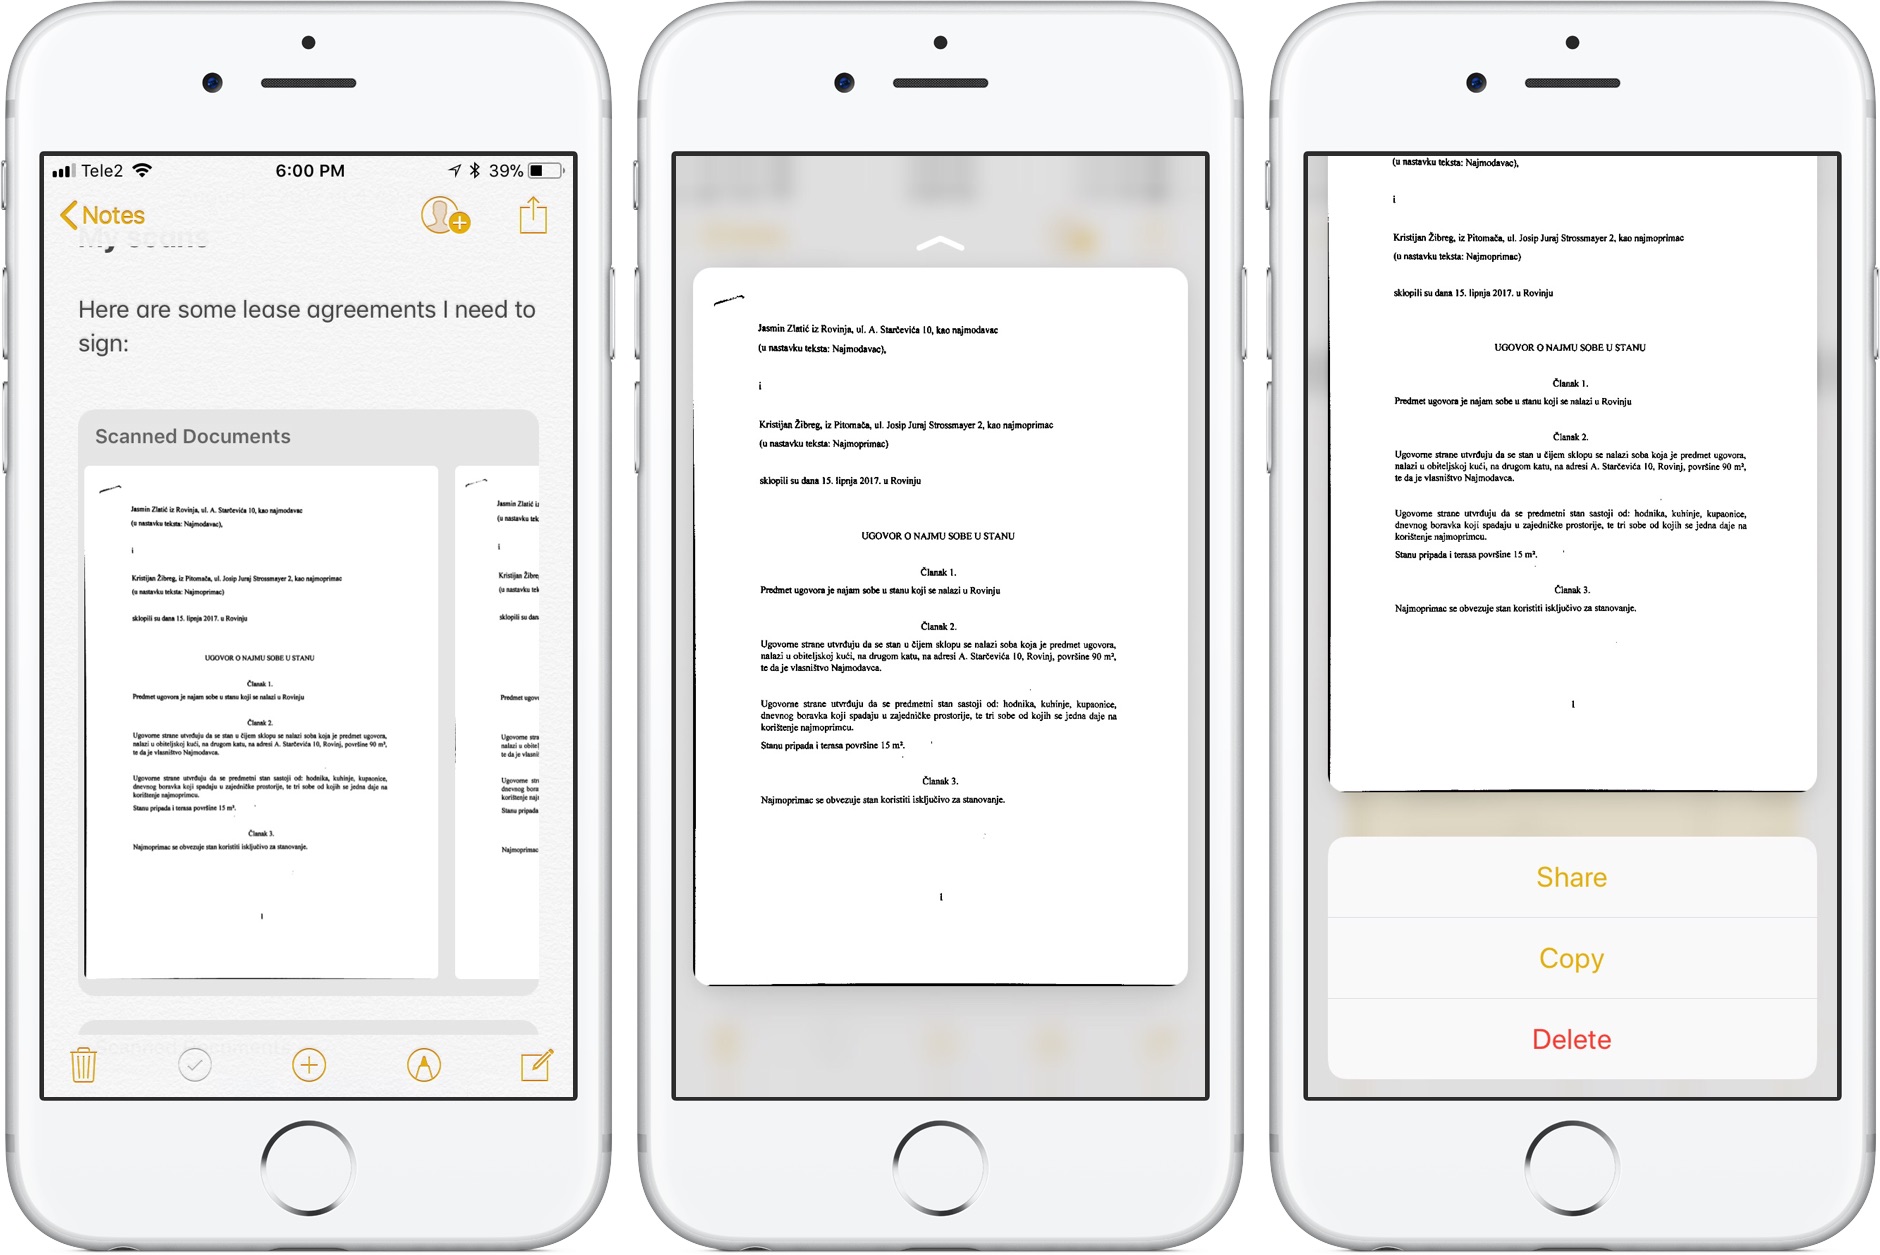
Access the Share, Copy and Delete options faster with 3D Touch.
TIP: If you own a 3D Touch device, press the attachment, swipe up to reveal hidden options and select the Share option from the popup menu at the bottom.
To share a single page from a multi-page scan, tap a bundle and scroll to the page you’d like to share, but don’t use the Share menu. Instead, tap and hold anywhere on the page and choose the Share action from the popup menu. This lets you share that particular page only.
You can even share your scans using AirDrop with your Mac to view in Preview or import in image editing apps such as Adobe Photoshop.
NOTE: Sharing a multi-page scan automatically converts it to a multi-page PDF. Sharing a single scan creates a JPG file. Keep in mind that PDFs are not editable because Notes scans stuff as bitmap images.
If you’d like to scan documents and then edit the text in a word processing app, consider using a more feature-complete document scanner with an OCR capability, like Readdle’s excellent Scanner Pro.
Wrapping it all up
And that’s all folks.
Thanks to iOS 11, there’s no need to run to the office scanner anymore. Even though this feature could be made even better with OCR abilities, it’s pretty powerful as-is and we’re pretty sure that any missing features will be added further the line by way of iOS software updates.
While the Notes document scanner may not be on par with dedicated apps such as Evernote, Scanbot or Scanner Pro, it will do the trick. For the vast majority of users, it’s something that’s always should they ever need to quickly scan anything on the go, right out of the box.
Ho do you like Notes’ document scanner so far? Will you be using it, and what for? Share your thoughts and observations with fellow iDownloadBlog readers in the comments below.
Need help? Ask iDB!
If you like this how-to, pass it along to your support folks and leave a comment below.
Got stuck? Not sure how to do certain things on your Apple device? Let us know via [email protected] and a future tutorial might provide a solution.
Submit your how-to suggestions via [email protected].
Source link: http://www.idownloadblog.com/2017/09/19/how-to-scan-documents-in-ios-11-notes-app/


Leave a Reply