How to save email attachments to iPhone and iPad

Downloading email attachments to your iPhone or iPad is not complicated per say, but it’s not very straightforward either. Over the course of the years, many third-party email apps have actually seen this as an opportunity and started offering easier and better ways to handle attachments. However, Apple has slowly closed the gap, and even if there is still no user-accessible file system on iOS, it is now easier than ever to save an email attachment.
Now don’t get me wrong, it’s not perfect quite yet.
In this post, we’ll show you how to save attachments from emails received via the Mail app on iPhone or iPad.
Note that these are iPhone screenshots but the steps explained in this post are identical regardless of the device you’re using. If you are trying to download attachments from your iPad, fear not, because the process is exactly identical.
Where are email attachments saved?
The first question you should ask yourself is regarding the location of these attachments. Unlike what you may be used to on a computer, you don’t have the option to save an attachment to your iPhone or iPad that easily. By default, and assuming you’re using iCloud, the Mail app will offer to download the attachment to iCloud.
If you use third-party services such as Dropbox or Google Drive, you will also be able to save attachments there as well. This may be a better option for people with limited iCloud storage space, or for users who prefer a solution that is available across multiple platforms.
My newly-found preference for saving files and documents is via an app called Documents 5, a powerful file manager that can link to multiple services including iCloud, Dropbox, Google Drive, and much more. The main benefit of using Documents 5 is that it provides a central locations for all your files, regardless of where they come from.
From my experience, there are two main categories of attachments: images (such as .png, .jpg, .gif, etc), and virtually every other file type (.pdf, .doc, .ppt, etc). There is a very slight difference when downloading images, so I’ll make sure to highlight it below.
How to save image attachments
When you get ready to download an image attached to an email, iOS will assume you want to save it to your Camera roll. In most cases, this is actually what you intend to do, but there are occurrences where you might want to save it somewhere else.
1. Launch the Mail app and locate the email containing an image that you want to save.
2. Tap and hold your finger on the image for a second or two. The following Share extension will pop up, offering several options.
3. Depending on where you want to save the image, you will have to choose among different options. Here we’ll see how to save the image to your Camera roll, iCloud, or Dropbox.
To save the image to your Camera roll, simply tap on the first icon you see on the screenshot above, the one that says Save Image. Once done, the image will be automatically saved to your Camera roll and you will be able to see it using the Photos app.
To save the image to iCloud, tap on the second icon labeled Save Attachment. From there, you will be able to specify a folder where the image should be saved to within iCloud. You don’t have to choose a folder. You can simply tap on Move to this location and the image will be saved in the main iCloud Drive folder.
To save the image to Dropbox (or any other similar third-party cloud service), tap on the Save to Dropbox icon. You will also be able to specify a folder where to save the image, or just tap Save to save the image to the main default Dropbox one.
How to save files and documents from the Mail app
As mentioned before, the process to save various file types is almost identical to saving image files, except you won’t have the option to save the file to your Camera roll, obviously.
1. Locate the file you want to save from the Mail app.
2. Tap on it and hold your finger until the Share extension appears.
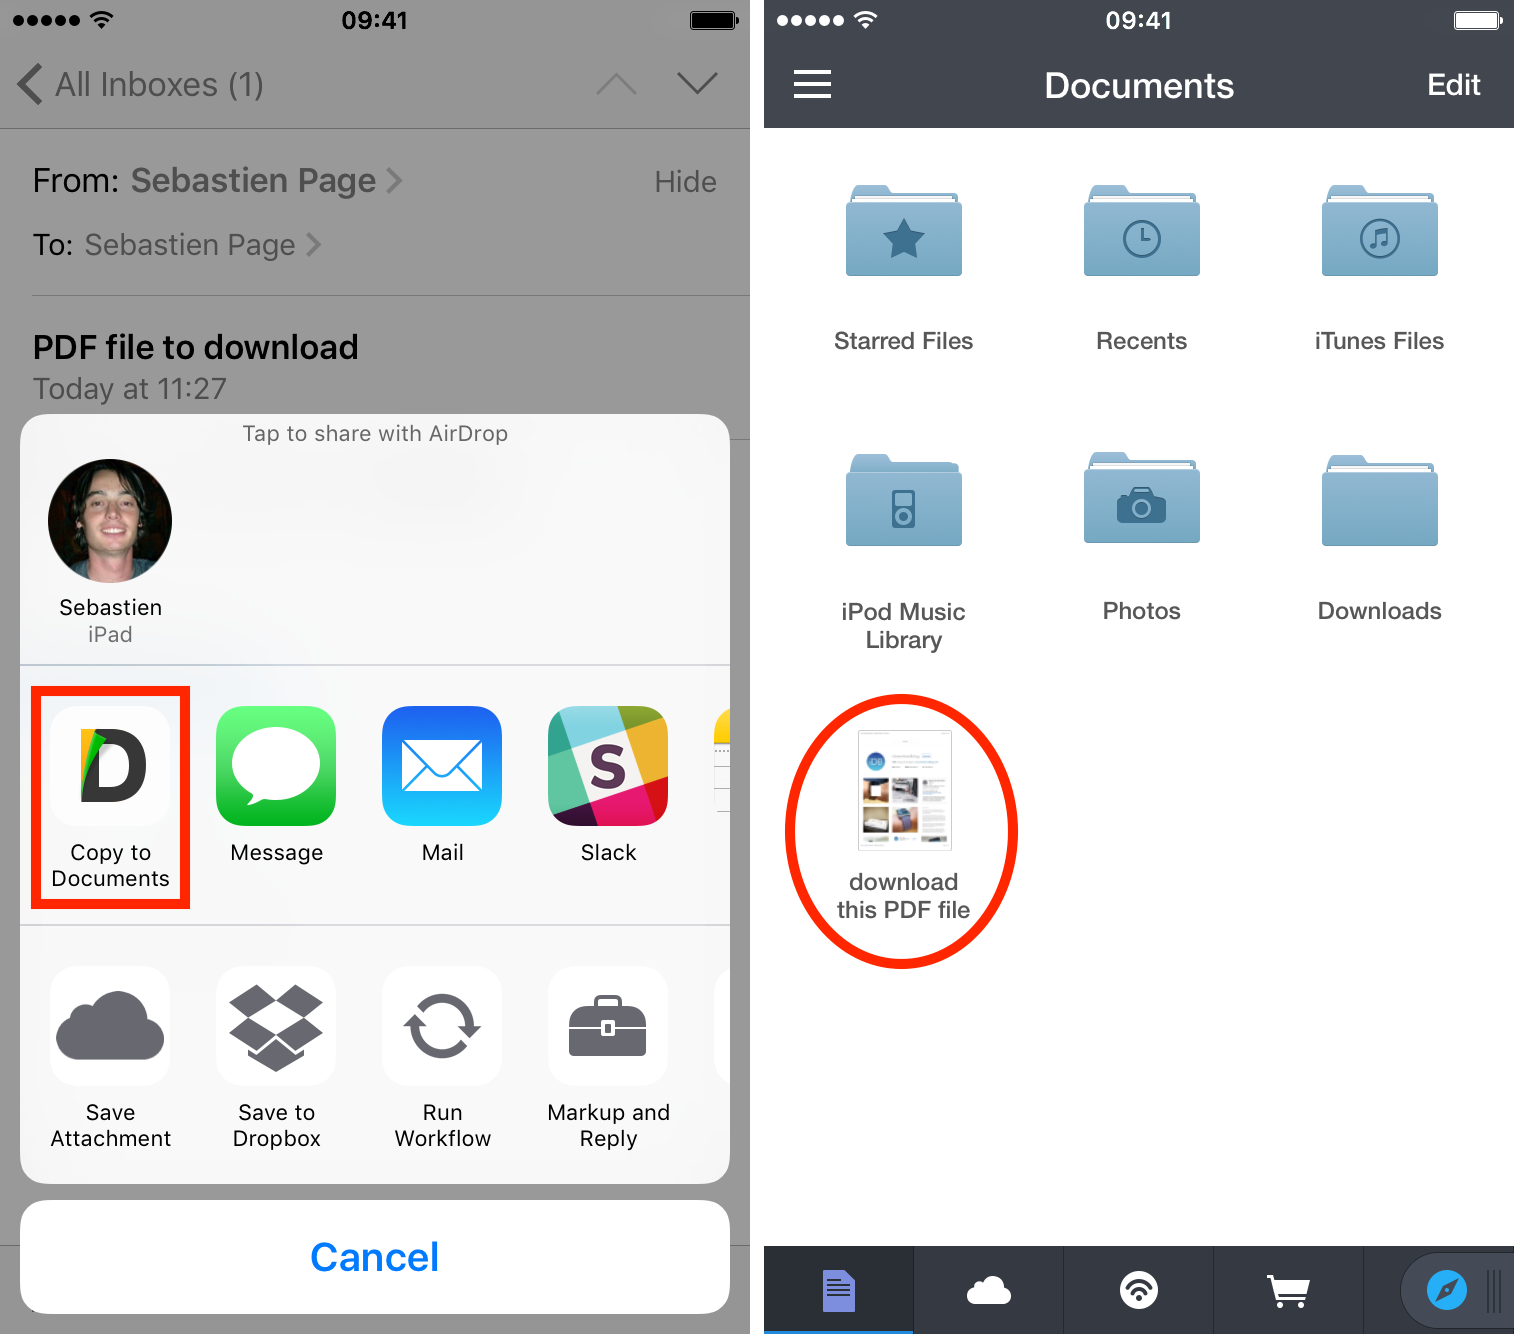
3. Select where you want to save the attachment to. I’ll run you through three different options: iCloud, Dropbox, and Documents 5.
If you want to save the file to iCloud, simply tap on the Save Attachment icon. You will then have the ability to select a different folder within iCloud. Tap Move to this location when done.
To move the file to Dropbox, select Save to Dropbox, then if needed, select a different folder to save the file to. Tap Save when done.
To move the file to Documents 5, select Copy to Documents. The file will then be saved automatically to the default Documents folder. From there, you can easily move it to iCloud, Dropbox (and other similar services), etc.
As mentioned above, Documents 5 is my preferred way of saving files because it plugs in with other services so well and allows you to really have an experience as close as the one you would have on your desktop computer as possible, essentially giving you the impression to be a proper file system.
Related: How to download files and documents to iPhone or iPad
If you have questions or comments, feel free to send them my way. I’m also always curious to learn new productivity tips, so if you know something you feel could make this workflow better, please share with all of us in the comments section below.
Source link: http://www.idownloadblog.com/2016/04/18/how-to-save-email-attachments-iphone-ipad/


Leave a Reply