

How to create a bootable installer for the macOS Big Sur beta

![]()
Following the conclusion of its WWDC 2020 keynote, Apple released the inaugural beta of macOS 11.0 Big Sur to its registered developers, with a public beta slated to arrive next month. If you’d like to install Big Sur on multiple Mac computers without having to download the installer each time, or just want more flexibility in terms of installing the software, you’ll need to create a bootable installer for the macOS Big Sur beta. Thankfully, this can be accomplished in just a few steps. Follow along with us as we document the step-by-step process for how to create a macOS Big Sur beta bootable installer.
Why do I need a bootable macOS installer?
Having a dedicated macOS Big Sur beta installer created on a USB thumb drive is a great option for people who have multiple Macs that they wish to upgrade to the macOS Big Sur beta. You can easily use your bootable USB installer as a startup disk from which you can boot your computer in order to install the Big Sur beta software.
You don’t need a bootable installer if you want to upgrade the current macOS on your startup disk to the Big Sur beta on a single machine. Nevertheless, it’s helpful to have a bootable installer handy for troubleshooting purposes and when installing the macOS Big Sure beta on multiple Mac computers without having to download the installer each time.
Prerequisites
Before proceeding with the creation of your bootable installer for the macOS Big Sure beta, here’s a quick checklist of the things you’ll need:
- A compatible Mac computer with macOS Catalina
- A USB thumb drive or external disk with at least twelve gigabytes of available storage
- Your disk must be named “Untitled” and formatted with the “Mac OS Extended” option
- The macOS Beta installer inside your Applications folder
The Terminal command that we’re going to use assumes that the macOS Beta installer resides in the Applications folder and “Untitled” is the name of the USB drive or other external disk you’ll be using as your bootable installer.
Do keep those two things in mind before you decide to move the macOS Beta installer out of the Applications folder and rename your external drive or format it with the APFS option.
macOS Big Sur system requirements
As we noted in our dedicated article which lists the official system requirements for macOS 11.0 Big Sur, the operating system is supported on these Mac models:
- MacBook (early 2015 and later)
- MacBook Air (mid 2013 and later)
- MacBook Pro (mid 2013 and later)
- Mac mini (2014 and later)
- iMac (2014 and later)
- iMac Pro all models (2017 and later)
- Mac Pro (2013 and later)
If your Mac is not on this list, you won’t be able to run macOS Big Sur.
As you can see for yourself, the Terminal command we’re going to use basically assumes that the macOS Beta installer resides in the Applications folder and “Untitled” is the name of the USB drive or other external disk you’re using.
How to create macOS Big Sur beta bootable installer
To create a bootable installer for the macOS Big Sur beta, you’ll need to do the following:
- Download the macOS Big Sur beta installer
- Prepare your external drive for the beta
- Create the bootable installer
- Change your Secure Boot settings, if necessary
- Start up from the bootable installer and install the beta the right way
The full tutorial continues below.
How to download macOS Big Sur beta
Follow the steps below to download the macOS beta installer.
1) Using the Safari browser on your Mac, visit Apple’s portal for developers at developer.apple.com, then click the link Discover in the navigation section top of page.
2) Click the macOS icon right below the navigation section.
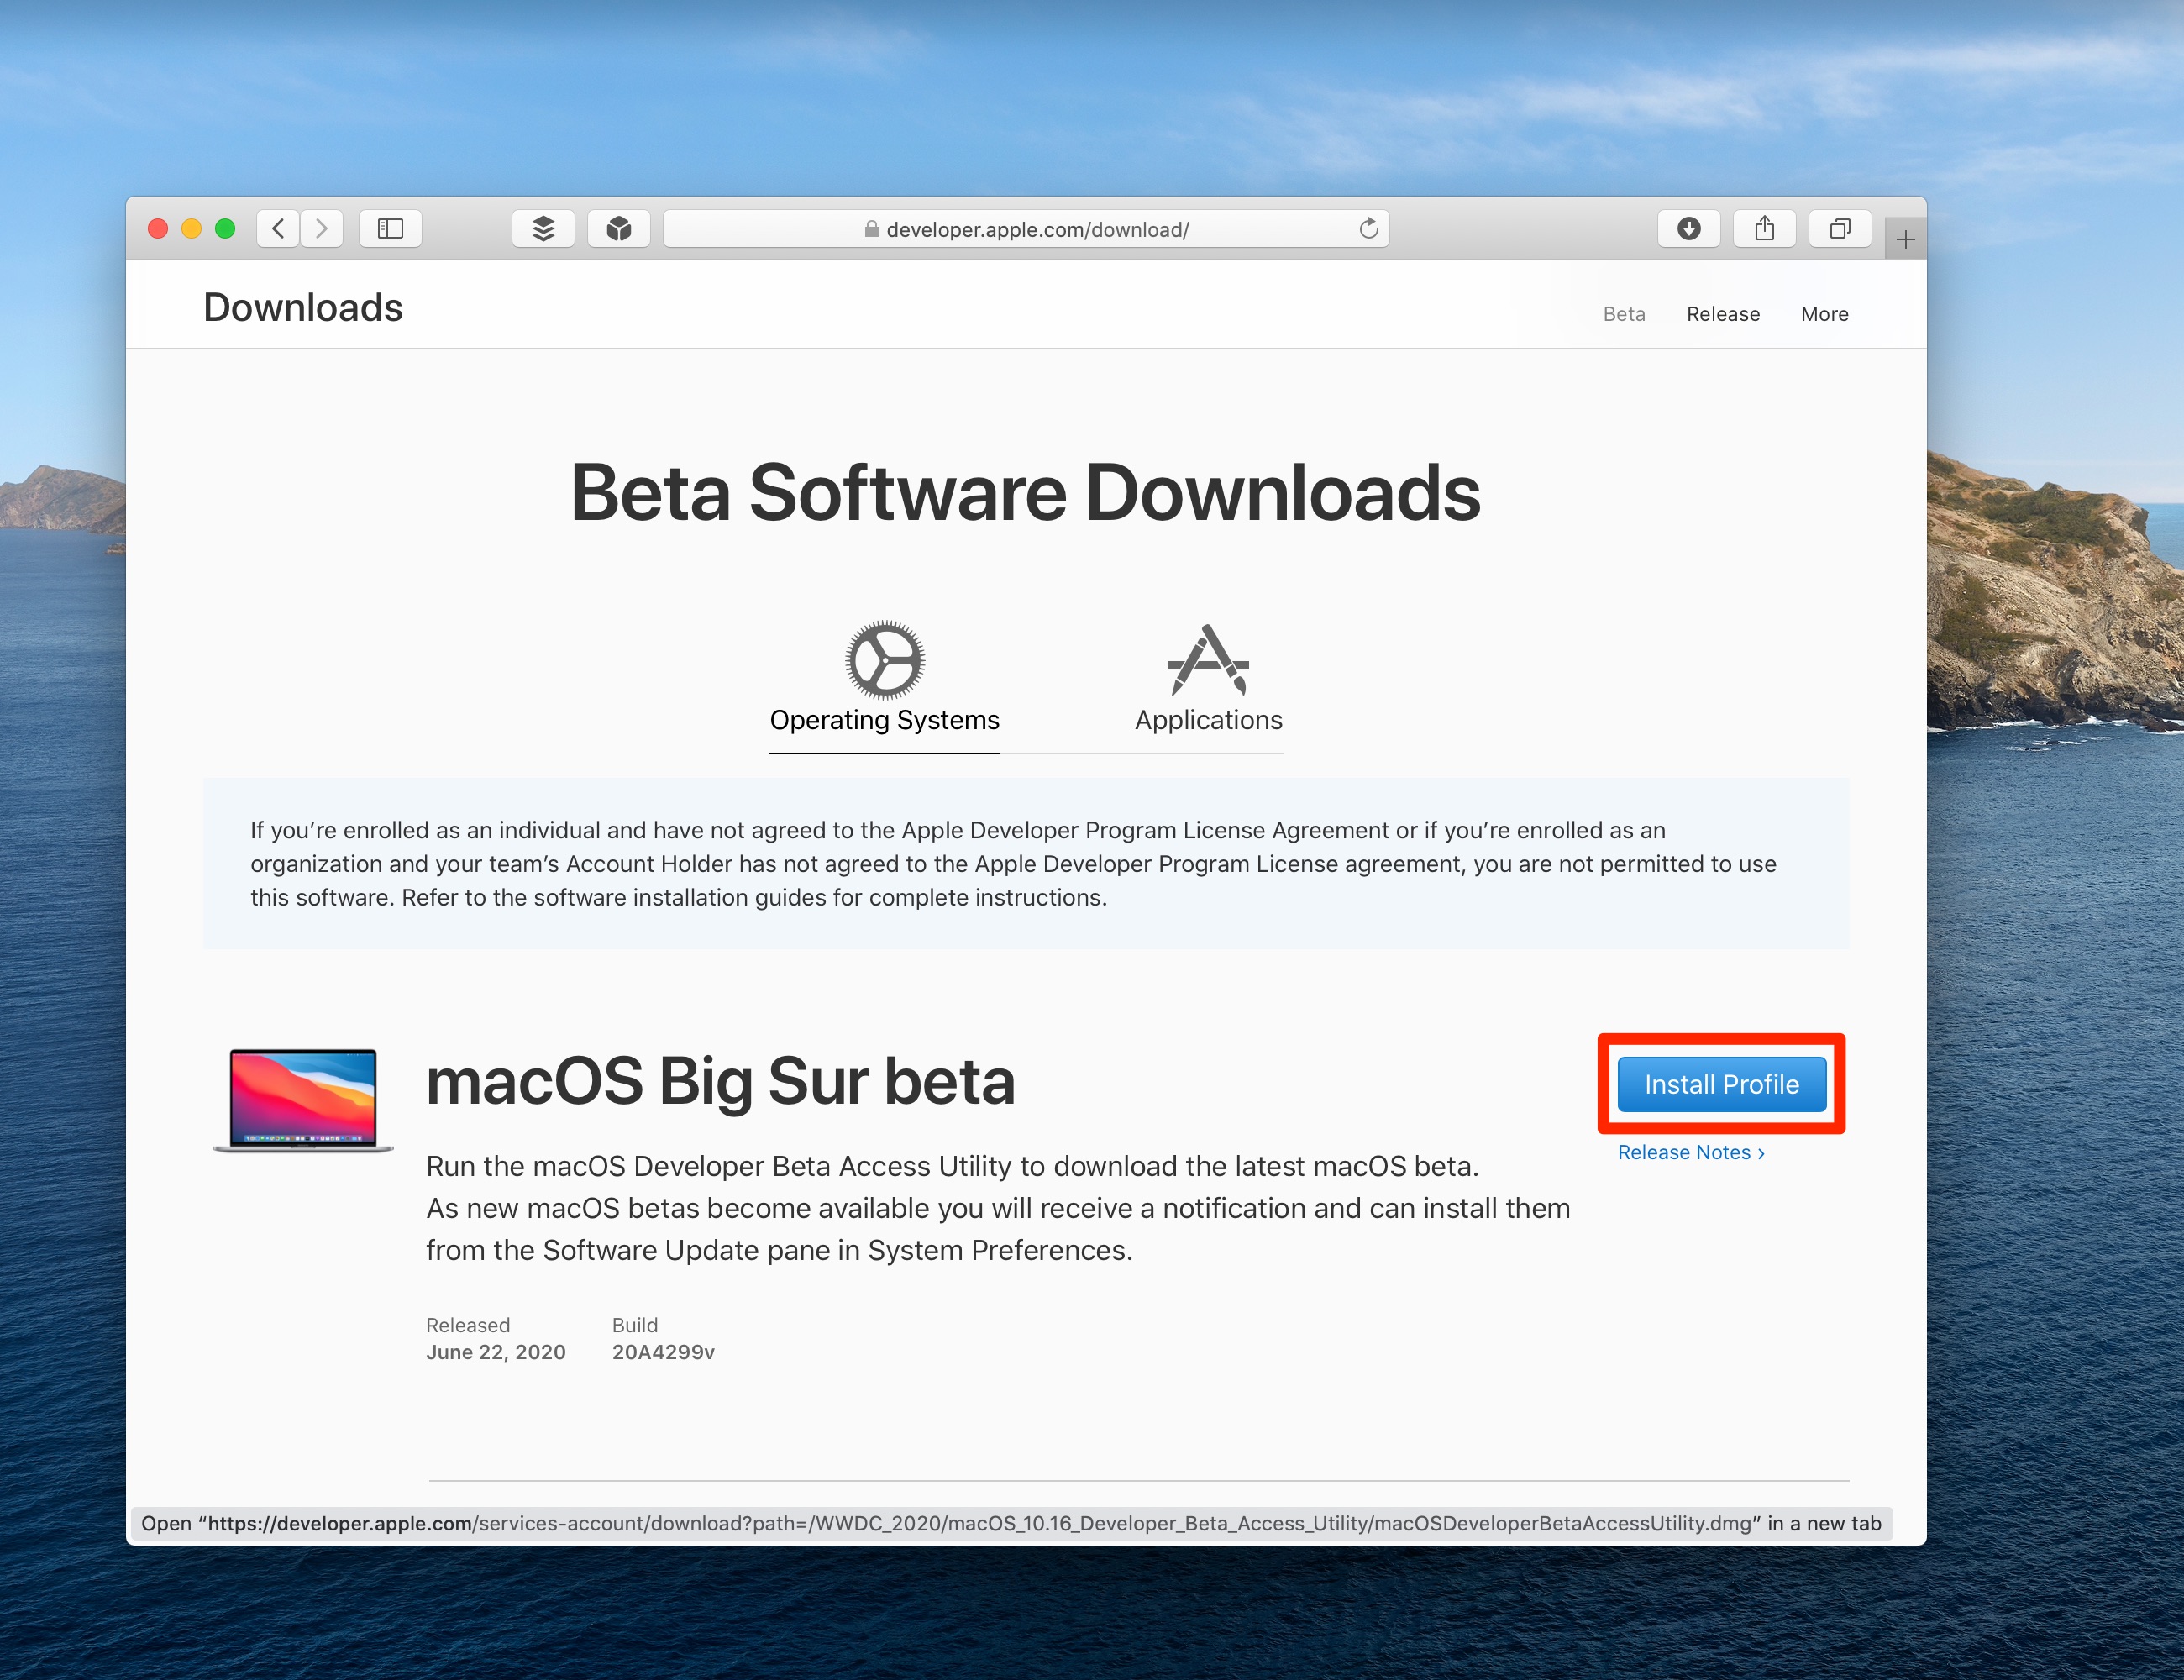
3) Now click the blue Download button near the window’s super-right corner and sign in with your Apple ID user name and password when asked. You can also visit the Downloads section directly, by pointing your browser at developer.apple.com/download.
4) Click the heading Operating Systems near the top of the page.
5) Click the blue Install Profile button next to the macOS Big Sur beta heading.
This will download Apple’s special app that will permit you to download the latest macOS beta using the standard Software Update mechanism in System Preferences.
6) If Safari hasn’t automatically opened your download, click the View menu and choose the option Show Downloads, then double-click the entry “macOSDeveloperBetaAccessUtility.dmg” to mount the disk image which has been downloaded into your browser’s Downloads folder.
7) From the mounted disk image, open the file “macOSDeveloperBetaAccessUtility.pkg”.
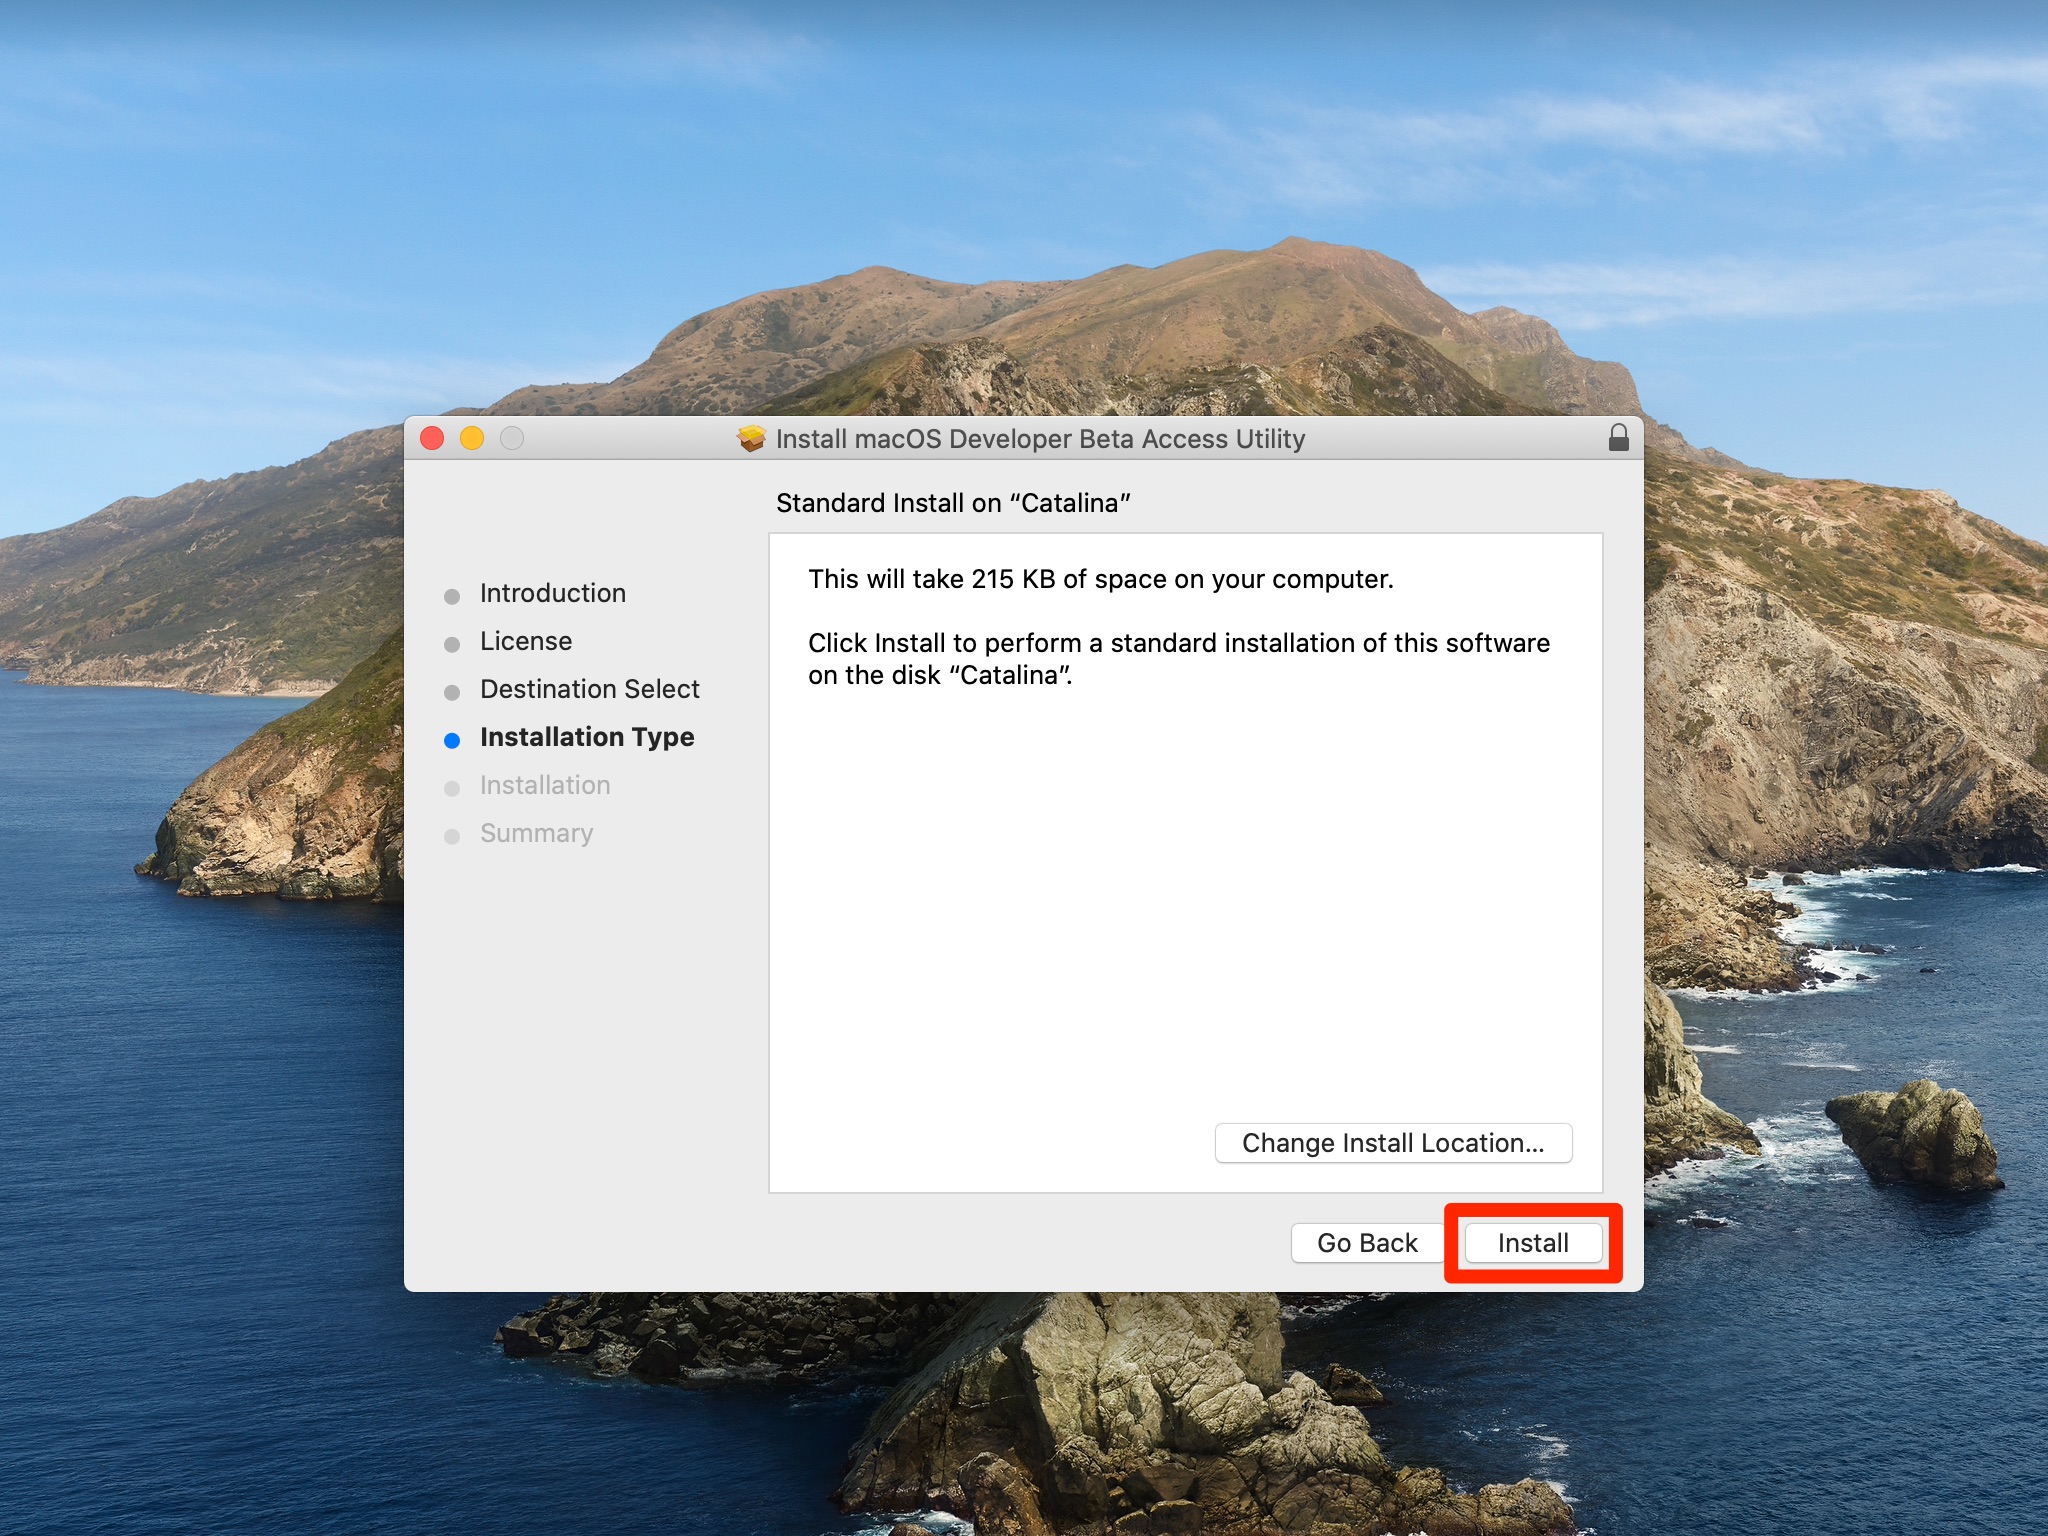
8) Doing so will launch the installer for the utility. Click the Continue button in the Install macOS Developer Beta Access Utility window to continue.
9) Click Continue, then Agree to accept Apple’s software license agreement.
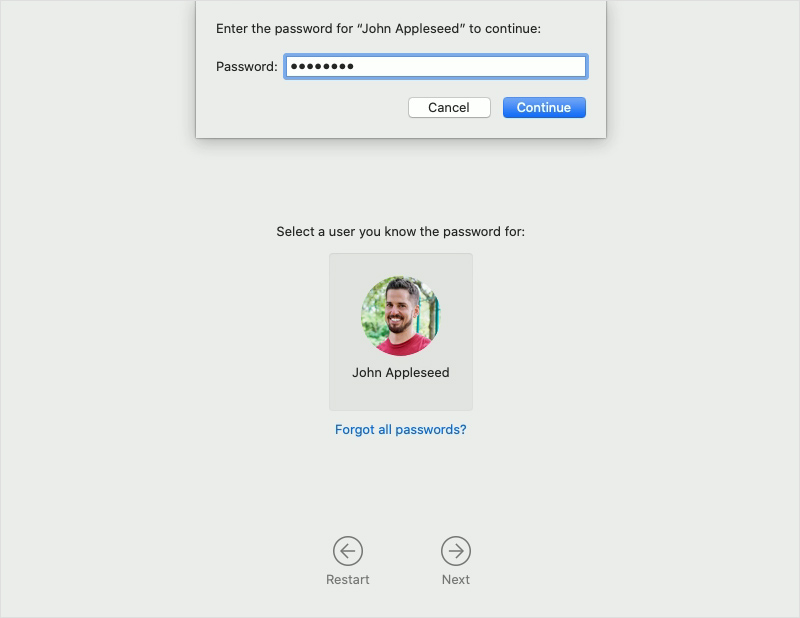
10) Click the Install button and type in your administrative password for this Mac, if asked, then click the Install Software button to continue.
11) Once you see a message saying installation was successful, click the Close button to continue. Optionally click Move to Trash when asked whether you’d like to keep the macOS Developer Beta Access Utility installer or move it to the trash.
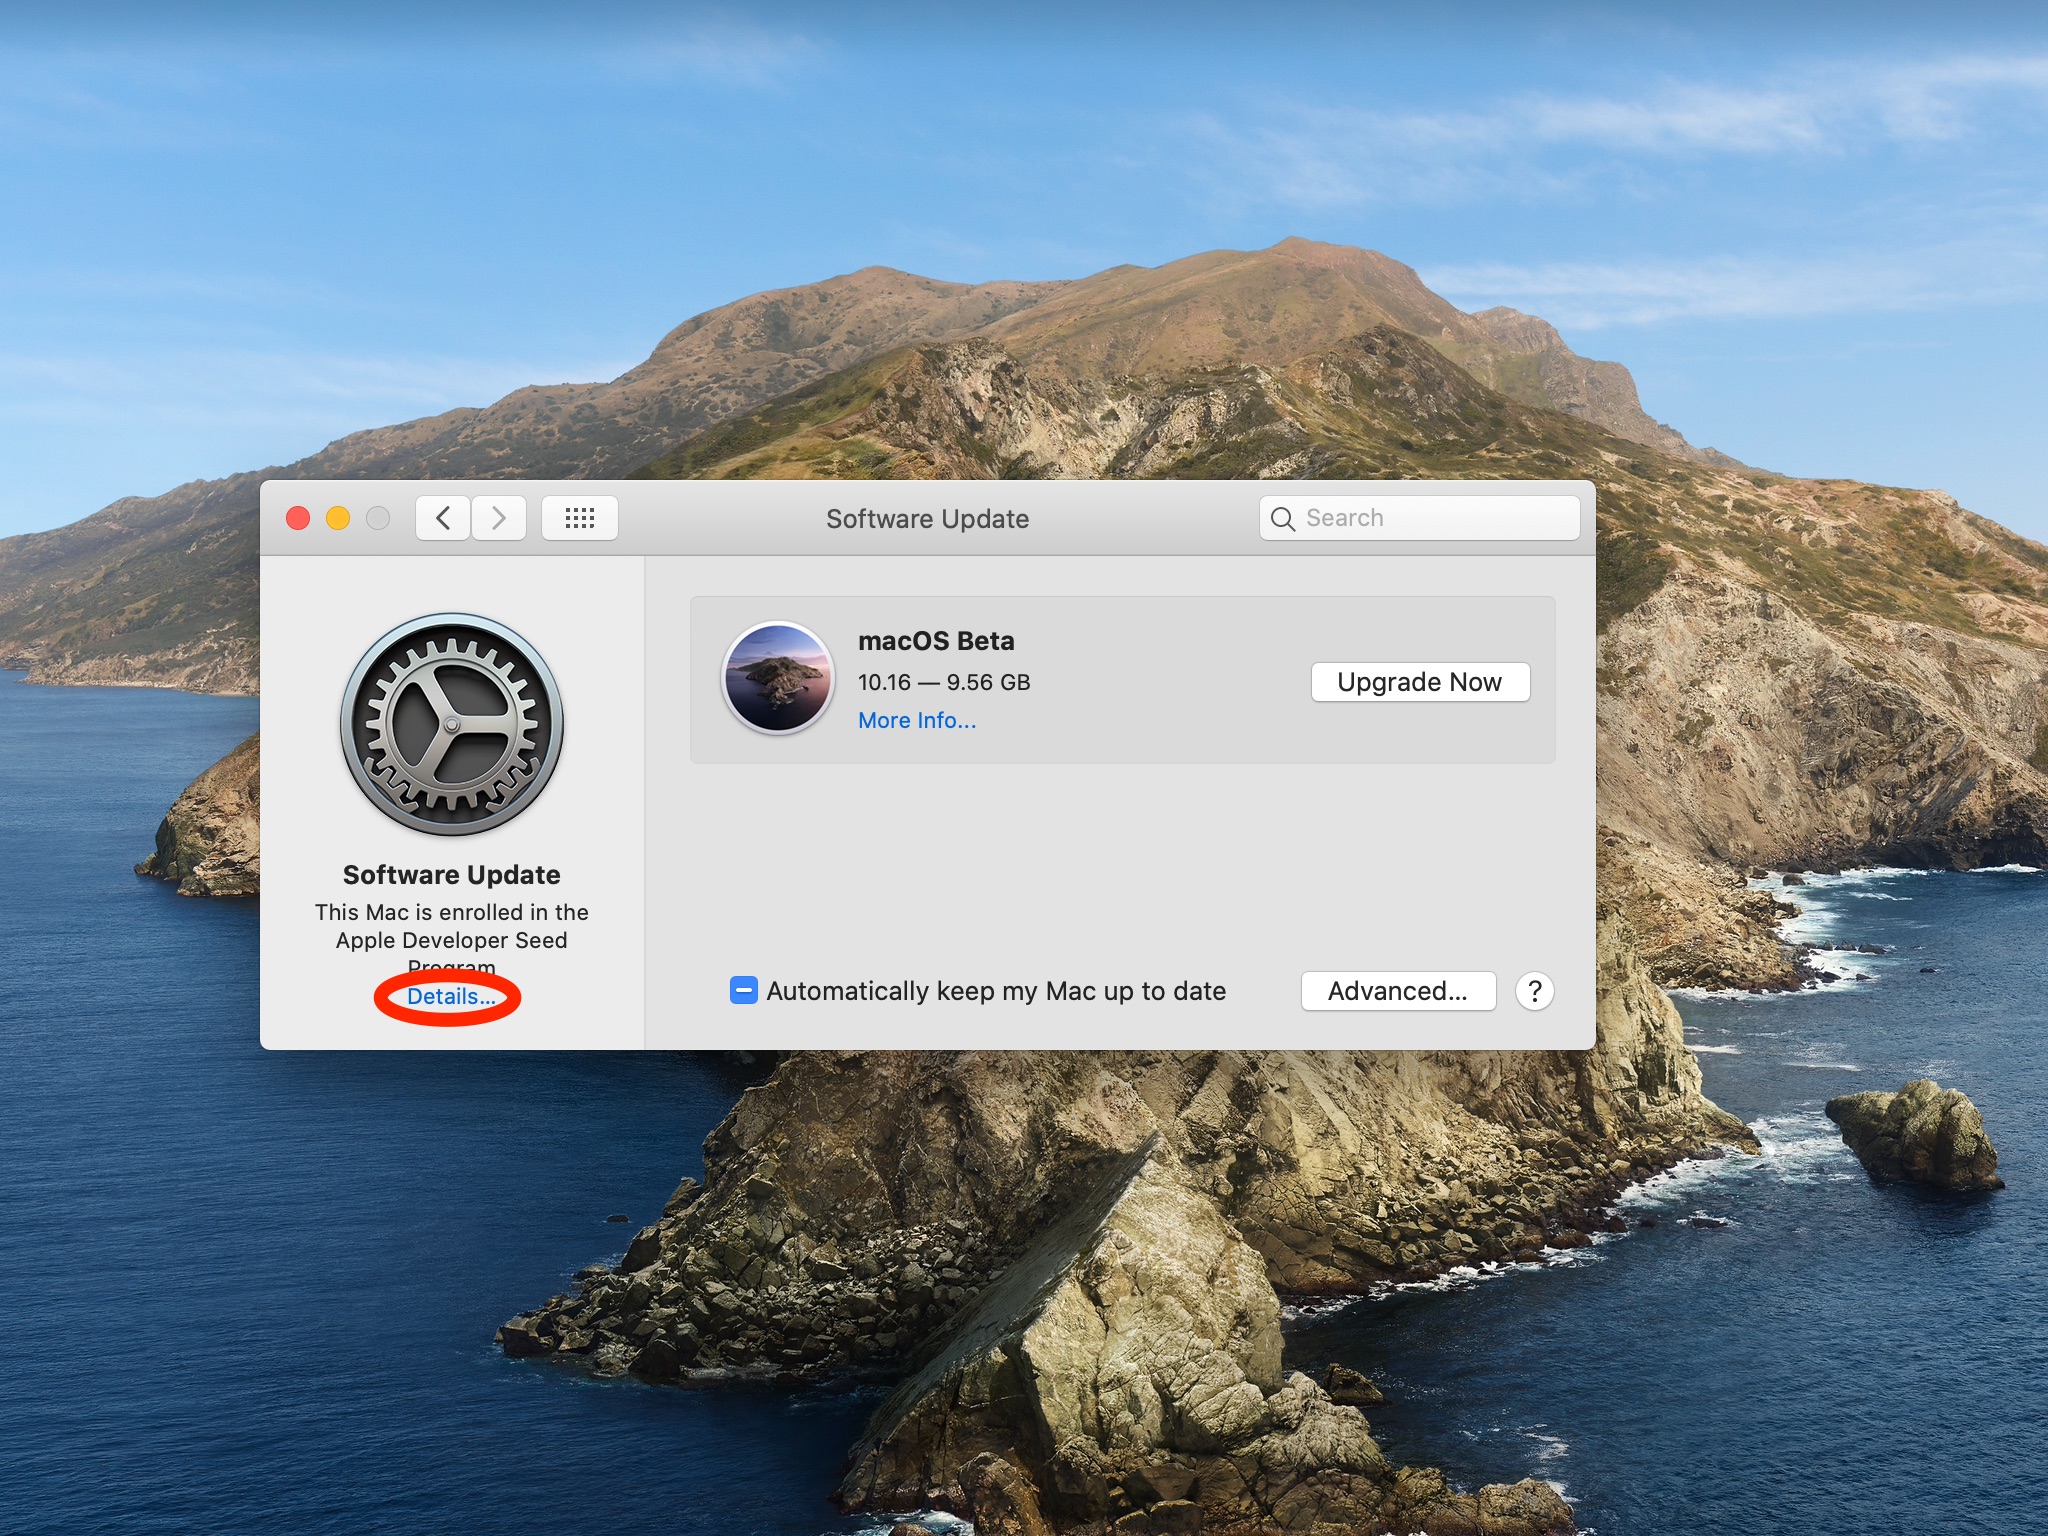
Before the installer quits, it will open the Software Update preferences pane. If not, open it manually by clicking the Apple menu and choose the option System Preferences then choose the Software Update icon from the System Preferences window.

A message below the cog wheel should say that this Mac is now enrolled in the Apple Developer Seed Program, which lets it receive beta software from Apple. After a few seconds, the Software Update window will refresh itself to display the latest arrival, macOS Beta.
12) Click the Upgrade Now to grab the installer and make sure to fix yourself a quick sandwich until the nearly ten-gigabyte file completes downloading to your computer.
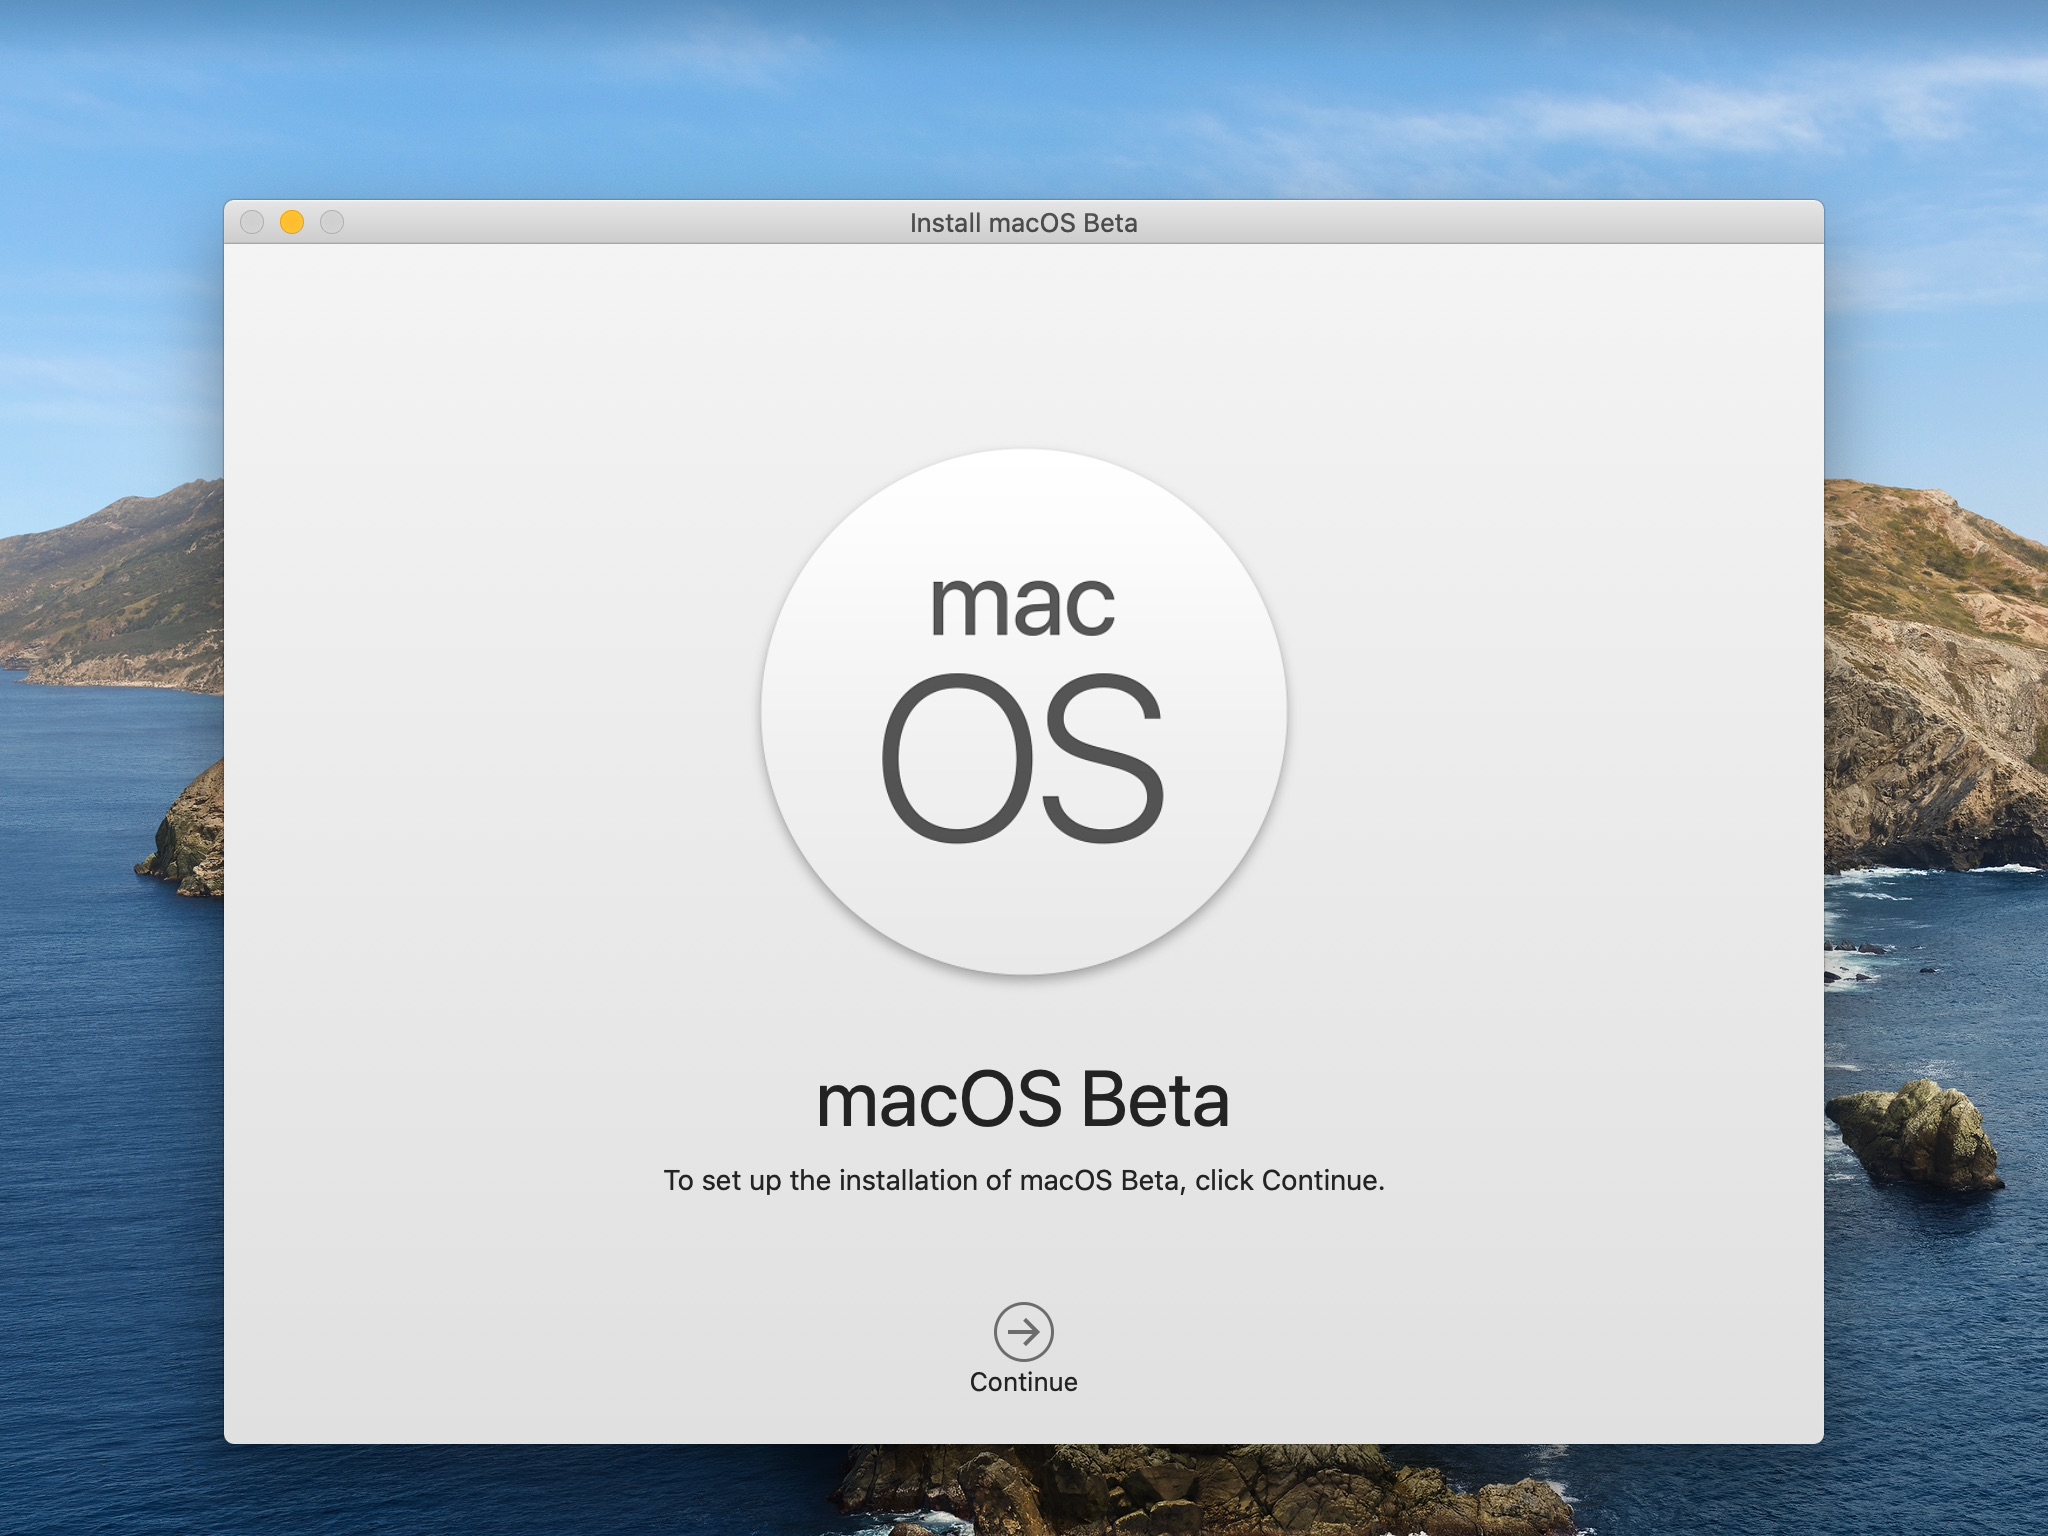
13) With the beta downloaded, your Mac should auto-run the installer and display the Install macOS Beta window. Do not click Continue because we’re not going to install the beta at this point. Instead, quit it without continuing installation by choosing the Quit Install macOS option from the Install macOS Beta menu or press the combination Command (⌘) + Q on your keyboard.
14) With the installer downloaded to the computer, we’re going to switch back to the standard Software Update feature so that your Mac only receives stable software. Switch back to the Software Update preferences pane and click Details below the cog wheel, the click the Restore Defaults button and provide your administrative password in order to confirm that you not longer want this computer to receive beta updates from Apple.
Don’t worry, this will not delete the macOS Beta installer that we’ve downloaded. After a few seconds, the Software Update feature will revert to its default settings.
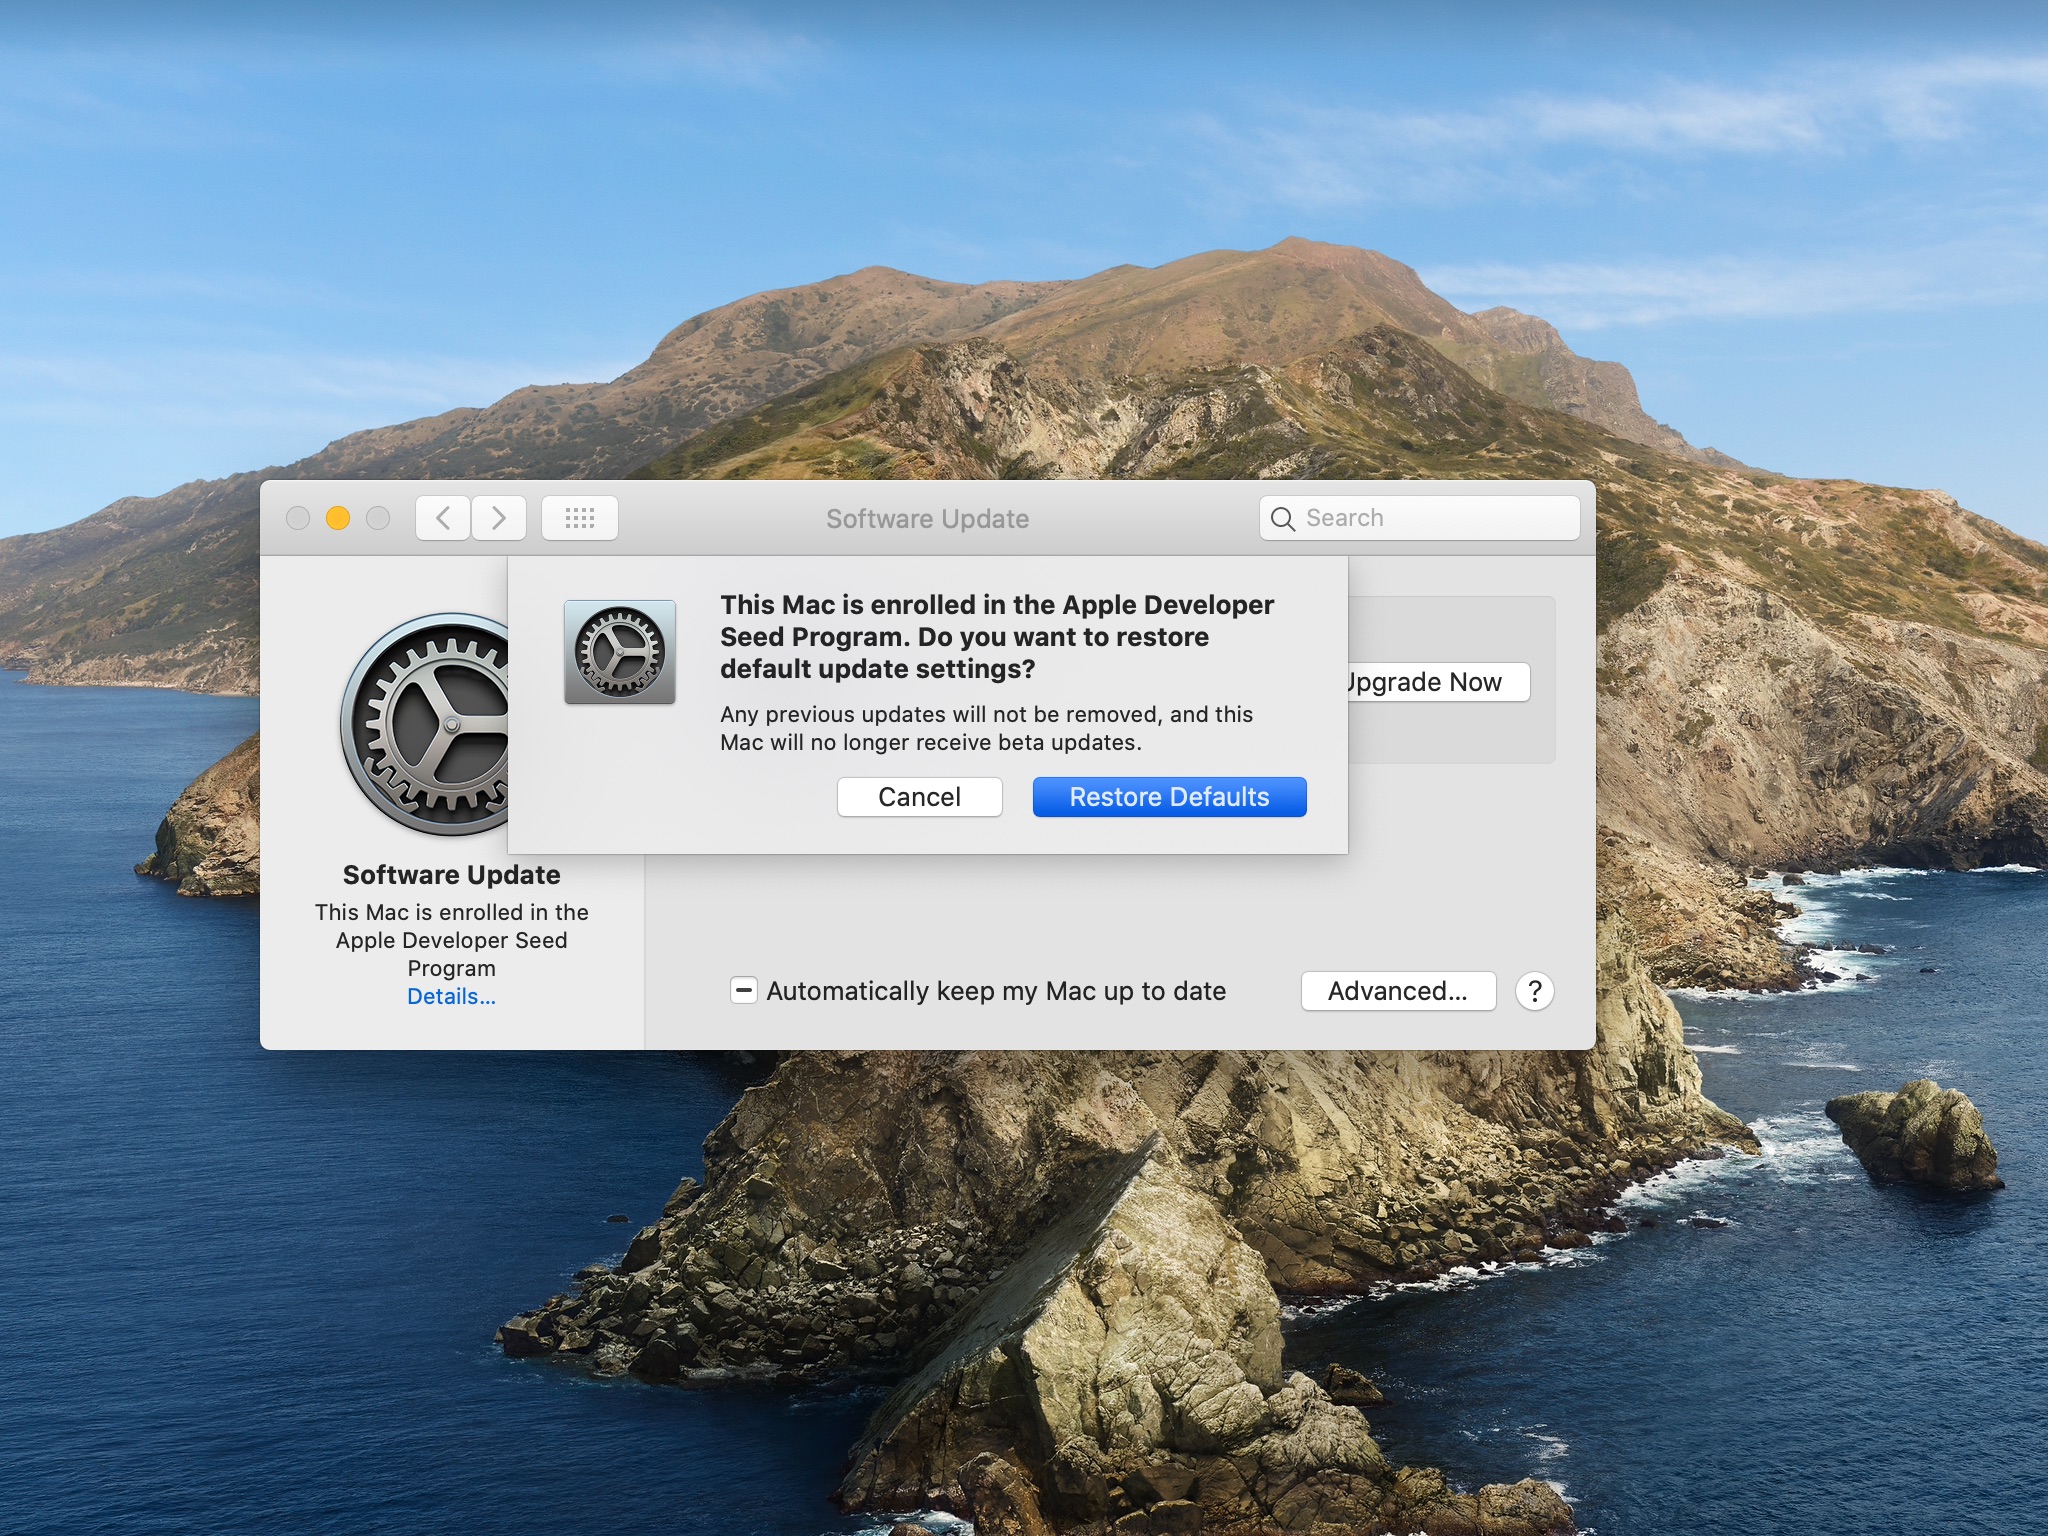
The message below the cog wheel that confirms your computer’s enrollment in the Apple Developer Seed Program should disappear automatically after a few a moment or two.
To verify that the macOS Beta installer has successfully downloaded to your computer, click the desktop and choose the Applications option from the Finder’s Go menu. You should now see the app named “Install macOS Beta.app” in the Applications folder.
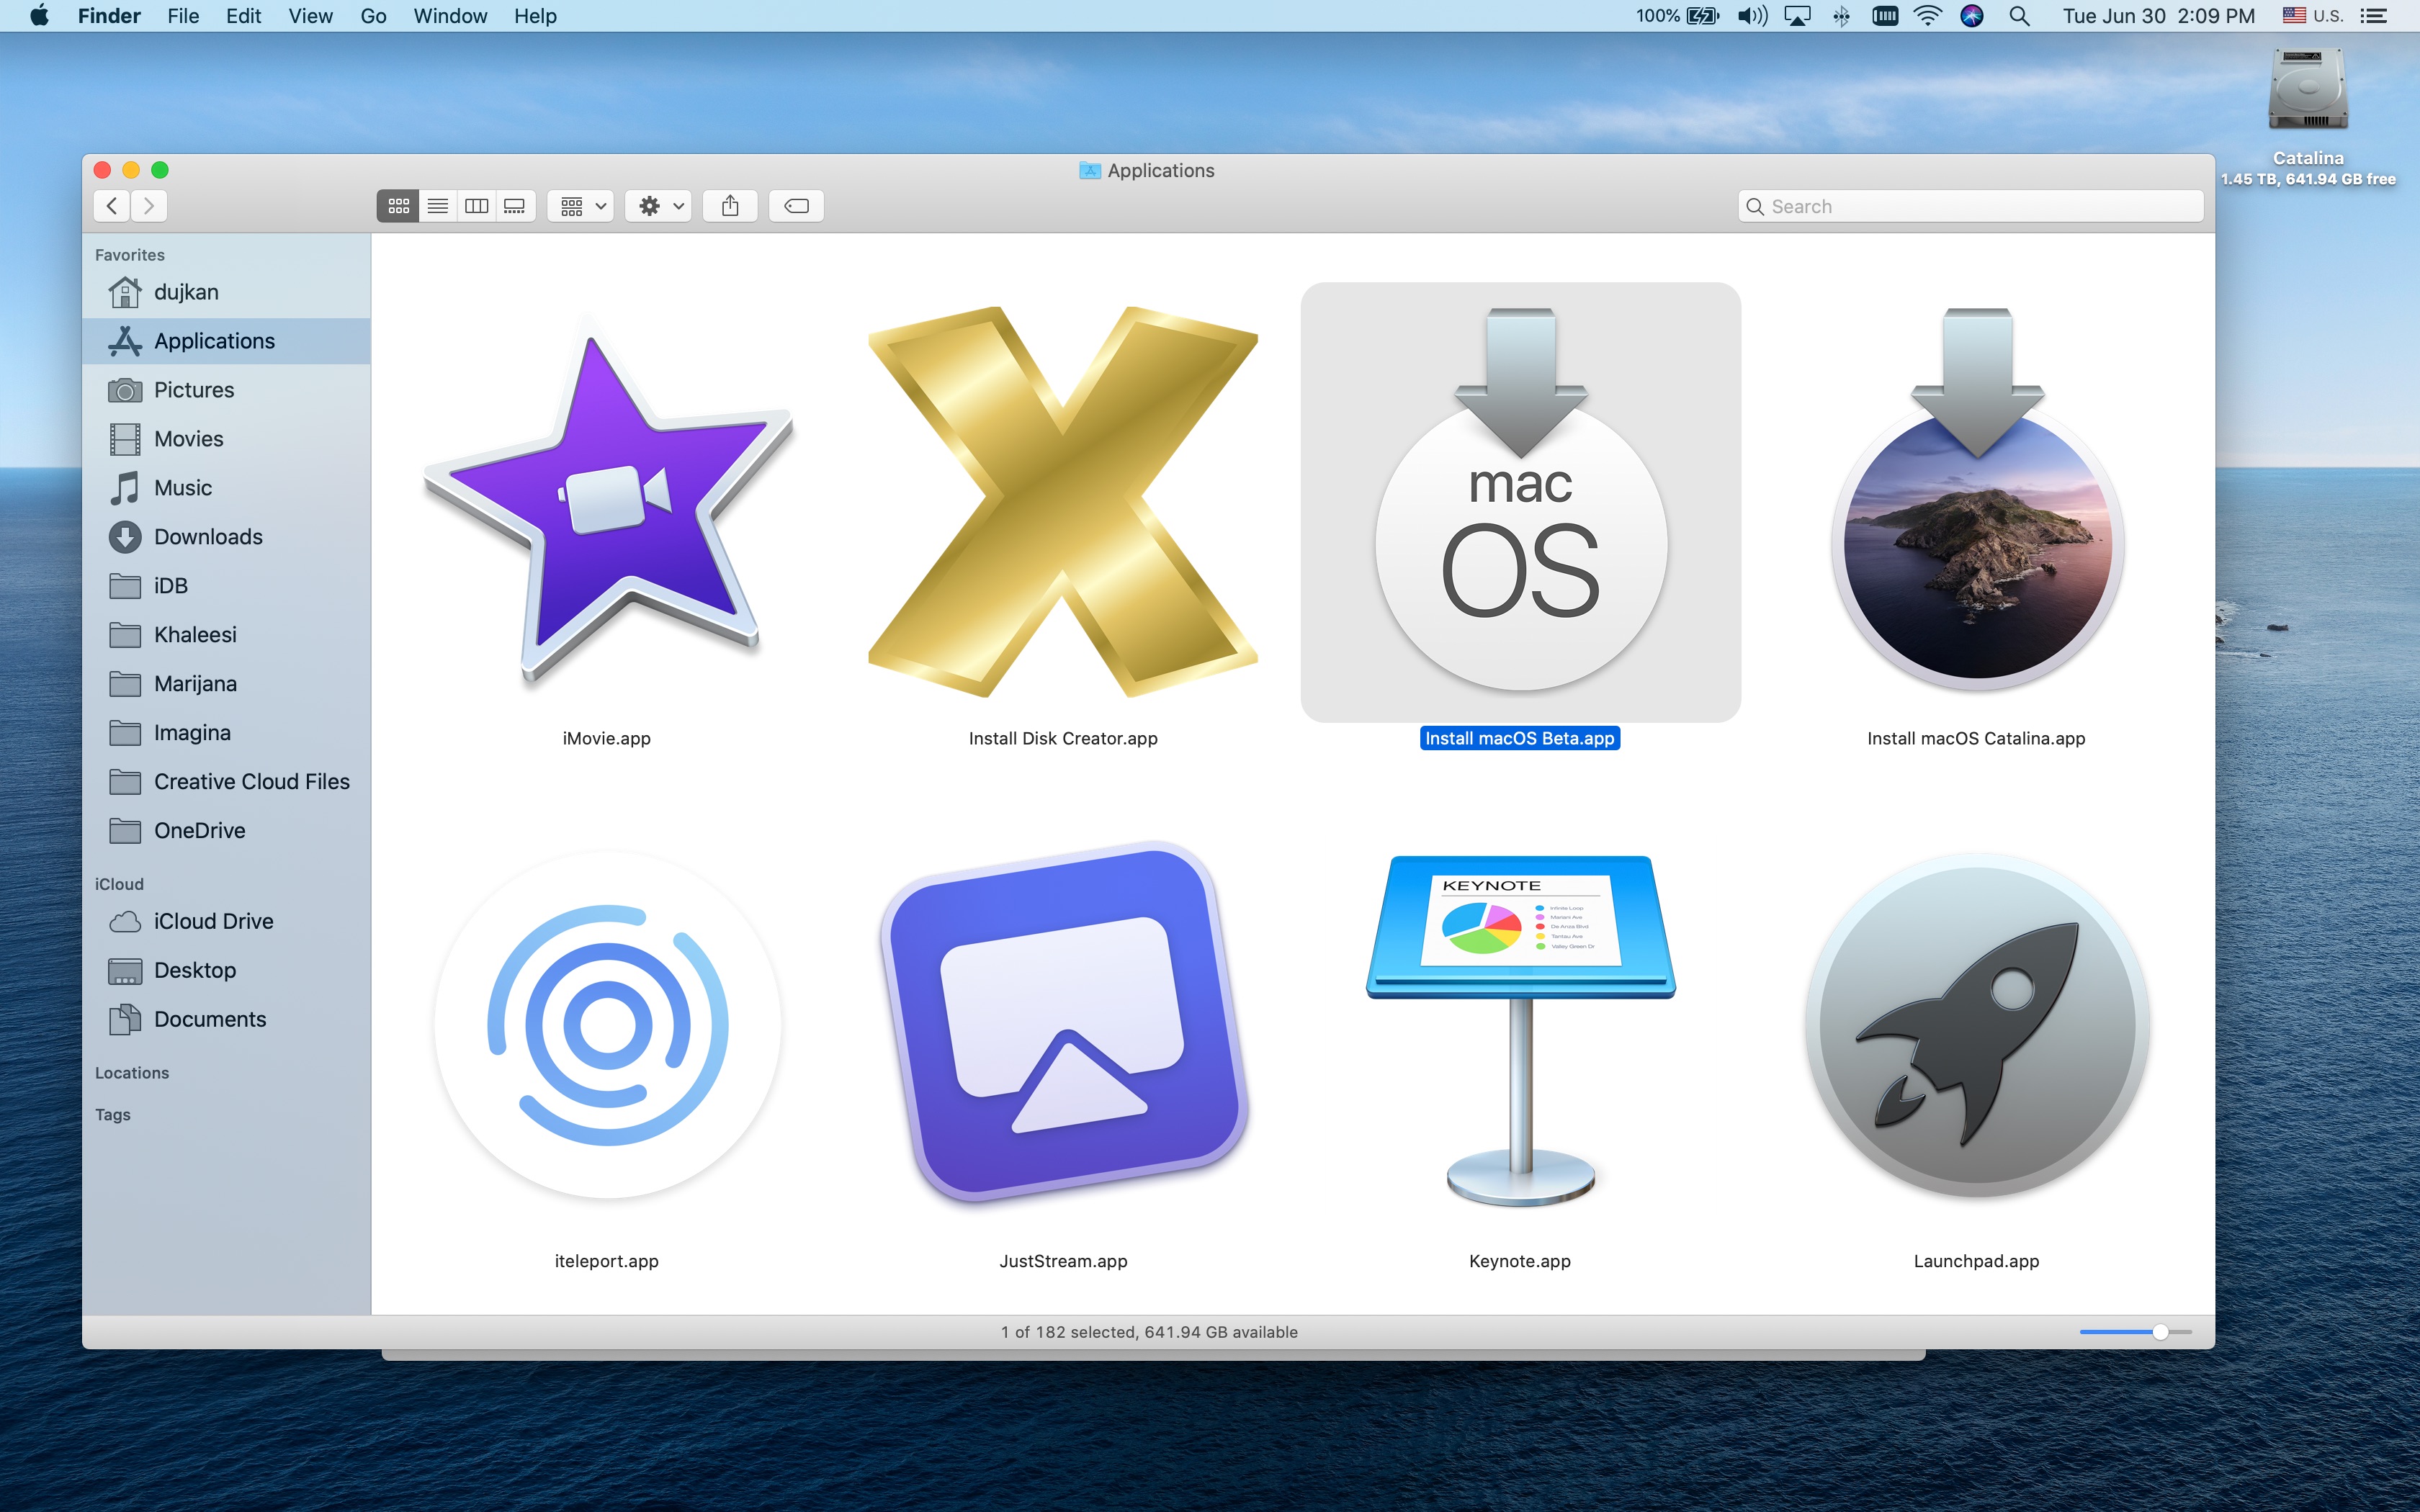
We’ll use the macOS Beta app to create a bootable installer on an external volume
Do not rename or move this file out of the Applications folder because our Terminal script depends on this default location and file name.
How to erase an external drive
Before you can create a bootable installer, you must prepare your USB thumb drive or other external disk by erasing it. Note that you must have at least 16 gigabytes of storage space available on the disk to create a bootable installer.
Follow the steps below to erase your external drive with Disk Utility:
1) Launch Disk Utility via Spotlight or the Applications/Utilities folder.
2) Plug your USB or other external drive and wait a few seconds, then select the mounted disk in the Disk Utility sidebar underneath the heading External.
3) Choose the option Erase from the Disk Utility toolbar near the window top.
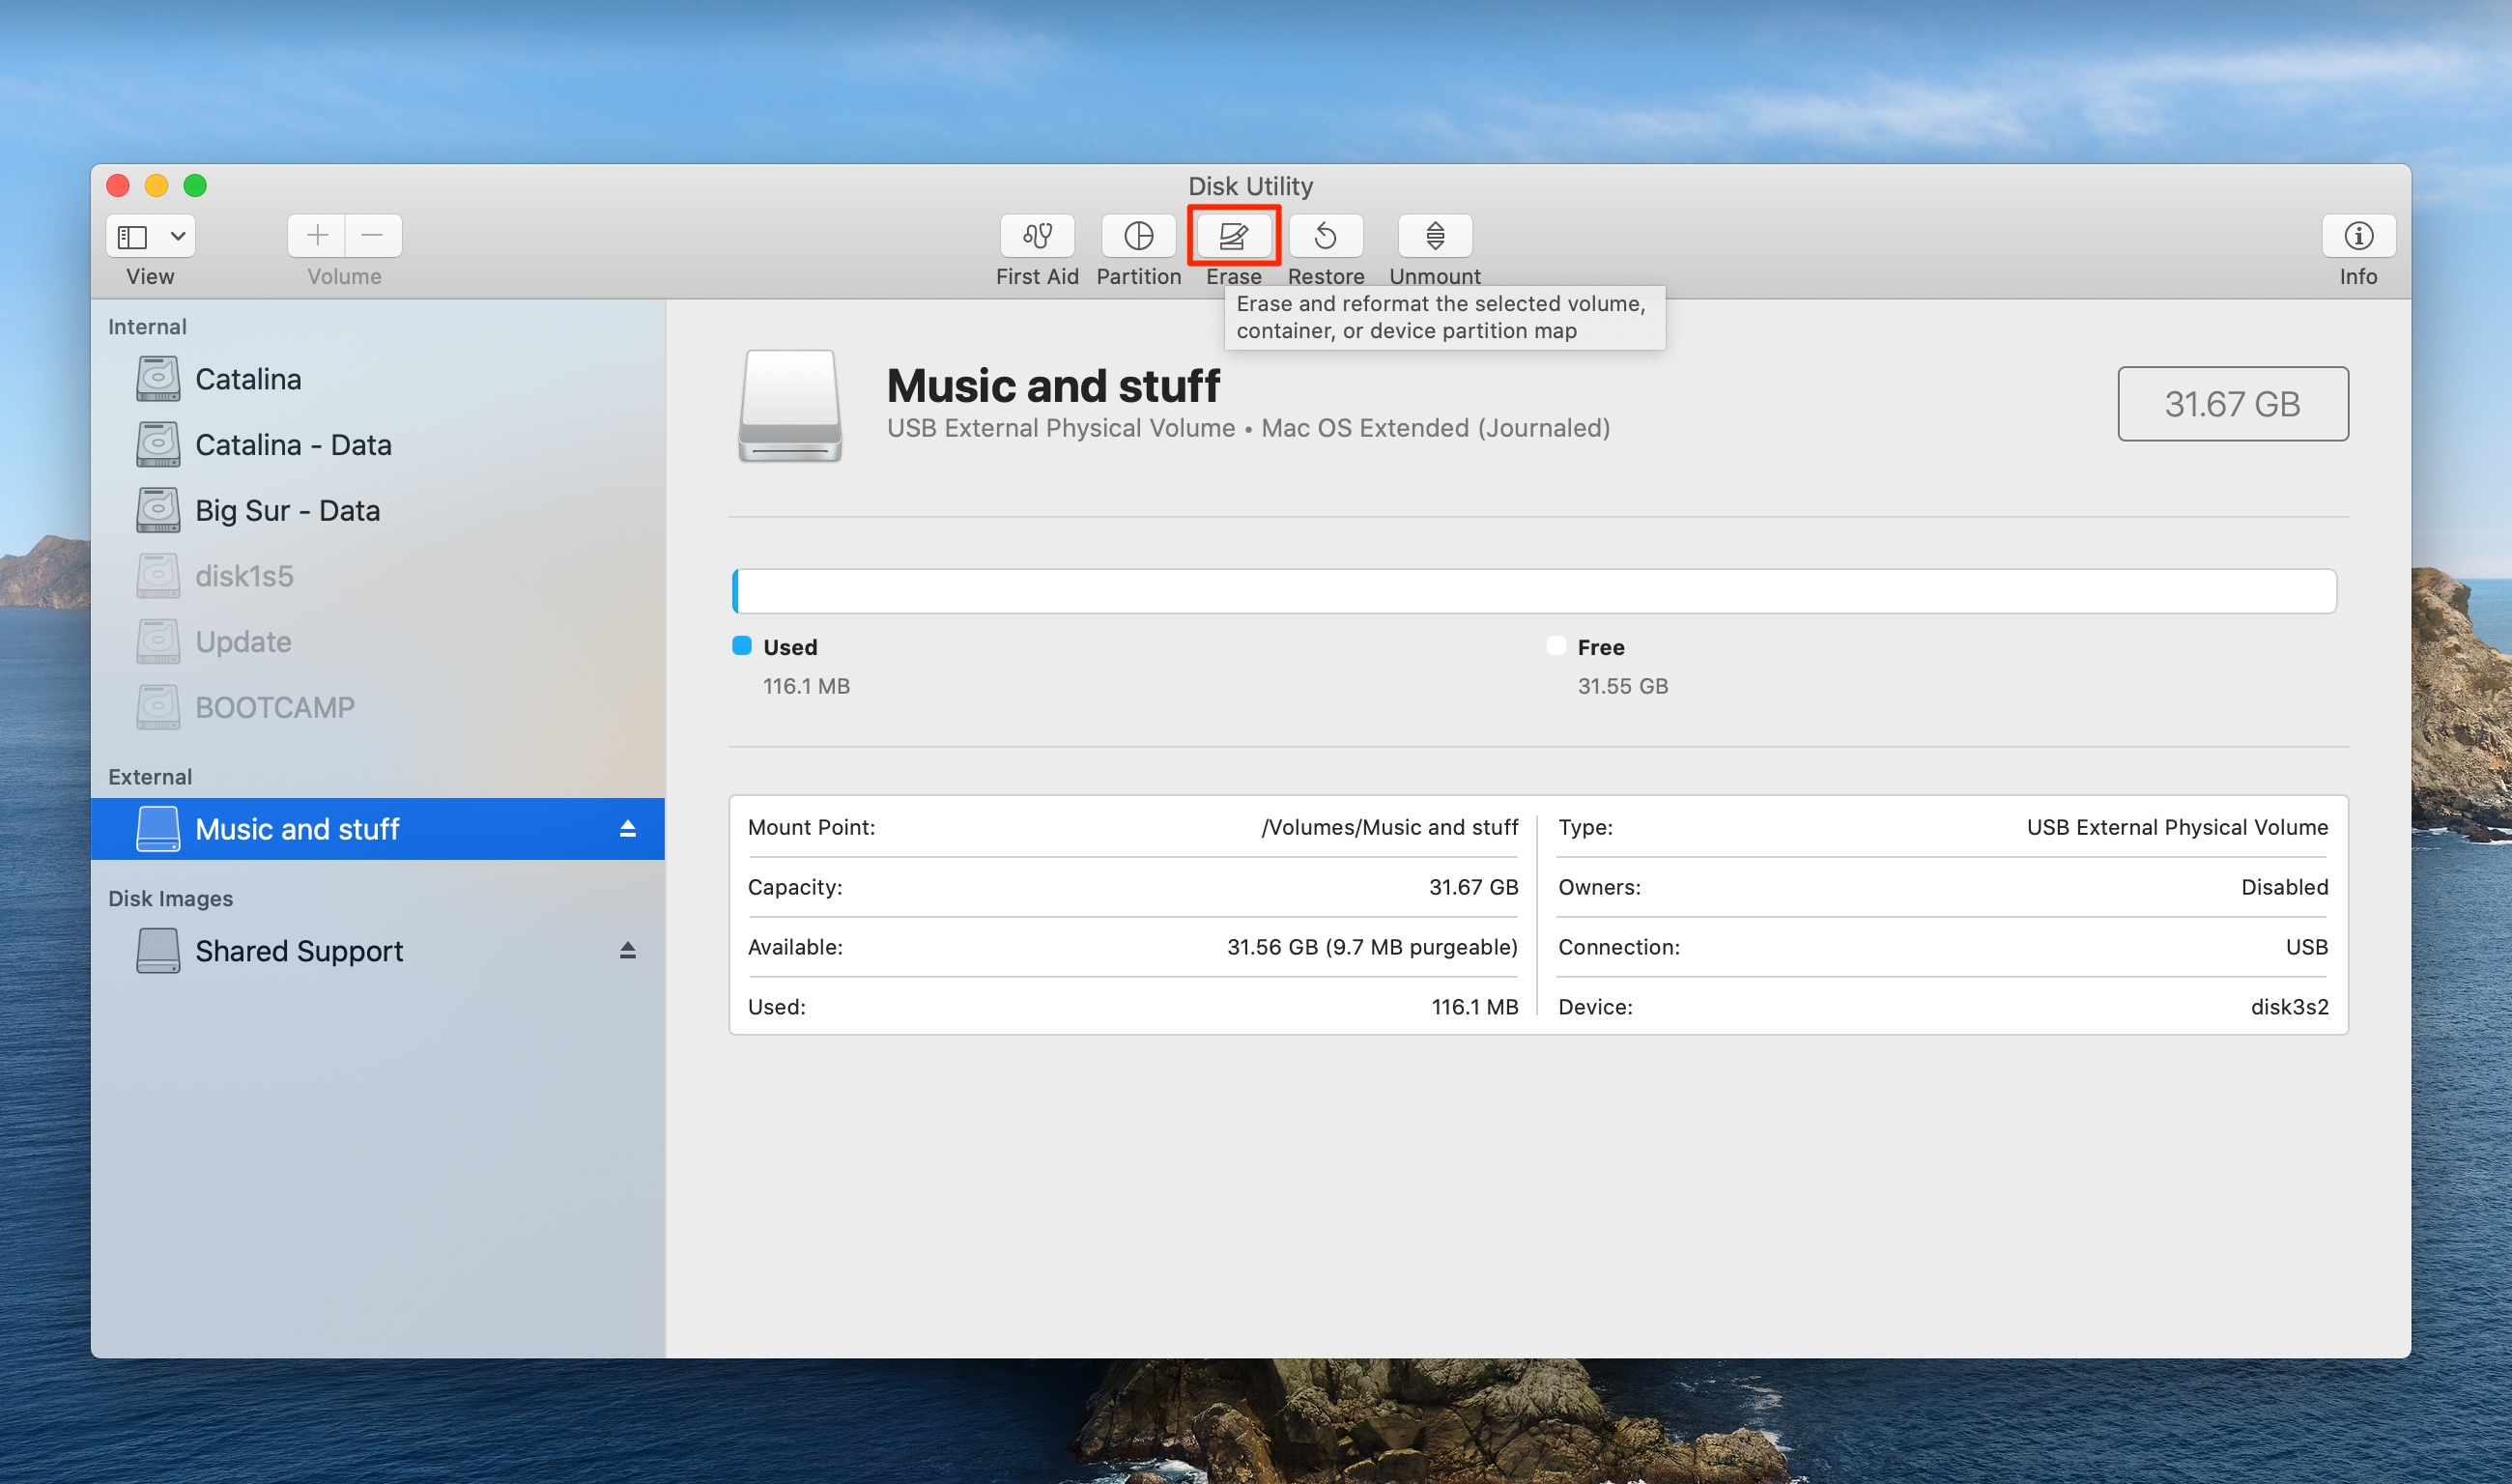
Erasing the disk permanently deletes all of its files
4) Type “Untitled” in the Name field and select Mac OS Extended (Journaled) next to the Format popup menu, then click the Erase button. Do net set the disk format to APFS because you won’t be able to create a bootable installer with it.
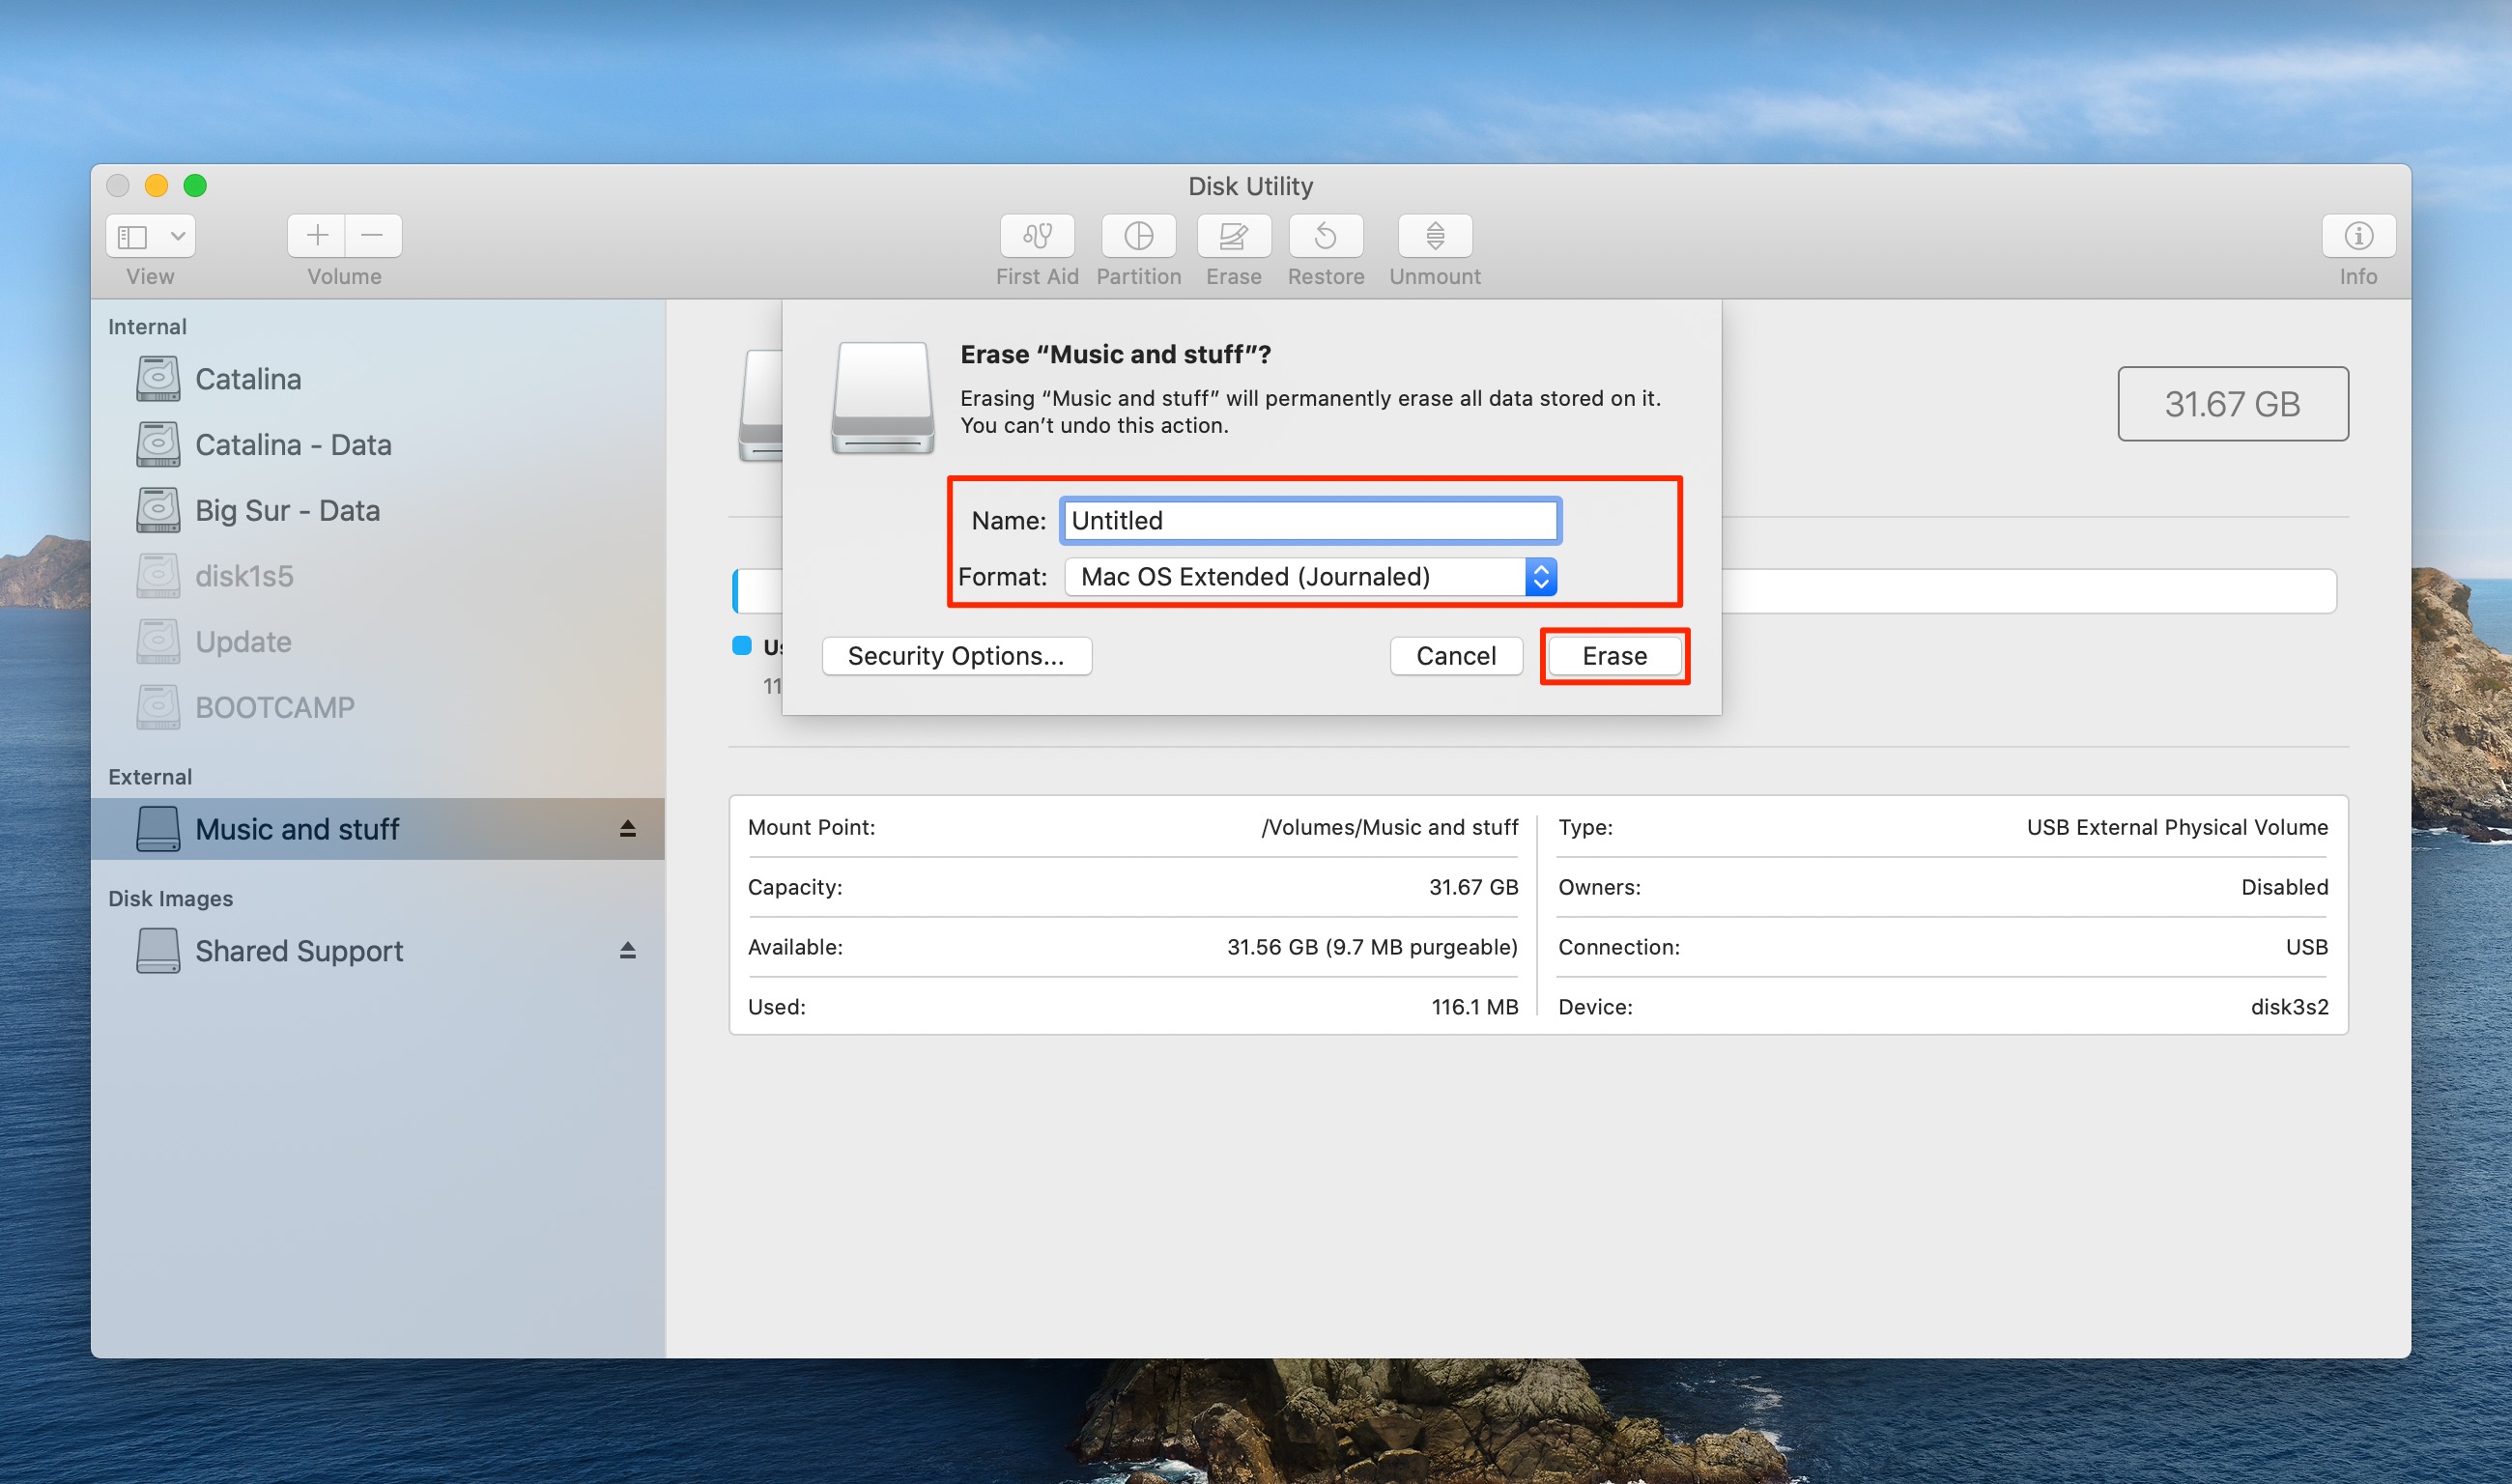
Do not change these options
This will wipe the disk clean, permanently erasing all data stored on it. Click Done when prompted to finish erasing the disk, which should now appear on the desktop.
How to create a bootable MacOS Big Sur beta installer
You can create a bootable installer for the macOS Big Sur beta with a little help from the handy “createinstallmedia” command in Terminal. Without further ado, follow the step-by-step tutorial right ahead that will guide you through creating a macOS Big Sur bootable installer in Terminal:
1) Plug in your USB thumb drive or other external drive into your Mac.
2) Launch Disk Utility via Spotlight, select your disk in the sidebar and use the Erase option with the parameters detailed in the section “How to erase your external drive”.

Be sure to set the formatting scheme to either APFS or Mac OS Extended (Journaled). The disk name must be “Untitled” or the Terminal command won’t work.
3) Launch Terminal via Spotlight or your Applications/Utilities folder.
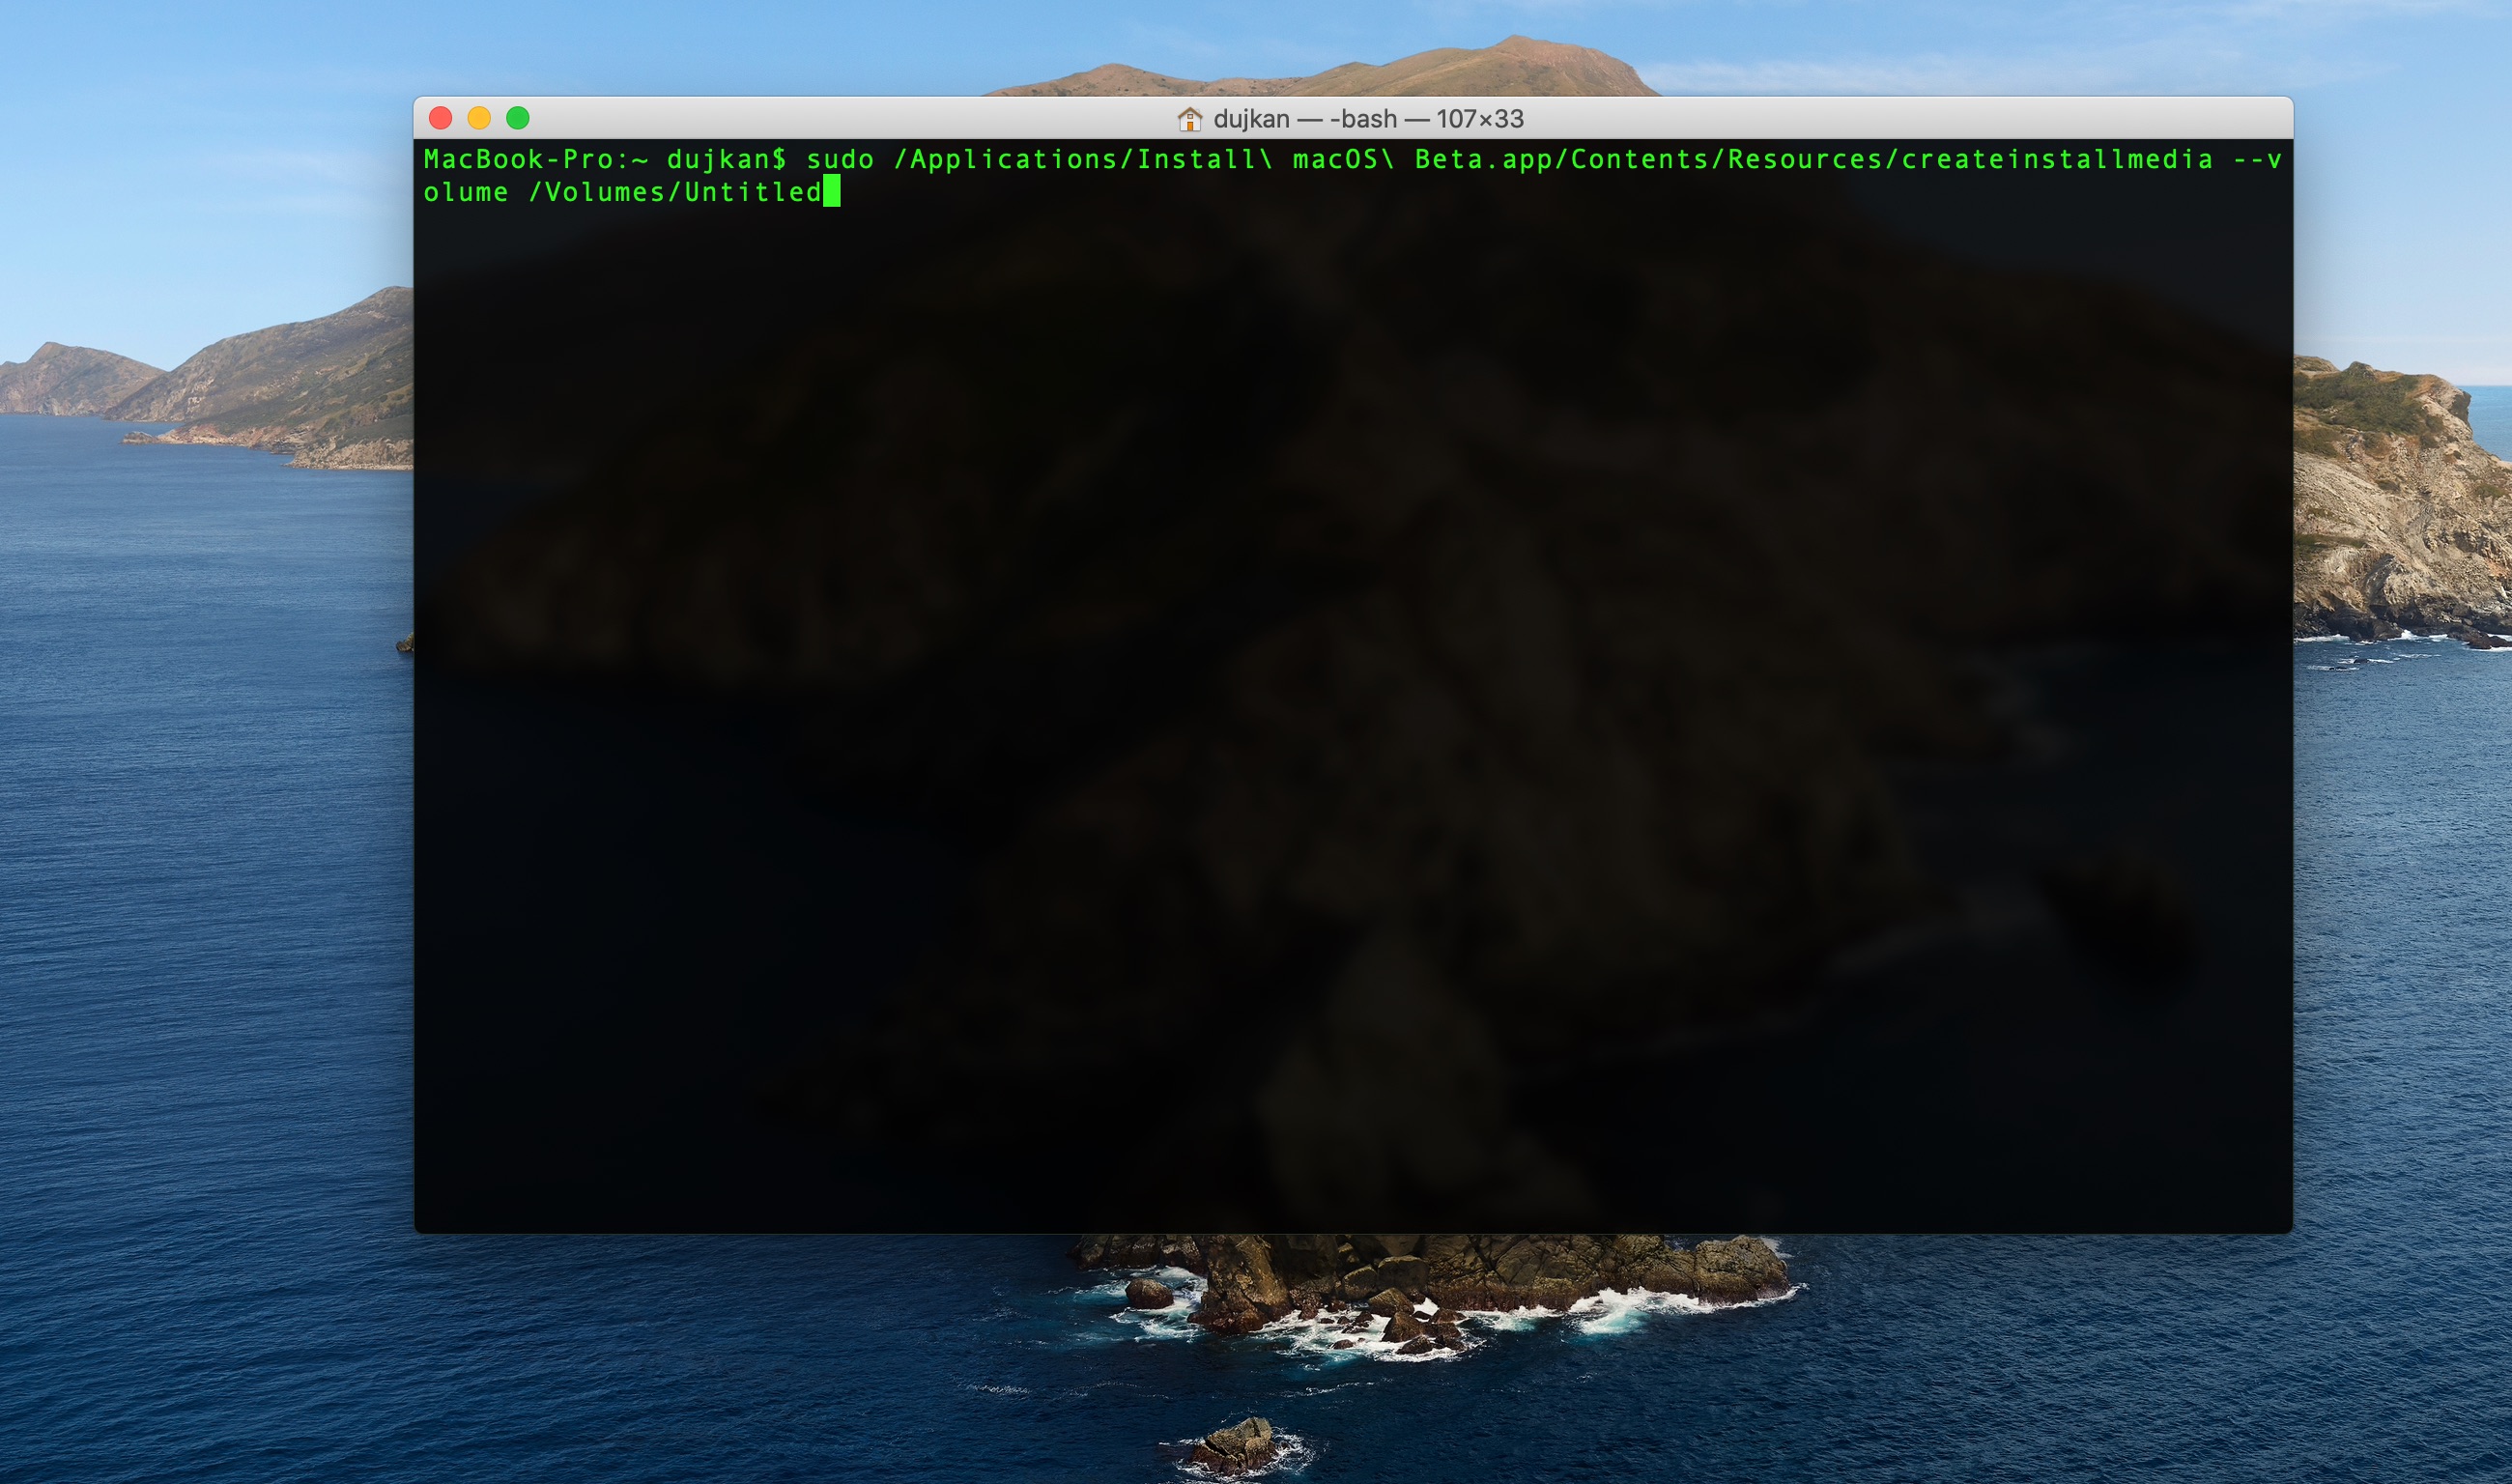
4) Type or paste the following command in the Terminal window:
sudo /Applications/Install macOS Beta.app/Contents/Resources/createinstallmedia --volume /Volumes/Untitled
5) Press Return after typing the command to execute it.
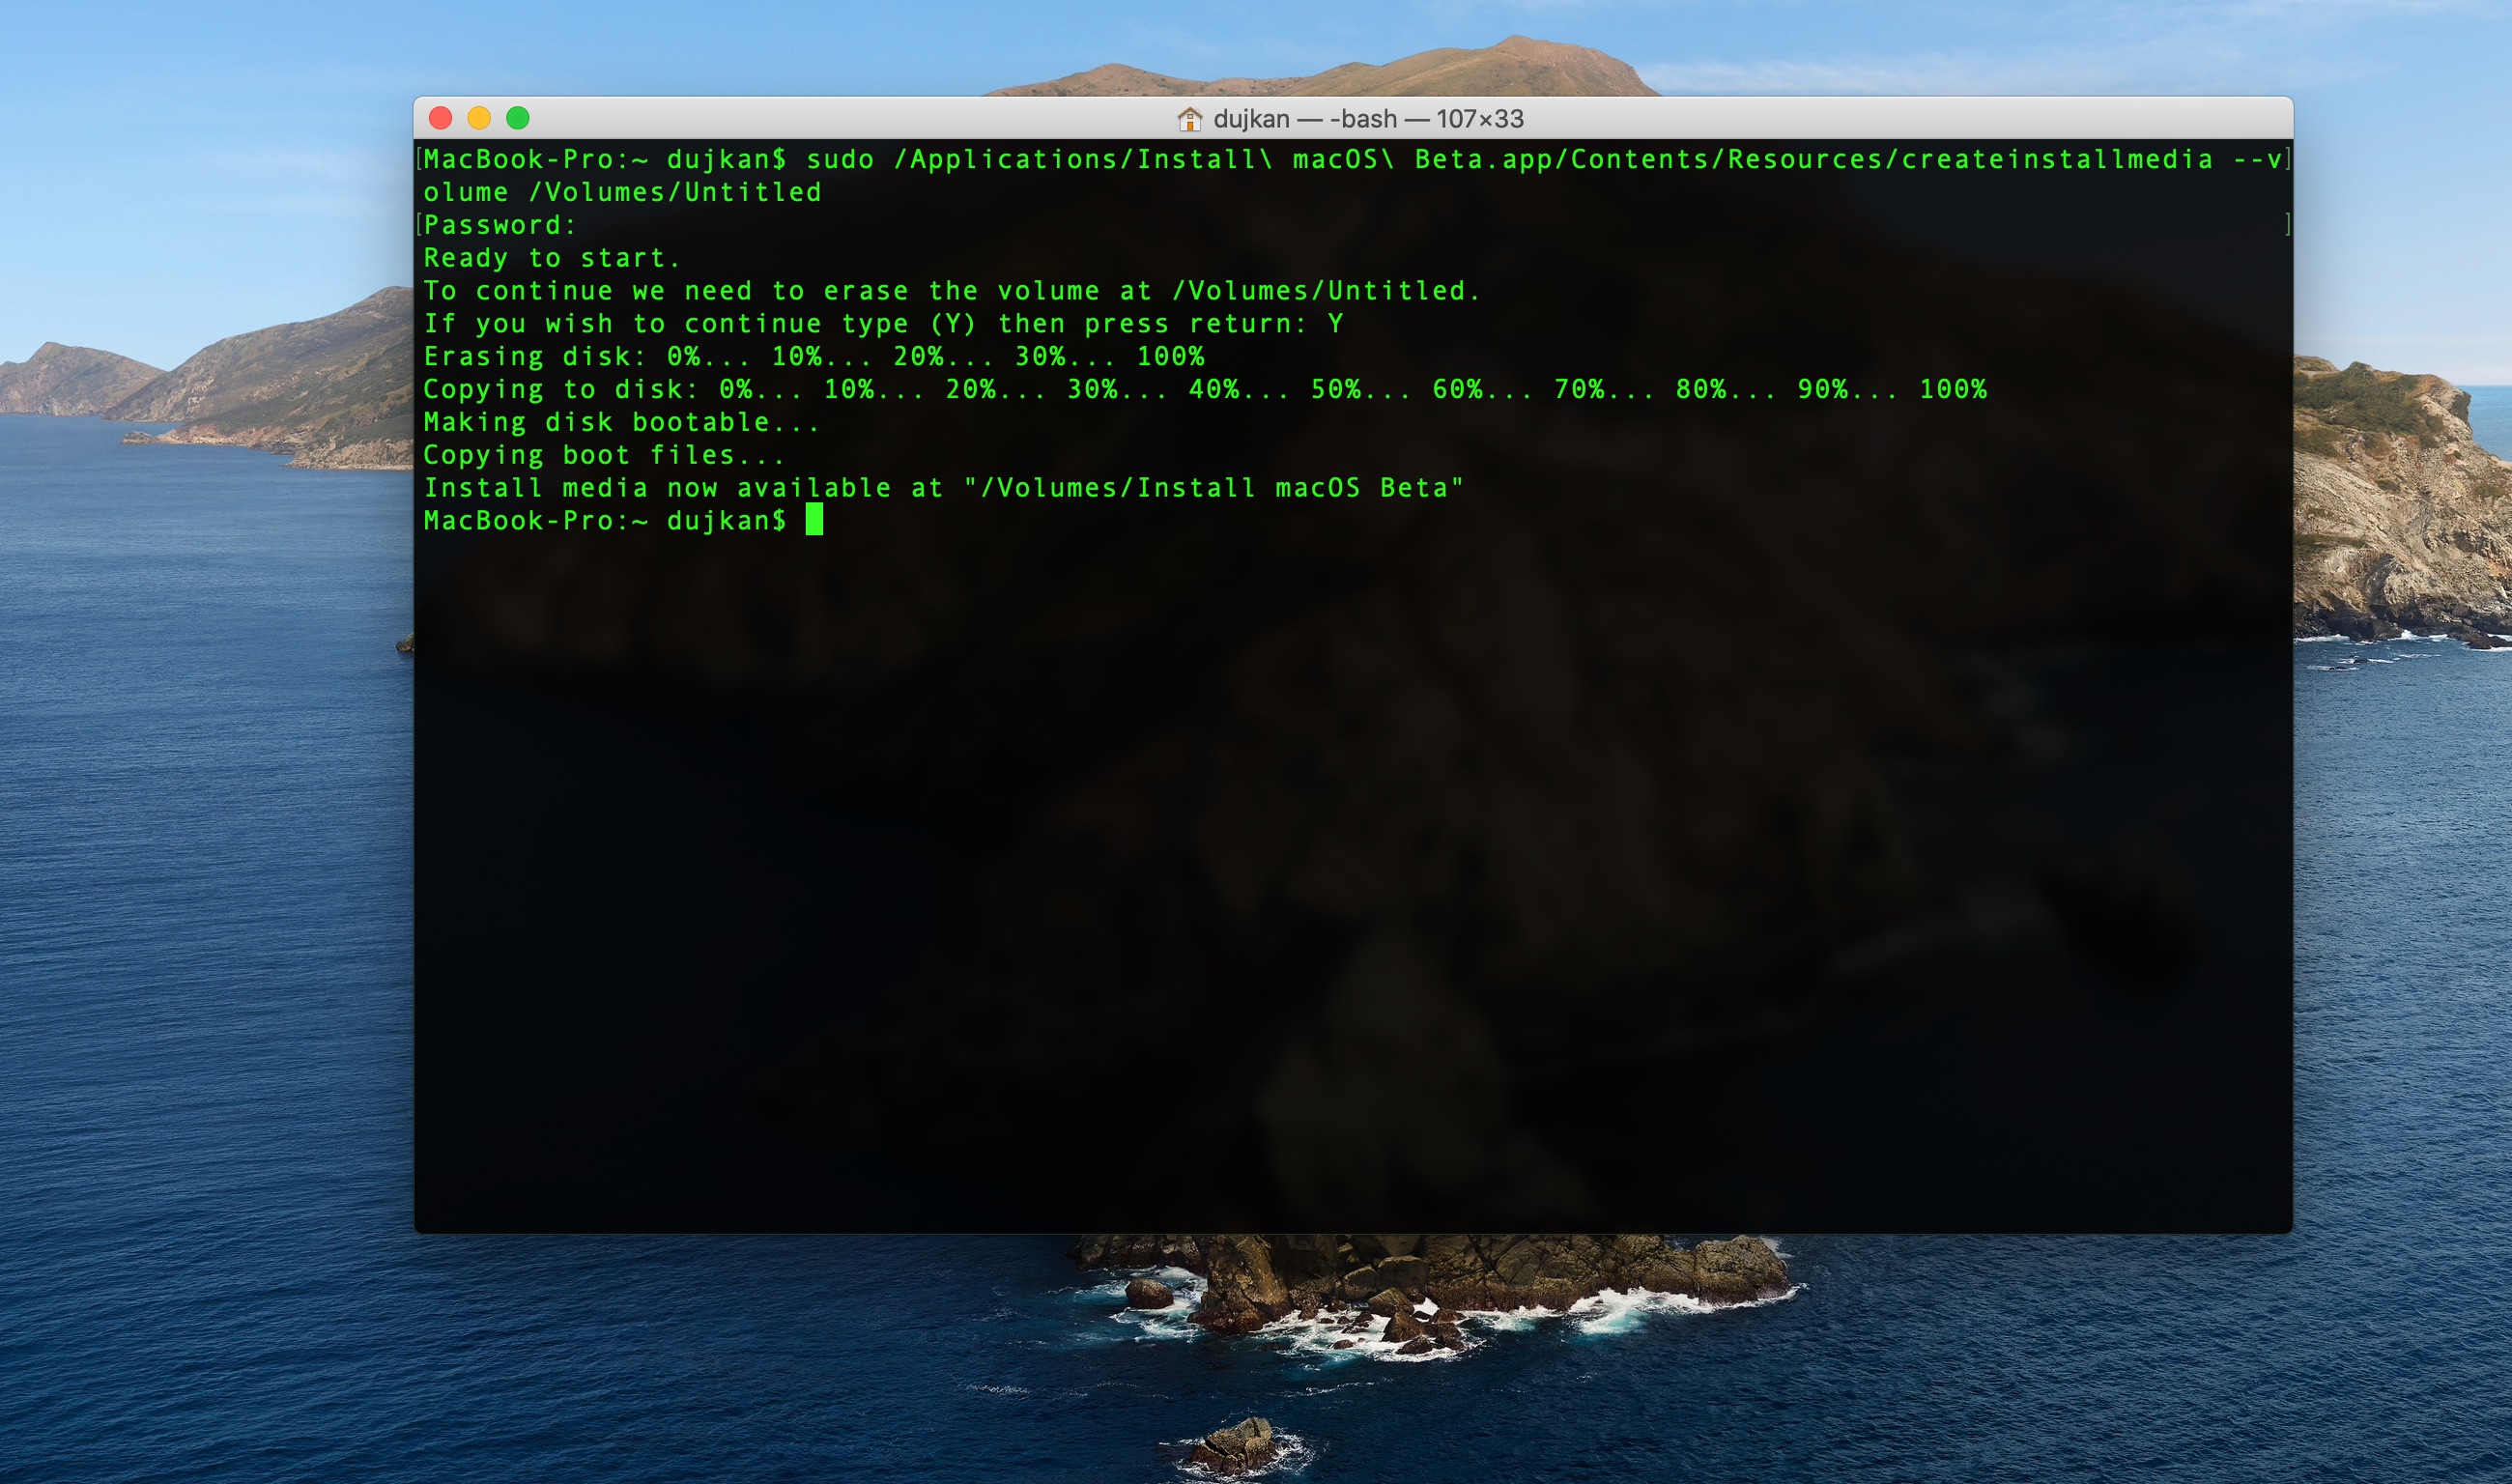
6) When asked, type your administrator password and press Return.

Terminal doesn’t show any characters as you type your password
7) When prompted, type Y to confirm that you want to erase the volume and press Return.

Creating a bootable installer takes some time so please wait until Terminal says it’s done.

Terminal shows the progress as the bootable installer is created
When finished, your USB thumb drive or other external disk will have the same name as the macOS installer you downloaded, such as “Install macOS Beta.”
At this point, you can quit Terminal and eject the volume
For those wondering about the potential that the Terminal method might wreak havoc on their Mac, you don’t need to worry as this is an official Apple-sanctioned solution.
How to use macOS Big Sur beta bootable installer
After creating the bootable installer, you must restart your Mac and invoke the Startup Manager at boot time which will let you choose the macOS Big Sur installer on your USB thumb drive or other external drive as your boot disk.
Follow the steps ahead to use your macOS Big Sur bootable installer:
1) Plug the bootable installer into your Mac.
2) Open System Preferences → Startup Disk and select the bootable installer as your new startup disk, then click the Restart button start up from it.
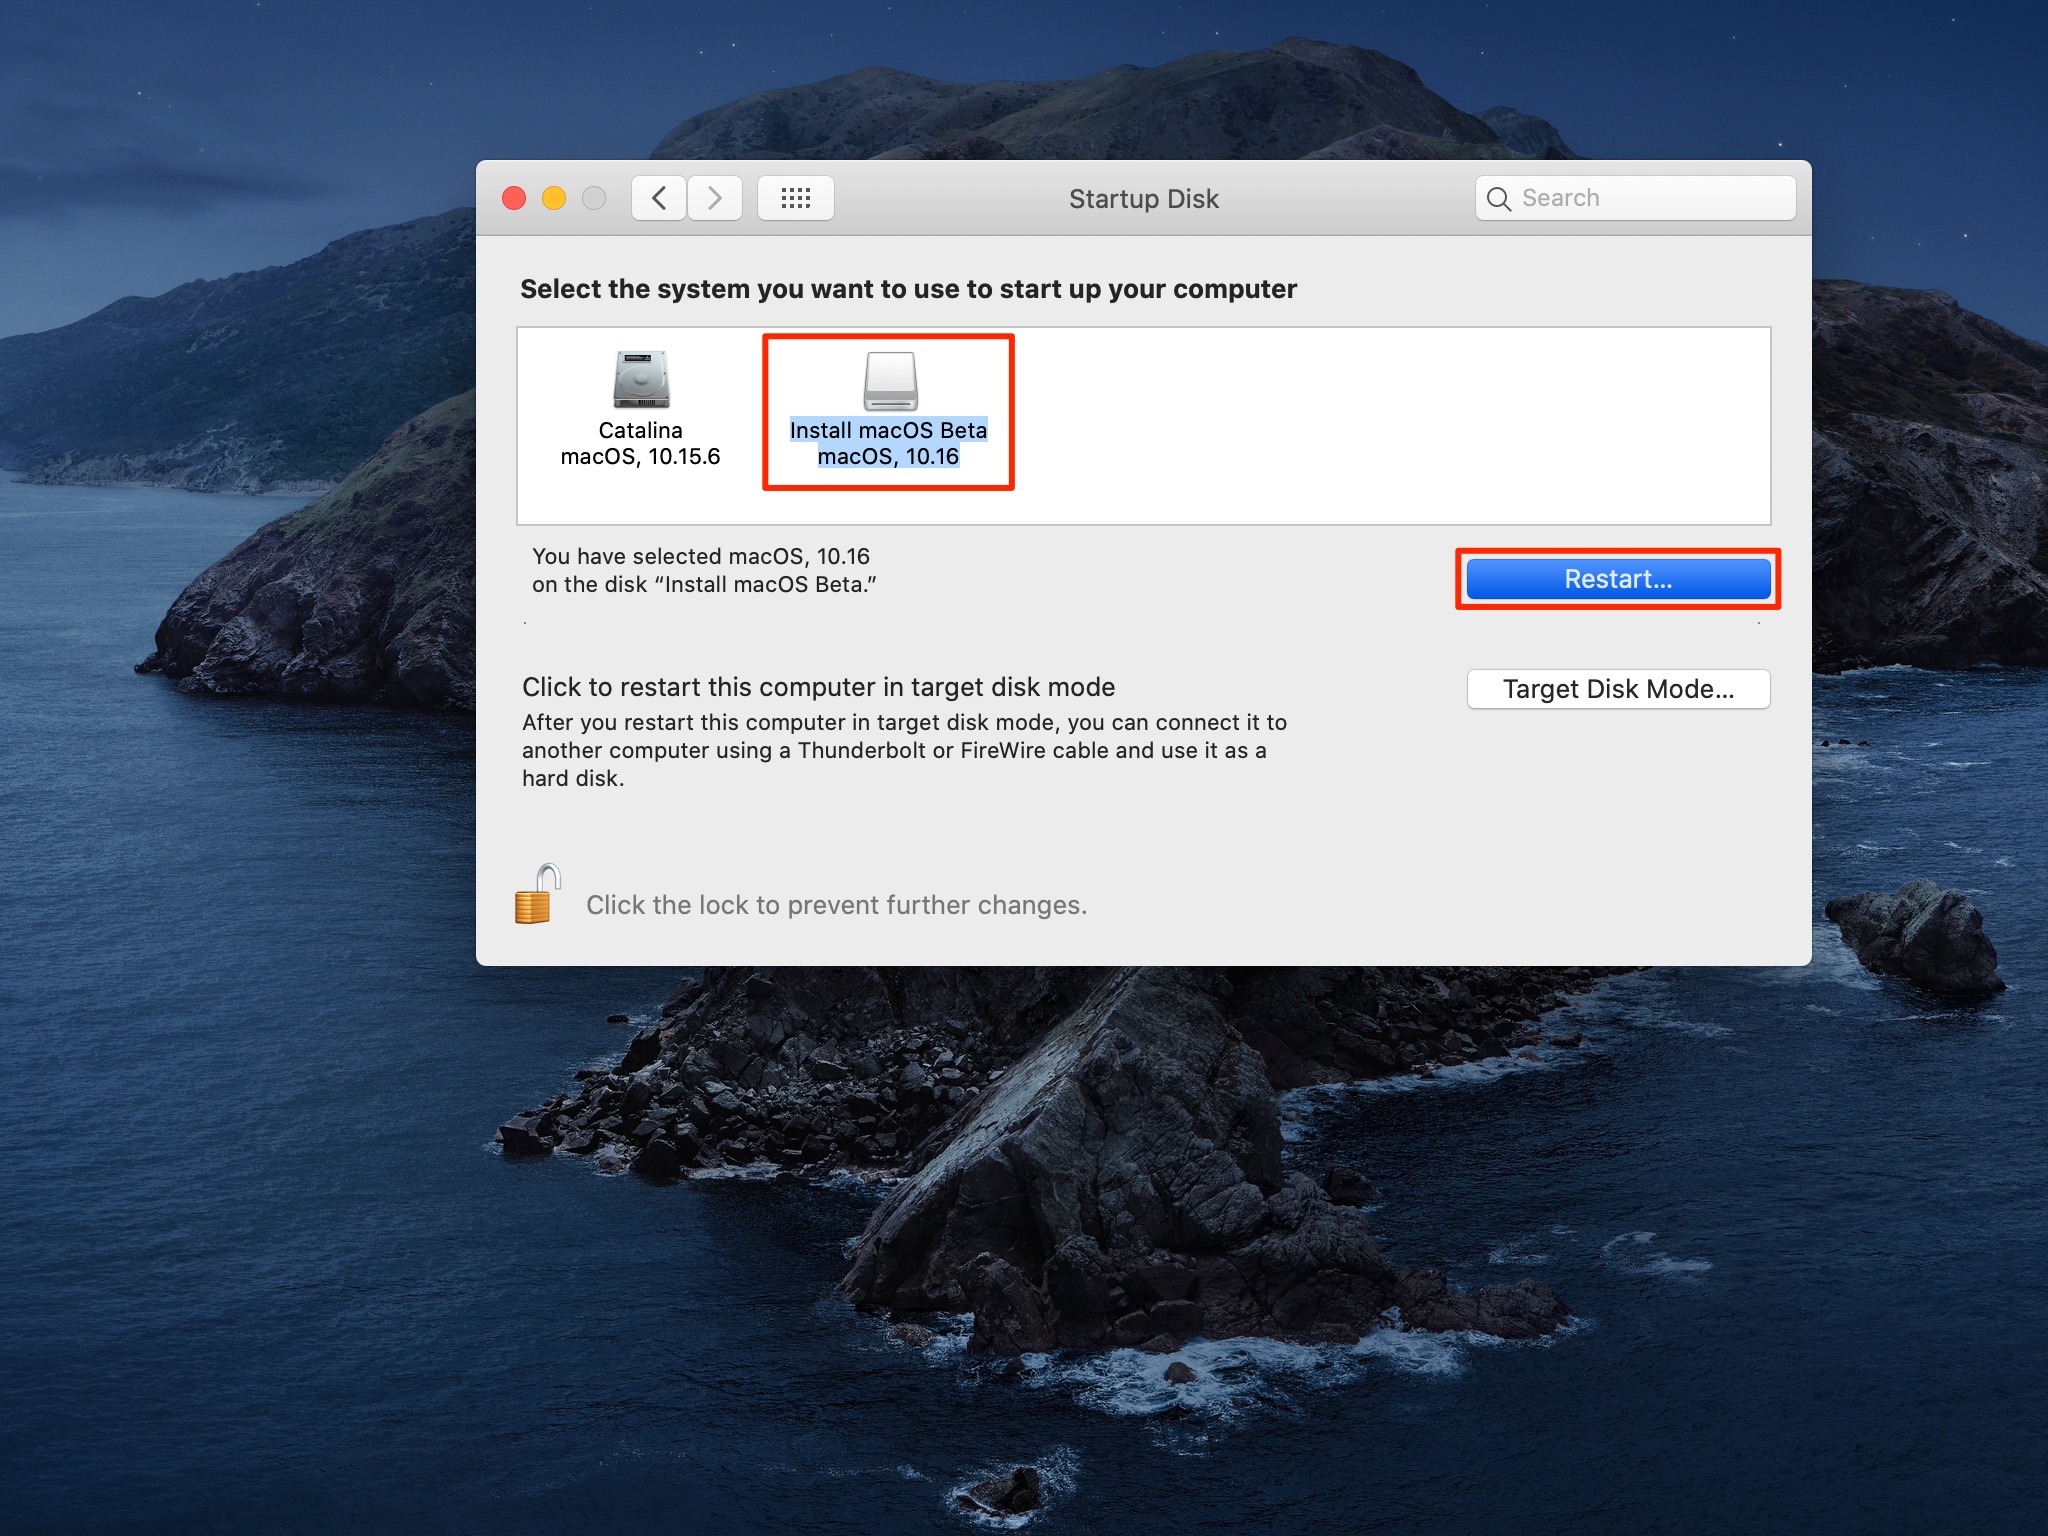
As an alternative method to the Startup Disk preference pane, you can simply restart your Mac and make sure to keep holding the Option key until you see the startup disk selector, then use the arrow keys to highlight your bootable installer and press Enter to boot from it.
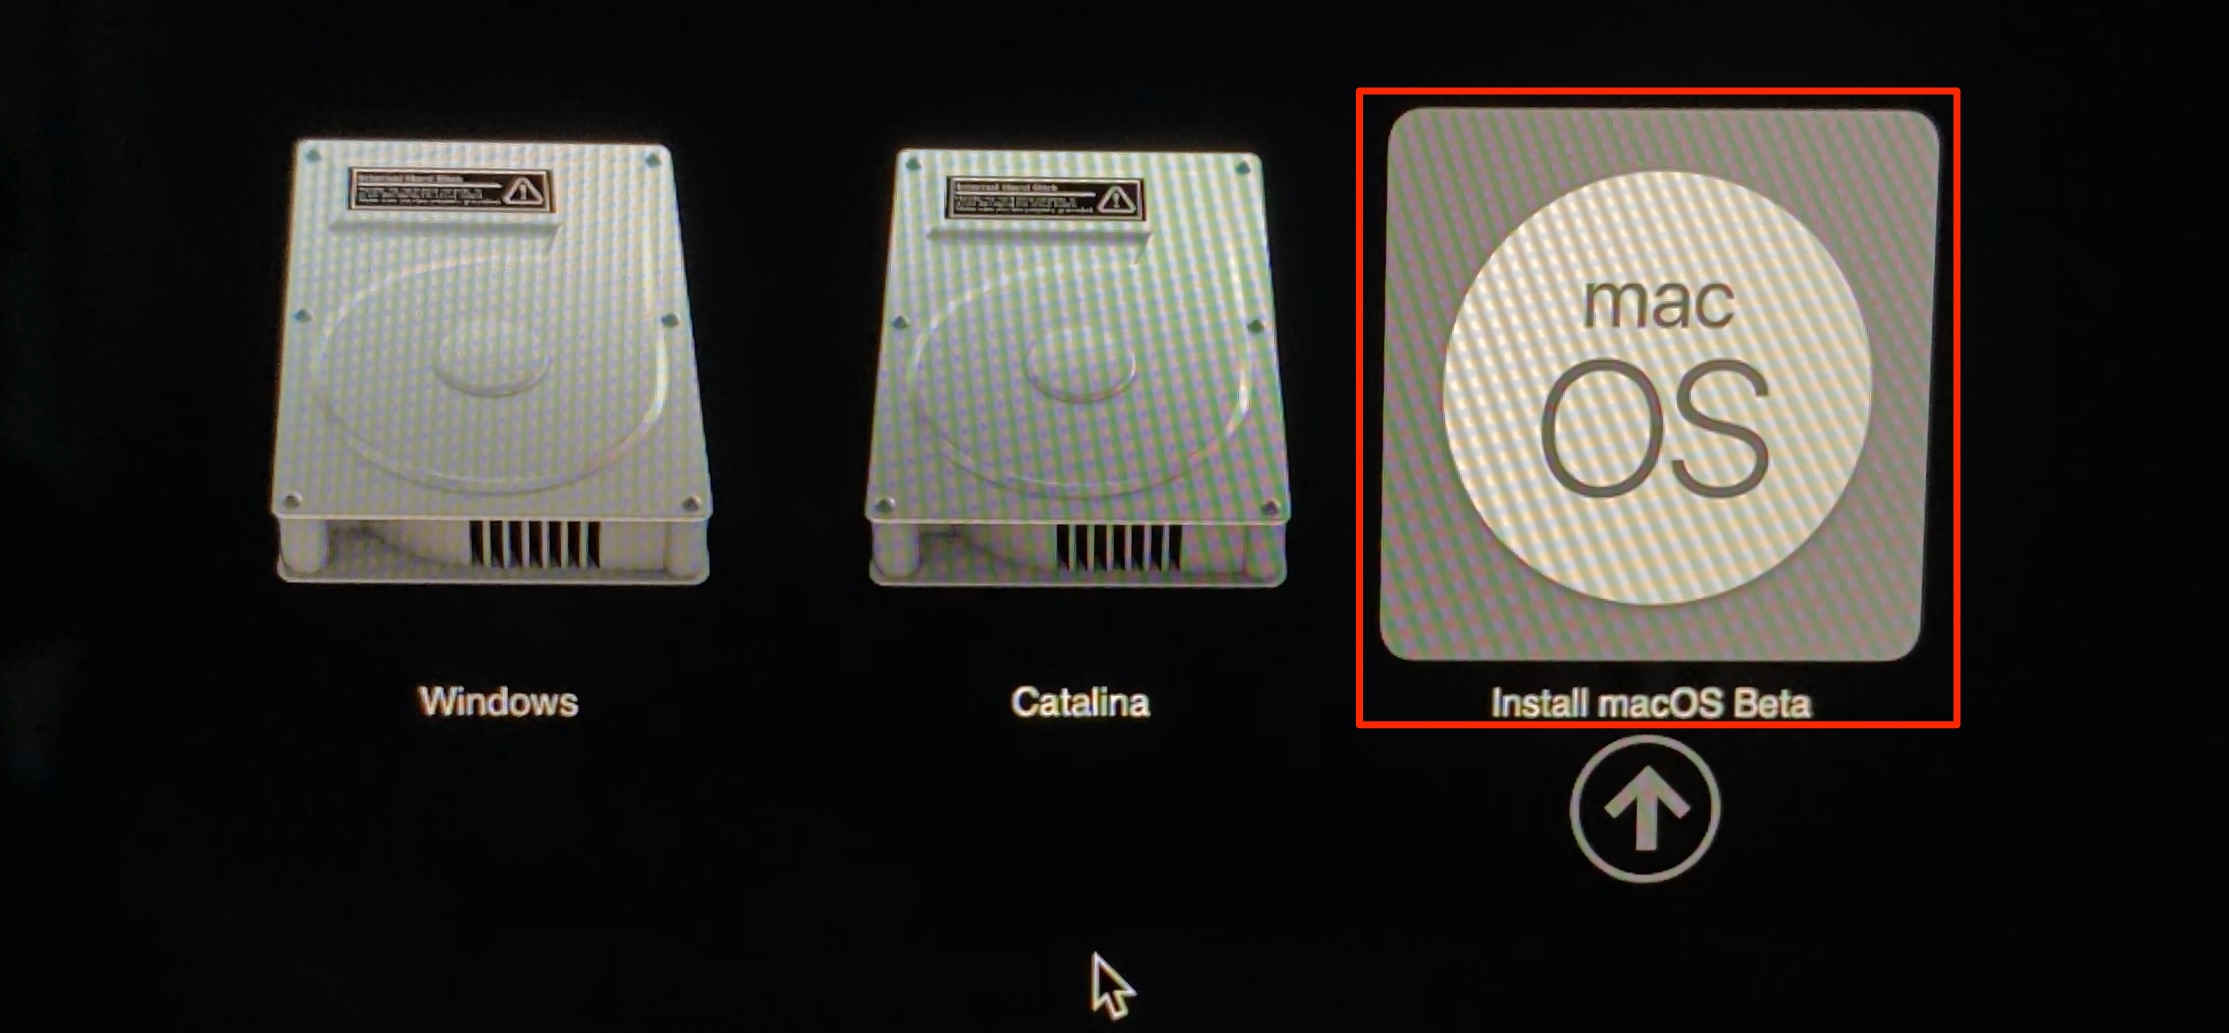
Hold down the Option key when turning on your Mac for the startup disk selector
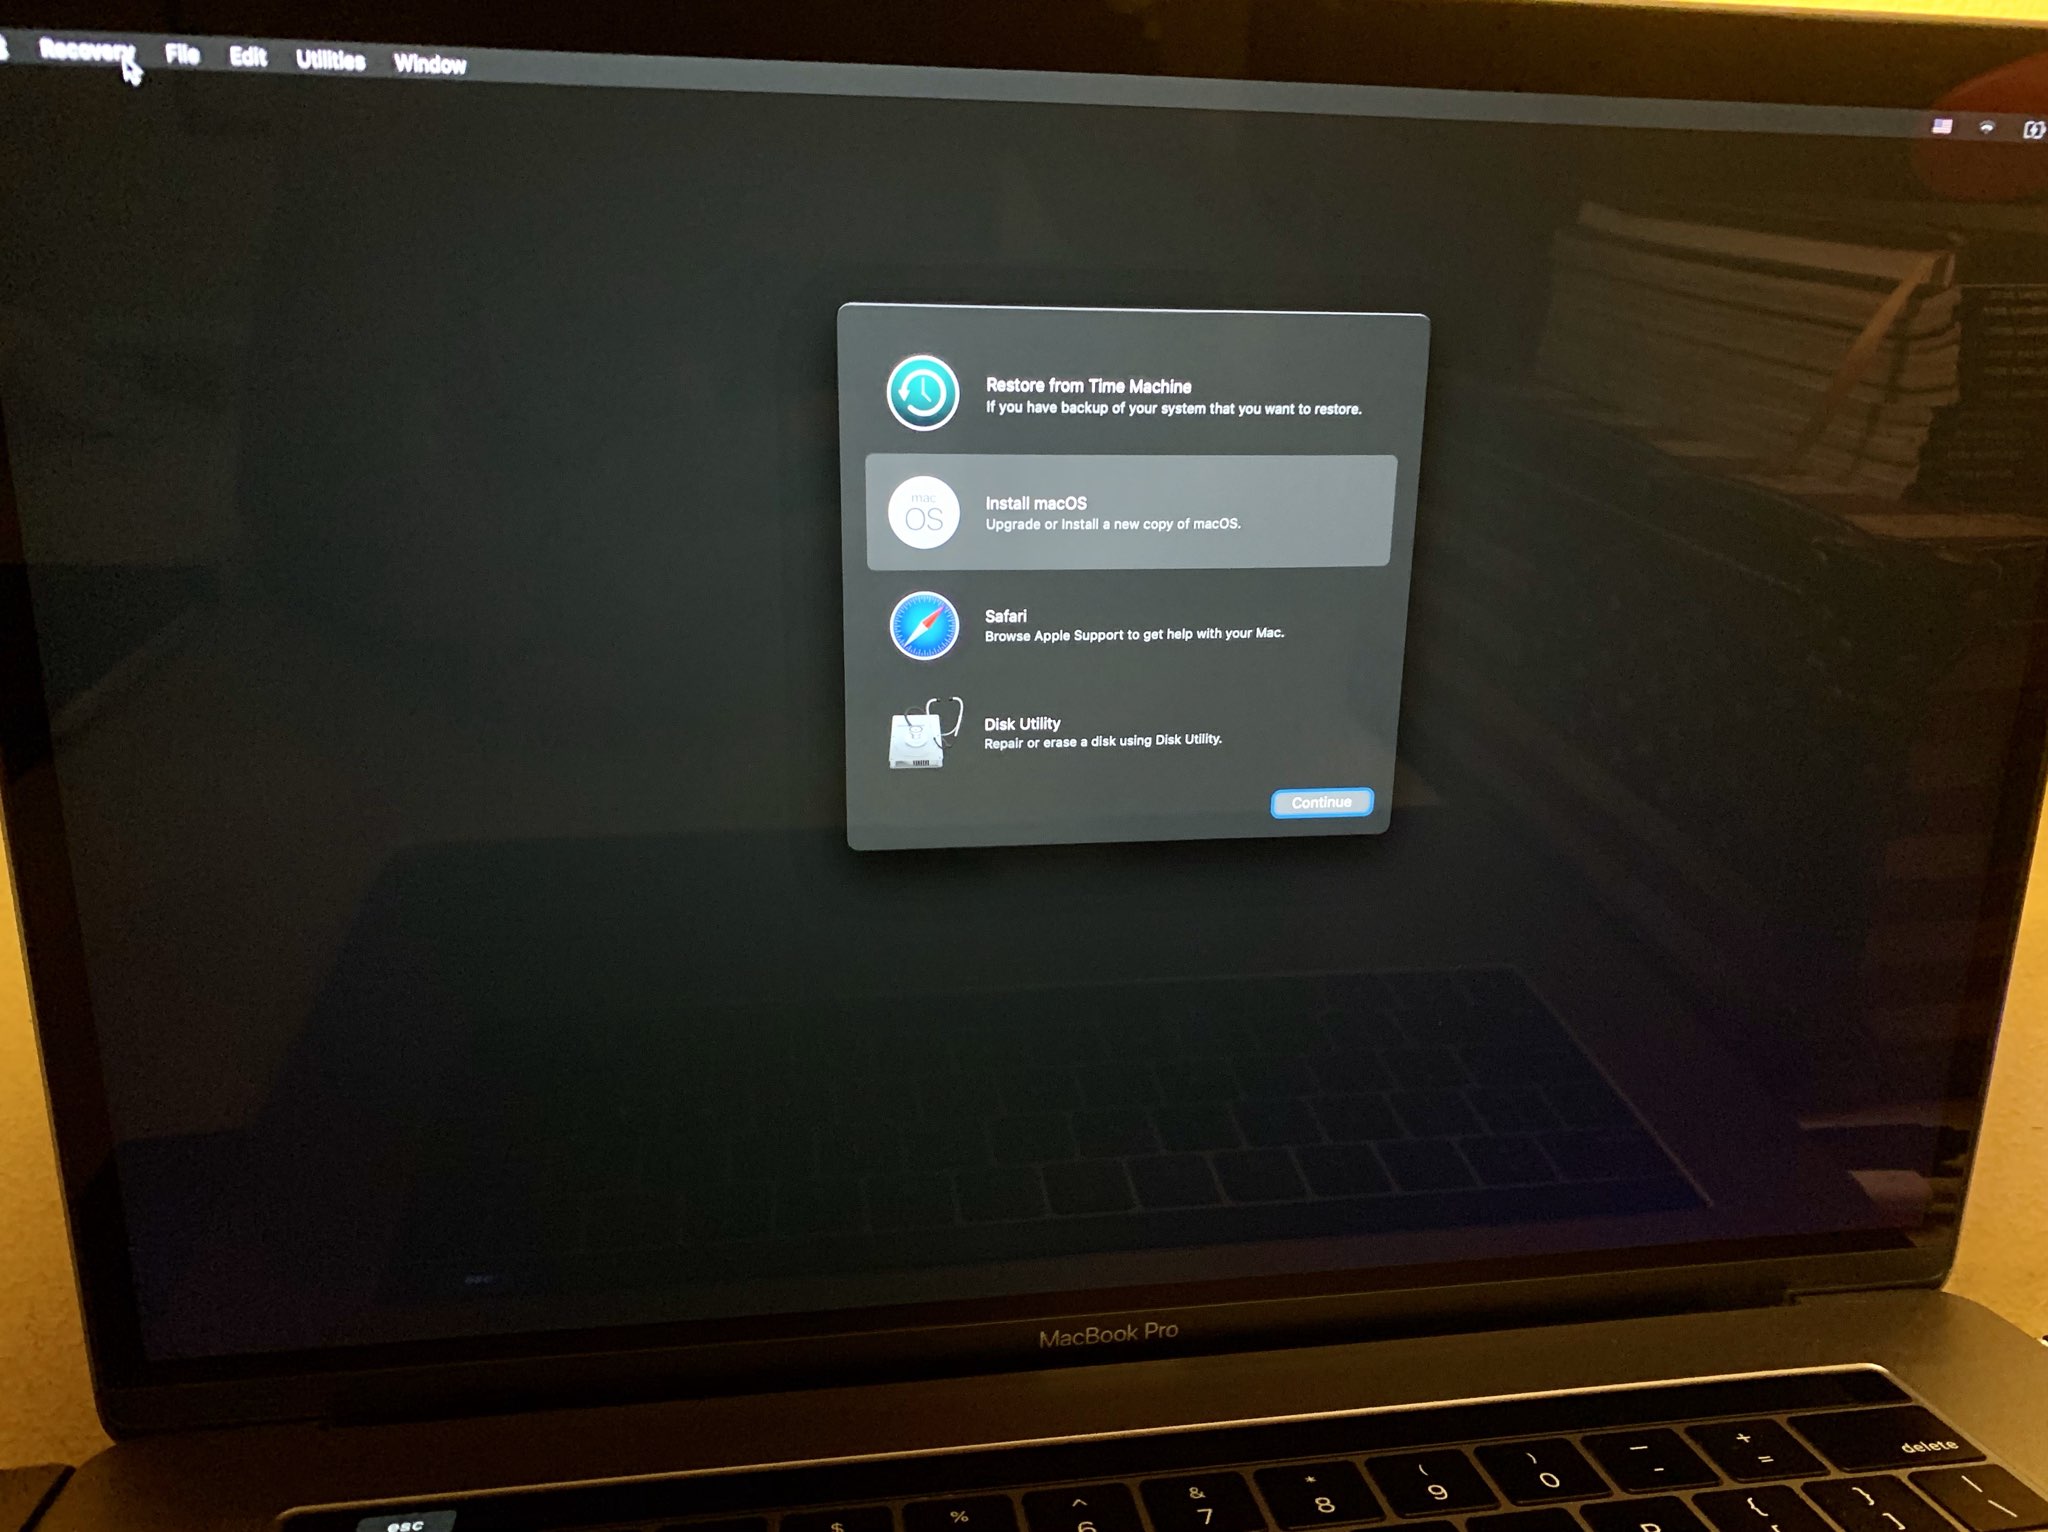
3) Your Mac may restart a few times before it starts up to macOS Recovery mode. Choose your language, if prompted, then provide a password for your account to continue.
4) You will now see the Utilities window with several options. If you’d like to upgrade your current macOS version to the macOS Big Sur beta or install the beta to a separate partition, choose the Install macOS option and click Continue, then follow the onscreen instructions.
Avoid disrupting your current setup
You’ll want to select Disk Utility from the menu before launching the installer to prepare the startup disk by creating a separate partition to install the beta to it. You will be able to boot between your current macOS version and the macOS Big Sur beta by holding down the Option key while using the computer or changing your Startup Disk preferences.
You will want to install the macOS Big Sur beta without disrupting your current setup — according to Apple’s official release notes, installing the macOS Big Sur beta into the same APFS container as previous versions of macOS, like macOS Catalina, will prevent the Software Update mechanism from installing on the previous version of macOS.
That’s why you’re wholeheartedly recommended to use Disk Utility and create a new partition on your startup disk and choose it as your target during the macOS Big Sur beta instal process.
This caveat is buried deeply enough in the macOS Big Sur release notes that a lot of people are going to be bit by it. Creating a new volume in an existing APFS container had become the de facto best way to install a second OS. pic.twitter.com/BscbELxj6Q
— Daniel Jalkut (@danielpunkass) June 23, 2020
Oh, one more thing: the bootable installer may require the Internet to get information specific to your Mac model, such as firmware updates. If you’re prompted to connect to a Wi-Fi network, click the Wi-Fi icon in the menu bar to join a desired wireless network.
Change your Secure Boot settings
After selecting your bootable installer — either at boot time or via the Startup Disk preference pane — you may be see a message warning you that your default security settings do not permit your Mac to use an external startup disk.
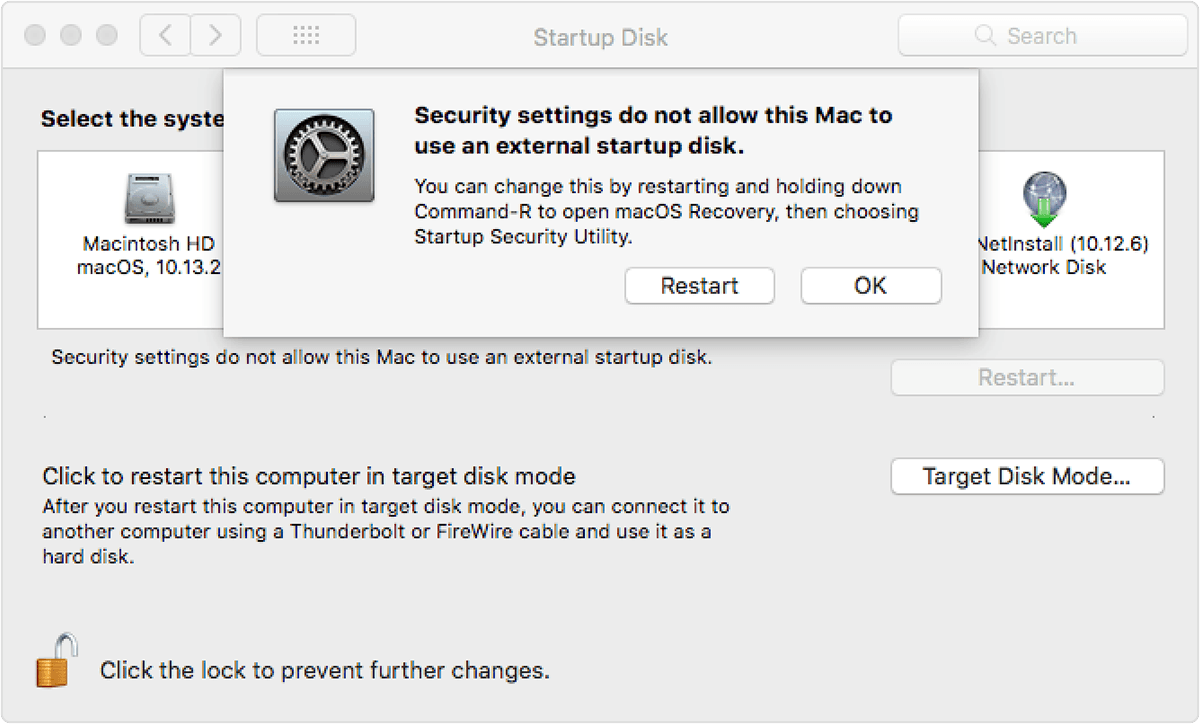
You may need to change your settings to allow booting from external disks
That’s especially true for newer Macs equipped with Apple’s security chip that provides the Secure Boot capabilities. In that case, start up in macOS Recovery mode by restarting and holding down Command (⌘) + R until the Apple logo appears on the screen.
After a minute or two, macOS Recovery should load. Choose Startup Security Utility from the Utilities menu and enter your administrator password when asked.
macOS Recovery mode requires your account password before you’re permitted to use its tools
Now select the option Allow Booting From External Media which does just that. Next, close out the Startup Security Utility window and choose Restart from the Apple menu.

Change your default settings to allow booting from external media
You should now be able to use the Startup Manager (hold down the Option key while restarting) or the Startup Disk preferences to set the bootable installer as your startup disk.
Need help? Ask iDB!
If you like this tutorial, pass it along to your friends and leave a comment below.
Got stuck? Not sure how to do certain things on your Apple device? Let us know via [email protected] and a future tutorial might provide a solution.
Submit your own how-to suggestions via [email protected].
Source link: https://www.idownloadblog.com/2020/06/30/how-to-create-a-bootable-installer-for-the-macos-big-sur-beta/

Leave a Reply