

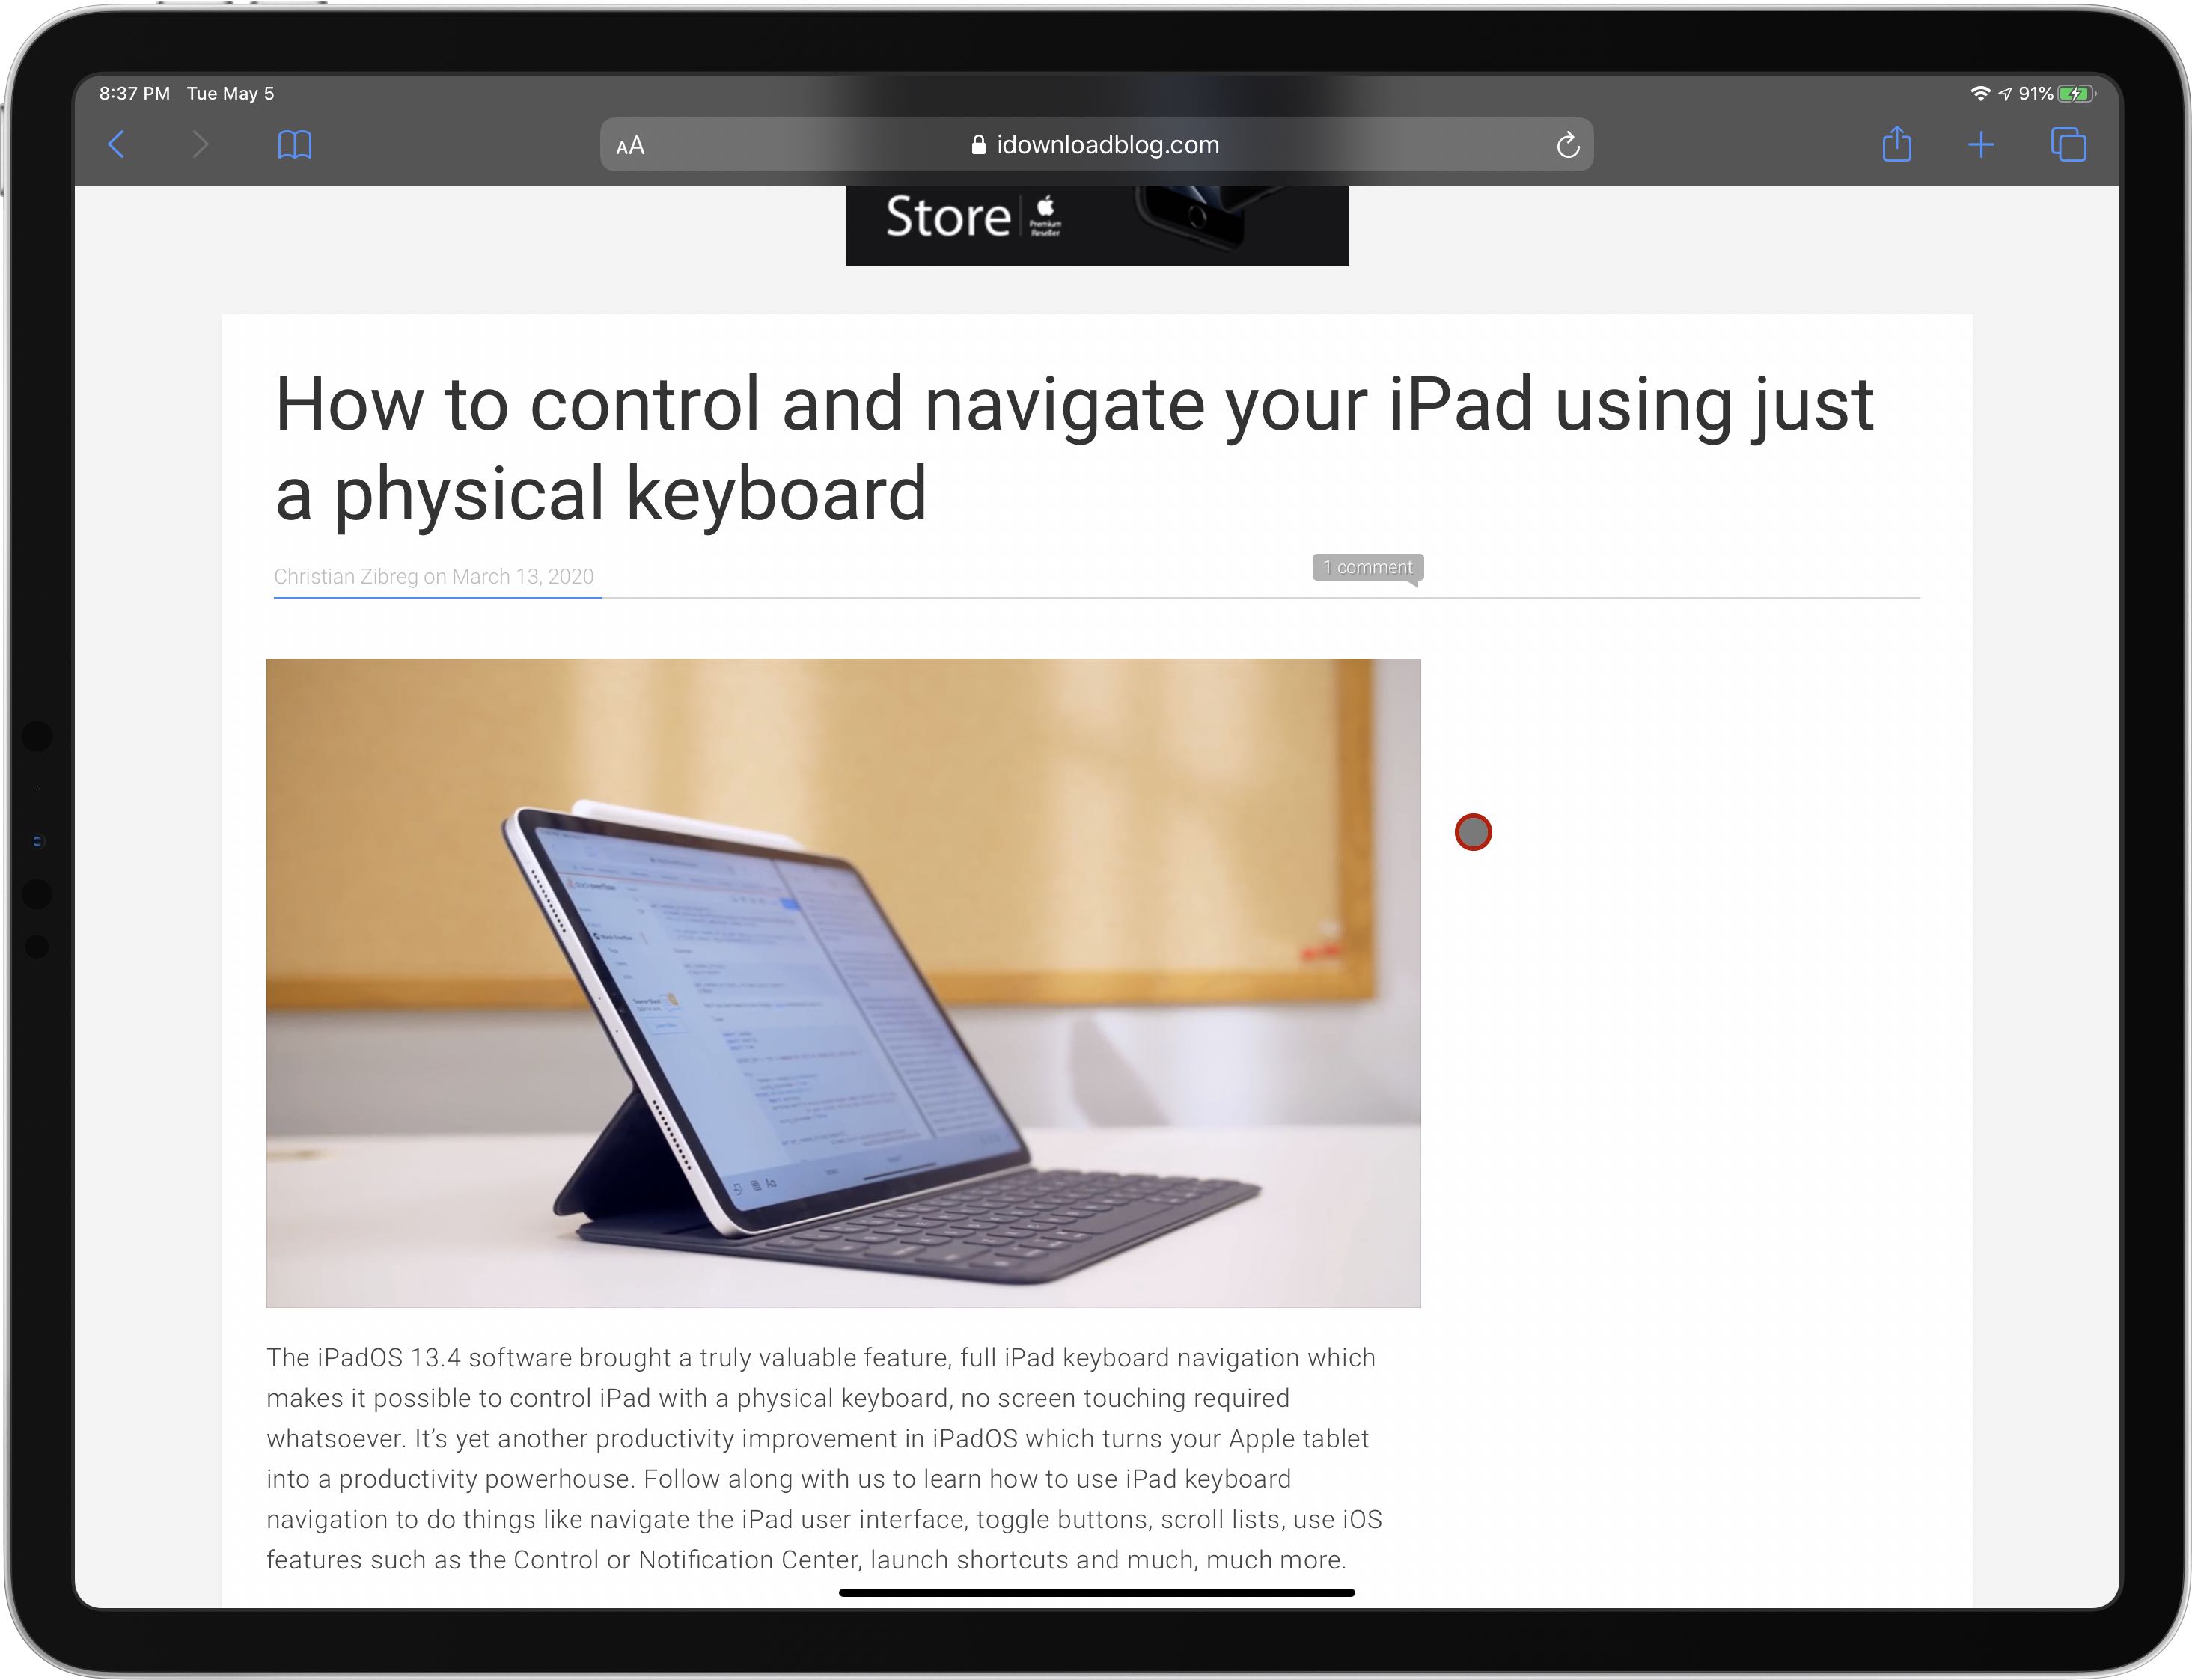
How to control iPad pointer with the keyboard
To control the iPad pointer with the keyboard, you must enable and configure Mouse Keys, a cool assistive feature in iOS and iPadOS 13.4. While moving the pointer with your connected mouse or trackpad trumps using the keyboard, sometimes you need high movement precision, like when doing some pixel-perfect editing in apps like Pixelmator or Adobe Photoshop. Aside from moving the pointer left, right, up, down and in all directions diagonally, the keys on your Mac’s keyboard also simulate actions like clicking, releasing or holding the mouse button. Without further ado, follow along with our step-by-step tutorial for instructions on setting up Mouse Keys on your device, which will allow you to control iPad pointer with the keyboard.
Introducing Mouse Keys
Apple is calling this cool feature Mouse Keys.
If the name sounds familiar, that’s because Mouse Keys has been present on the Mac for years. Mouse Keys for macOS and Mouse Keys for iOS both serve the same purpose — as an assistive feature, it was primary designed for people for motor skill issues who may find it challenging to control the pointer by moving their finger across the trackpad.
RELATED: Changing behavior of Mac’s Control, Option, Command and Caps Lock keys
It’s also a great option for folks who need precise pointer control when working in complex creative apps. Mouse Keys for iPhone, iPad and iPod touch was launched as part of the iOS and iPadOS 13.4 software updates which released commercially on March 24.

Follow along with the step-by-step tutorial below for tips on how to control iPad pointer with the keyboard keys or keys on a numeric keypad, if your physical keyboard has the number pad.
How to control iPad pointer via the keyboard
Before you can use a keyboard to control your pointer, you must first turn on the Mouse Keys assistive option in Settings. We’ll also cover the keyboard shortcuts for Mouse Keys and adjusting the feature to your liking by changing the available settings.
How to enable Mouse Keys
Mouse Keys is part of the AssistiveTouch features designed for people who have difficulty touch the screen or if they require an adaptive accessory. As mentioned earlier, it’s also great for anyone who would like to precisely control iPad pointer with the keyboard.
Mouse Keys lets you use a keyboard to control the pointer
To enable the Mouse Keys feature on your iPad with iPadOS 13.4+ or your iPhone and iPod touch with iOS 13.4+, follow the steps below:
- Open Settings on your device.
- Choose Accessibility from the root list.
- Select Touch.
- Tap AssistiveTouch at the very top of the list.
- On the next screen, enable AssistiveTouch at the top.
- Disable Always Show Menu underneath the heading Pointer Devices. Doing so tells the operating system to hide the AssistiveTouch’s special onscreen menu when a pointer device like a trackpad or mouse is connected. You’re also recommended to set to change Idle Opacity of the AssistiveTouch onscreen menu to the lowest value (15 percent).
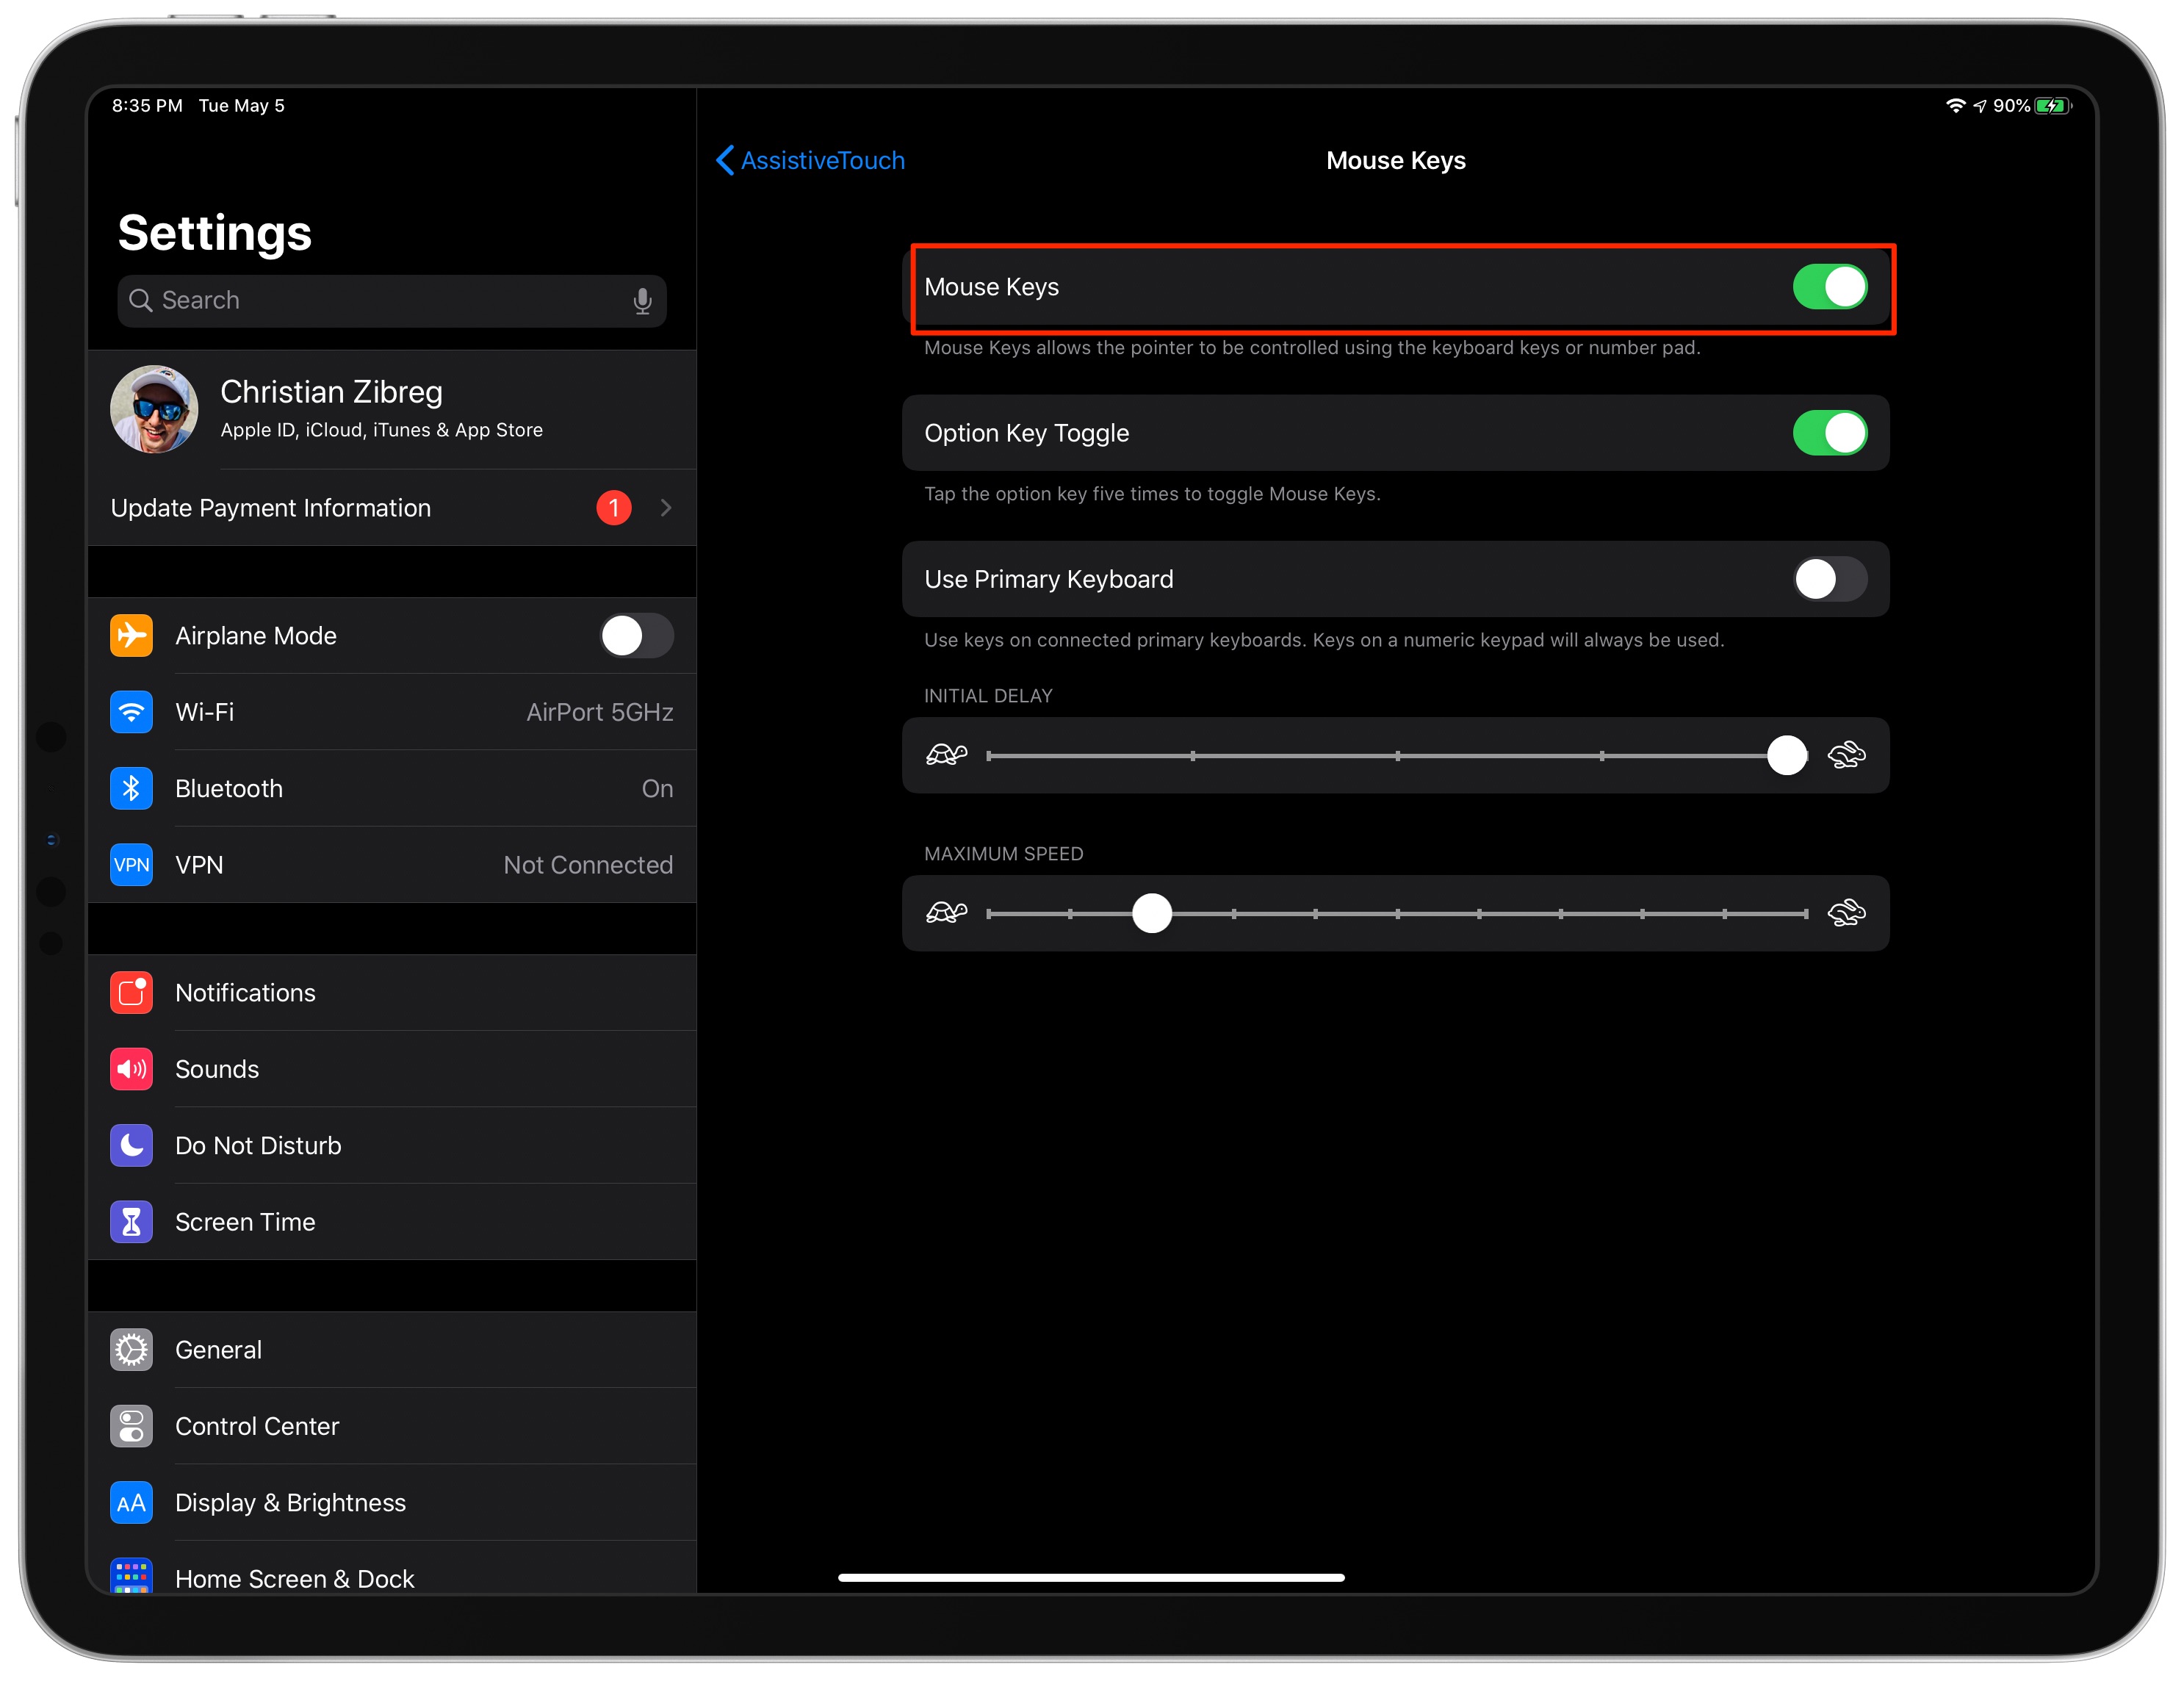
- Now tap Mouse Keys underneath the heading Pointer Devices.
- Finally, slide the toggle next to Mouse Keys to the ON position to enable the feature.
You can also quickly toggle Mouse Keys on-the-fly by pressing the Option (⌥) key on the connected keyboard five times in a quick succession as explained later in this tutorial.
Conversely, toggle off the Mouse Keys button to disable the feature.
Note that AssistiveTouch must be enabled for Mouse Keys to work
“Mouse Keys allows the pointer to be controlled using the keyboard keys or number pad,” according to the feature’s description.
How to use Mouse Keys
With Mouse Keys enabled, you can control the mouse pointer keys on your Mac’s keyboard. These keys let you move the pointer left, right, up, down and diagonally in all four directions for as long as the Mouse Keys feature is active.
Once it’s off, these keys switch back to their normal functions.
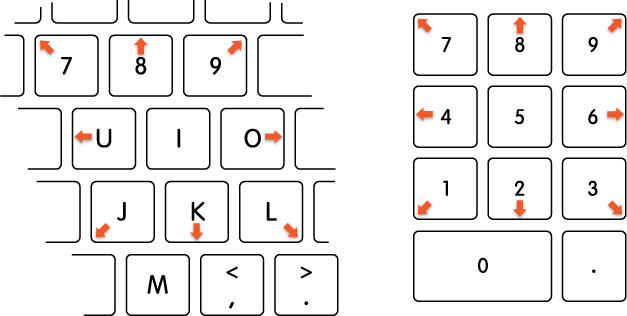
Here’s the full list of Mouse Keys shortcuts for your convenience:
- Move the mouse pointer
- With the numeric keypad:
- Use the 7, 8, 9, 4, 6, 1, 2 and 3 keys on the keypad
- With the keyboard:
- Use the 7, 8, 9, U, O, J, K and L keys on the keyboard
- With the numeric keypad:
- Click the mouse button
- With the numeric keypad:
- Press 5 on the keypad
- With the keyboard:
- Press I on the keyboard
- With the numeric keypad:
- Hold the mouse button
- With the numeric keypad:
- Press 0 (zero) on the keypad
- With the keyboard:
- Press M on the keyboard
- With the numeric keypad:
- Release the mouse button
- With a numeric keypad
- Press “.” (period) on the keypad.
- With the keyboard
- Press “.” (period) on the keyboard
- With a numeric keypad
Proceed to the next section to learn about Mouse Key customization.
How to change Mouse Keys settings
You can customize Mouse Keys to your liking, including enabling the built-in Mouse Key shortcut, adjusting how Mouse Keys moves the pointer, controlling whether the onscreen keyboard appears and more.
Follow the steps below to change your Mouse Keys settings:
- Open Settings on your device.
- Choose Accessibility from the root list.
- Select Touch.
- Tap AssistiveTouch at the very top of the list.
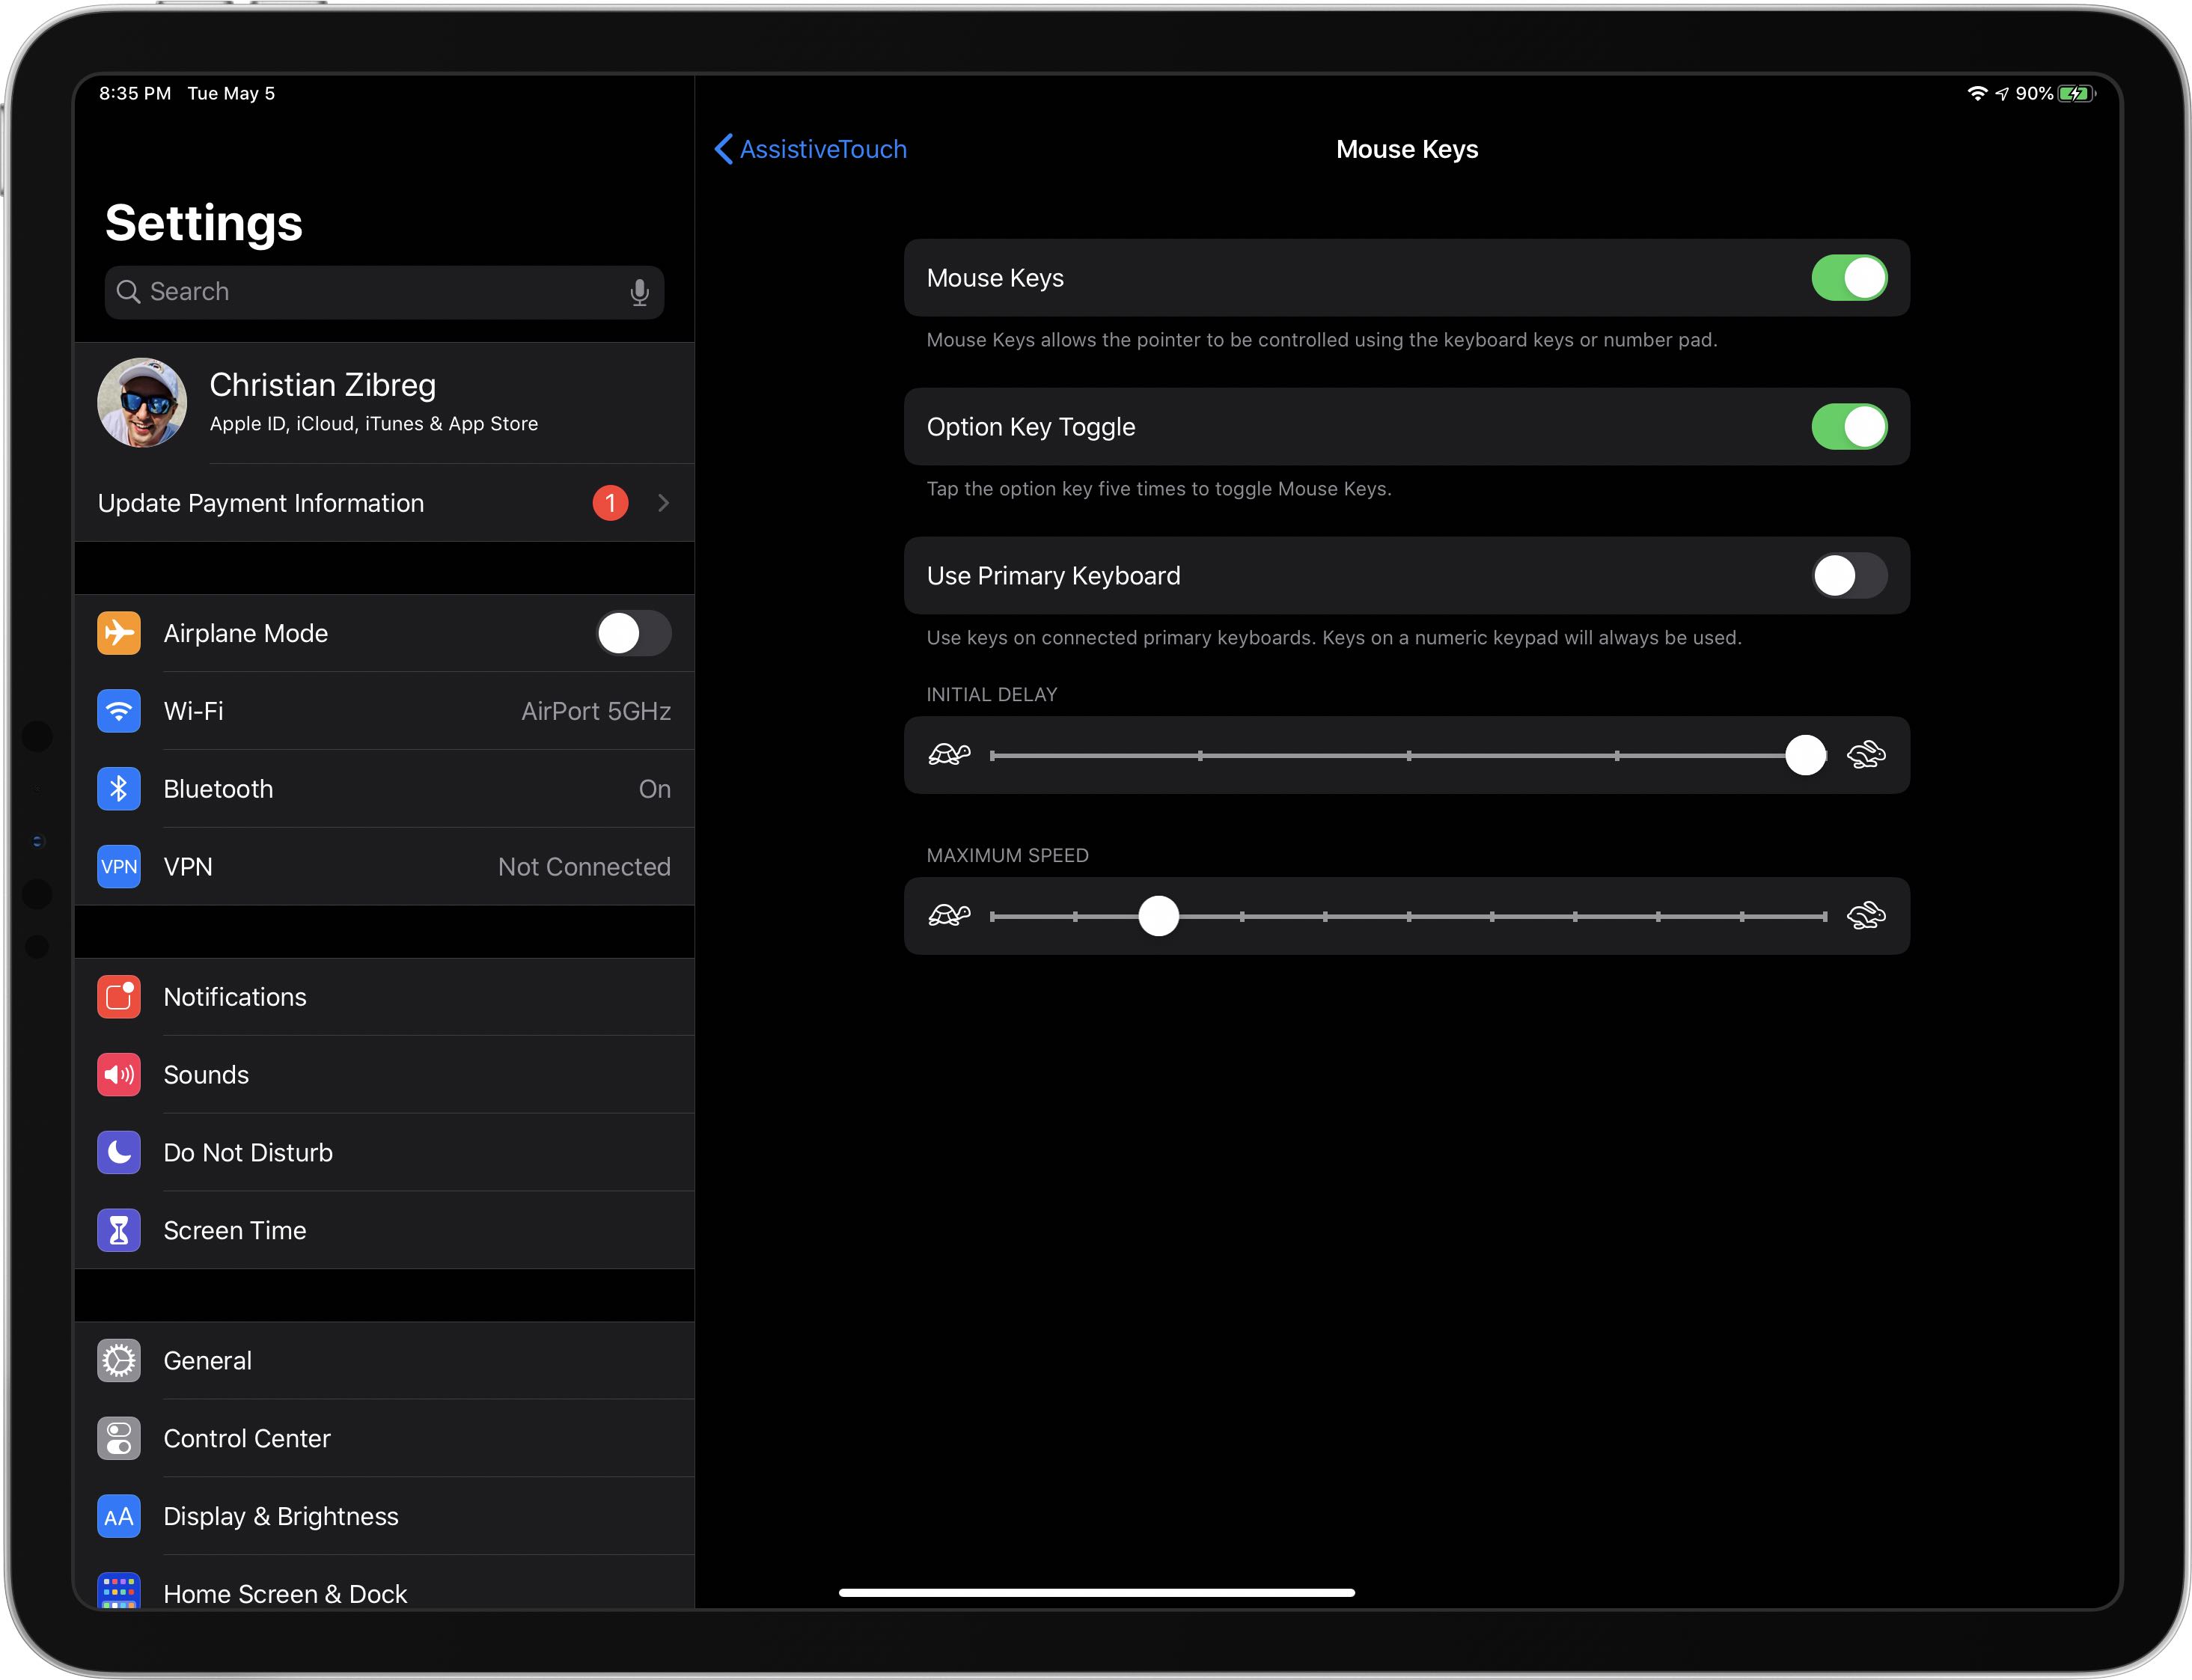
- Choose Mouse Keys underneath the heading Pointer Devices.
Make your adjustments from this screen.
The following settings can be customized:
- Option Key Toggle: Save yourself from having to tap your way to the Mouse Keys toggle in Accessibility every time you want to turn the feature on or off by toggling on this setting. When this is enabled, simply press the Option (⌥) key on your physical keyboard to quickly toggle Mouse Keys.
- Use Primary Keyboard: Enabled by default, this setting lets you use keys on your connected primary keyboards. According to the feature’s description, keys on a numbered keypad will always be used. If your physical keyboard has a numeric keypad, turning this off will let you use all the keys on the keyboard for typing text (the 7, 8, 9, U, I, O, J, K and L keys won’t pass input to Mouse Keys) while still being able to use Mouse Keys with your numbered keypad.
- Initial Delay: Choose the initial delay before the pointer starts moving by moving the slider closer to the right to shorten the delay (move it all the way to the right for no delay) or to the left to increase the delay.
- Maximum Speed: Move this slider to determine how fast the pointer moves when being controlled by keyboard keys.
Unfortunately, there’s no option to use inertia with Mouse Keys.
Onscreen keyboard and Mouse Keys
iOS automatically hides the stock onscreen keyboard when it detects that a physical keyboard is connected to your iPhone or iPad. While you can easily switch between your hardware and software keyboards on the fly, you can instead choose to always show the onscreen keyboard when using Mouse Keys.
TUTORIAL: How to switch between hardware and software keyboards on the fly
To do so, venture to Settings → Accessibility → Touch and enable the option Show Onscreen Keyboard underneath the Pointer Devices heading.
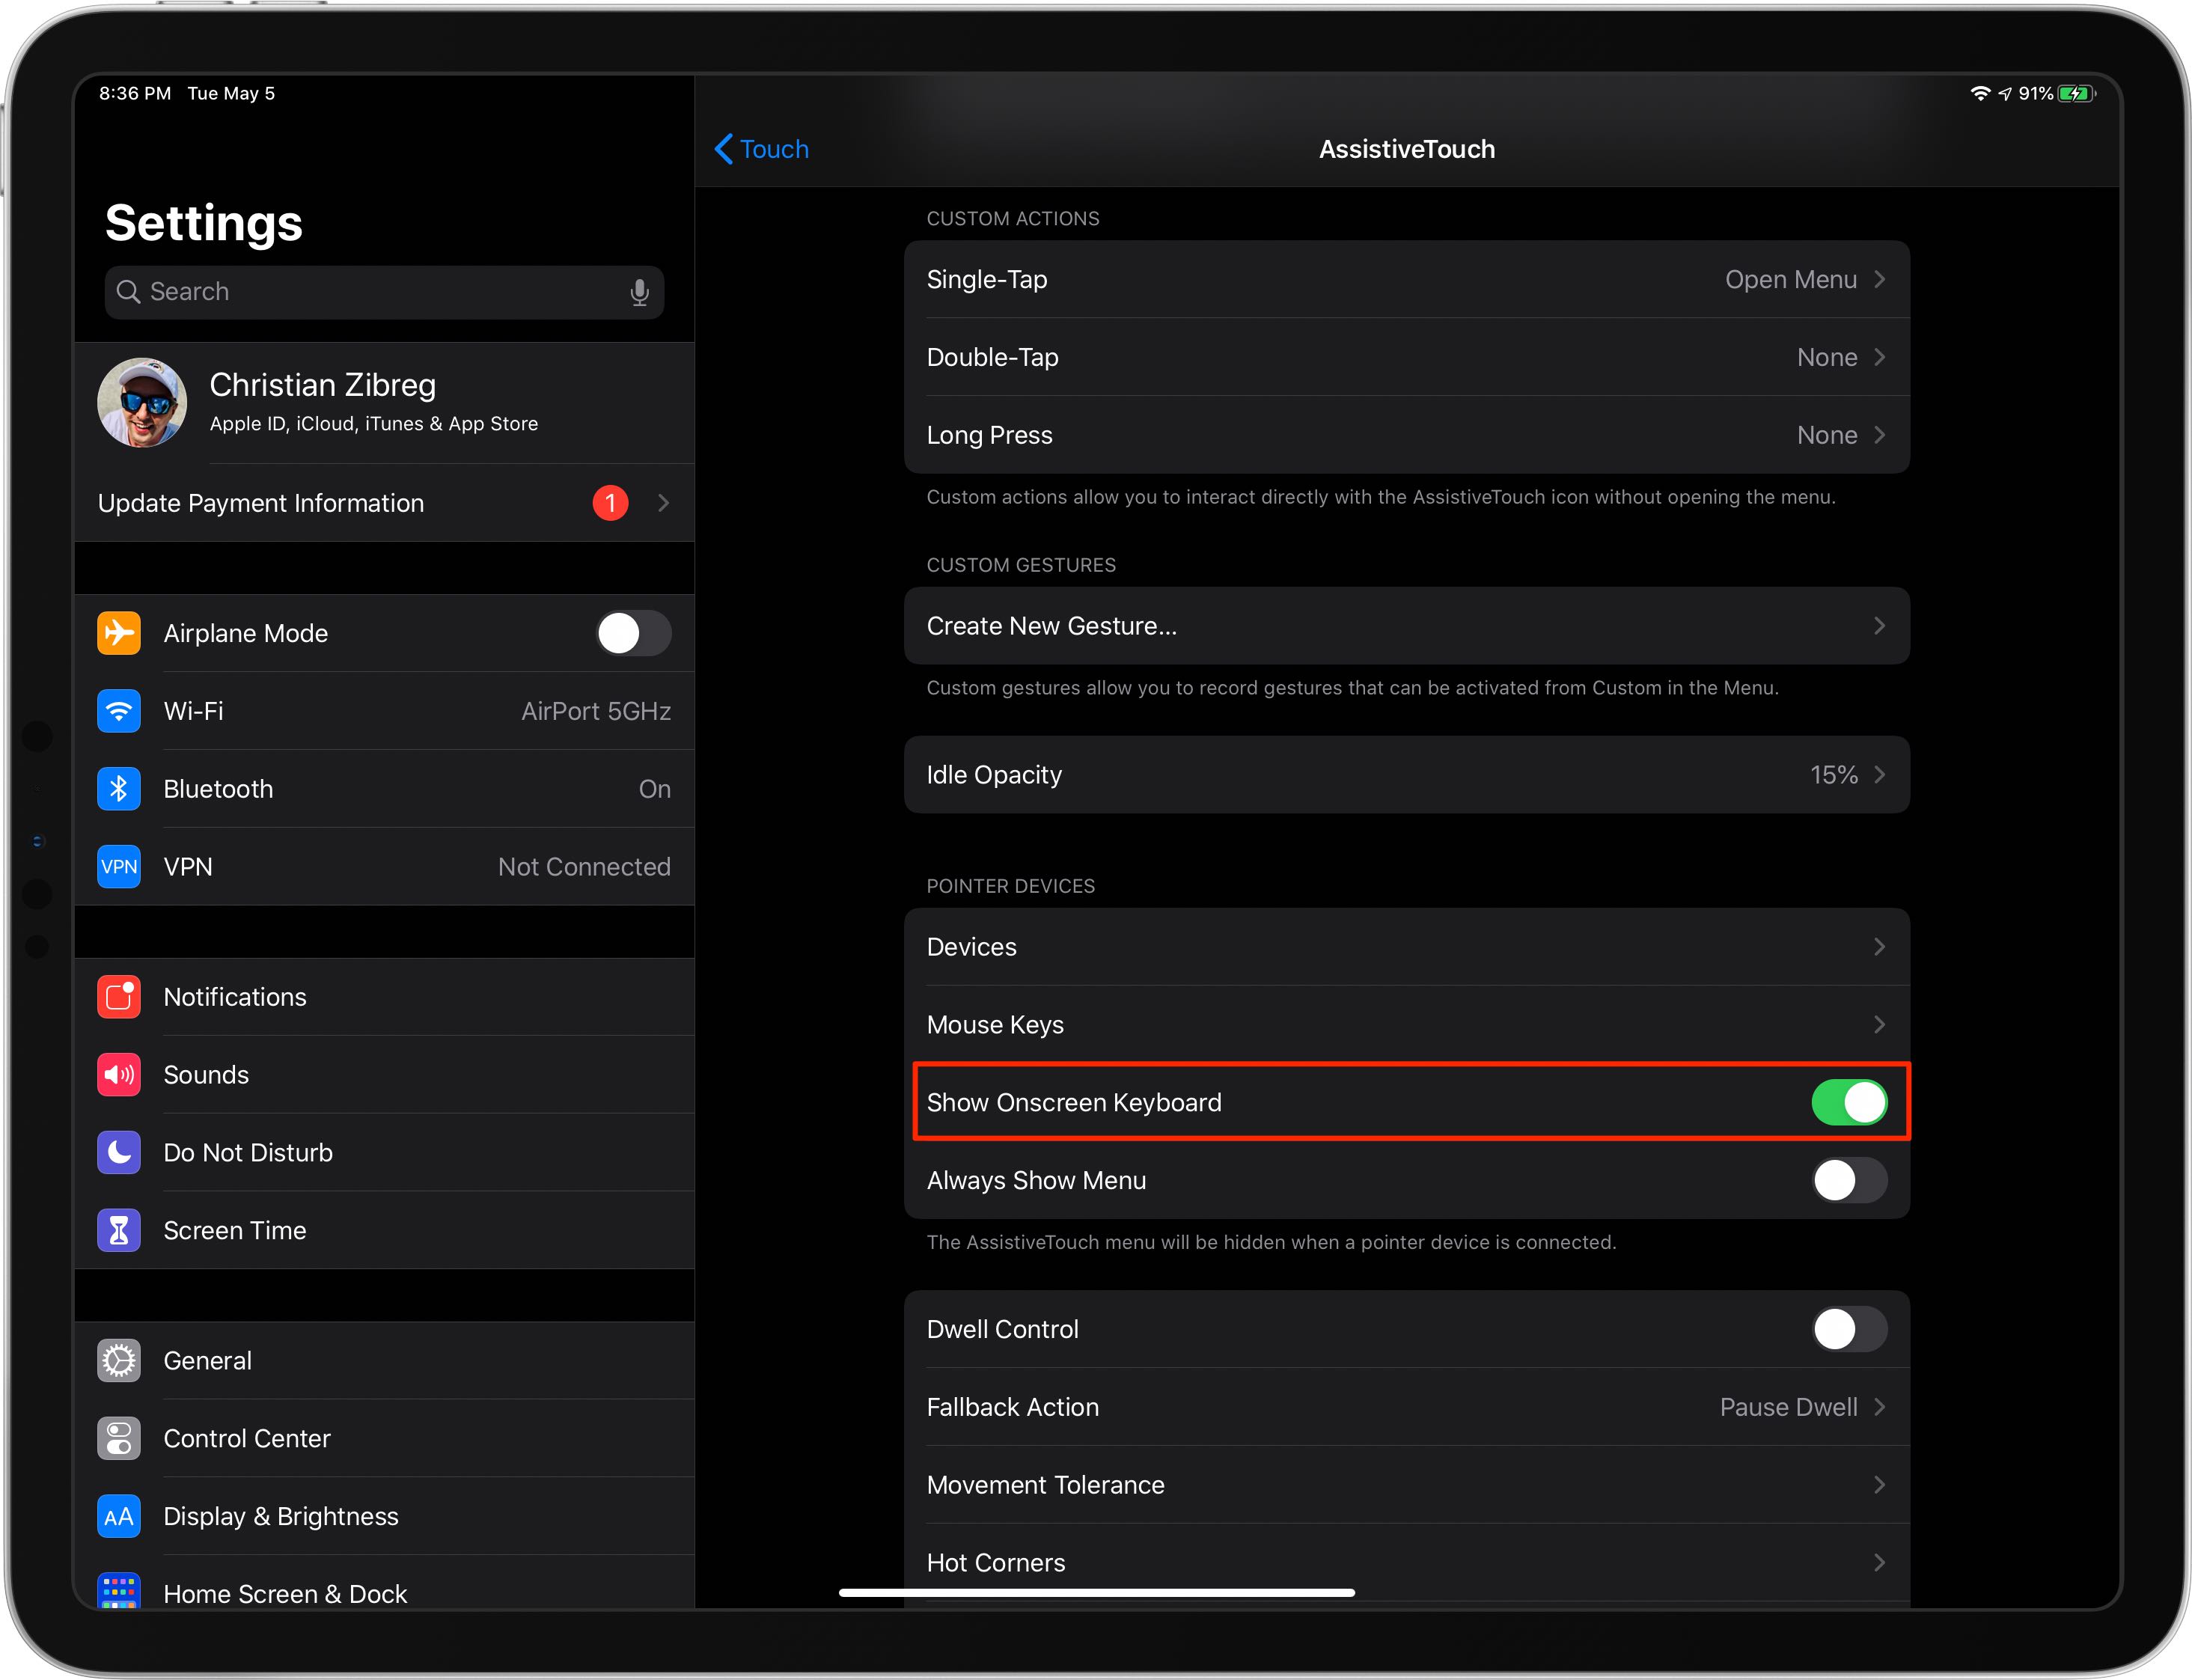
Enable this to type on the virtual keyboard with Mouse Keys
Now you can use the Mouse Keys keyboard shortcuts, or a pointer device, to type on the onscreen keyboard while a physical keyboard is connected to the device.
Using iOS keyboard while a hardware one is connected
By default, connecting a hardware keyboard to your device disables the stock onscreen keyboard provided by the operating system. As explained in our separate tutorial, you can switch between the software and hardware keyboard on the fly.
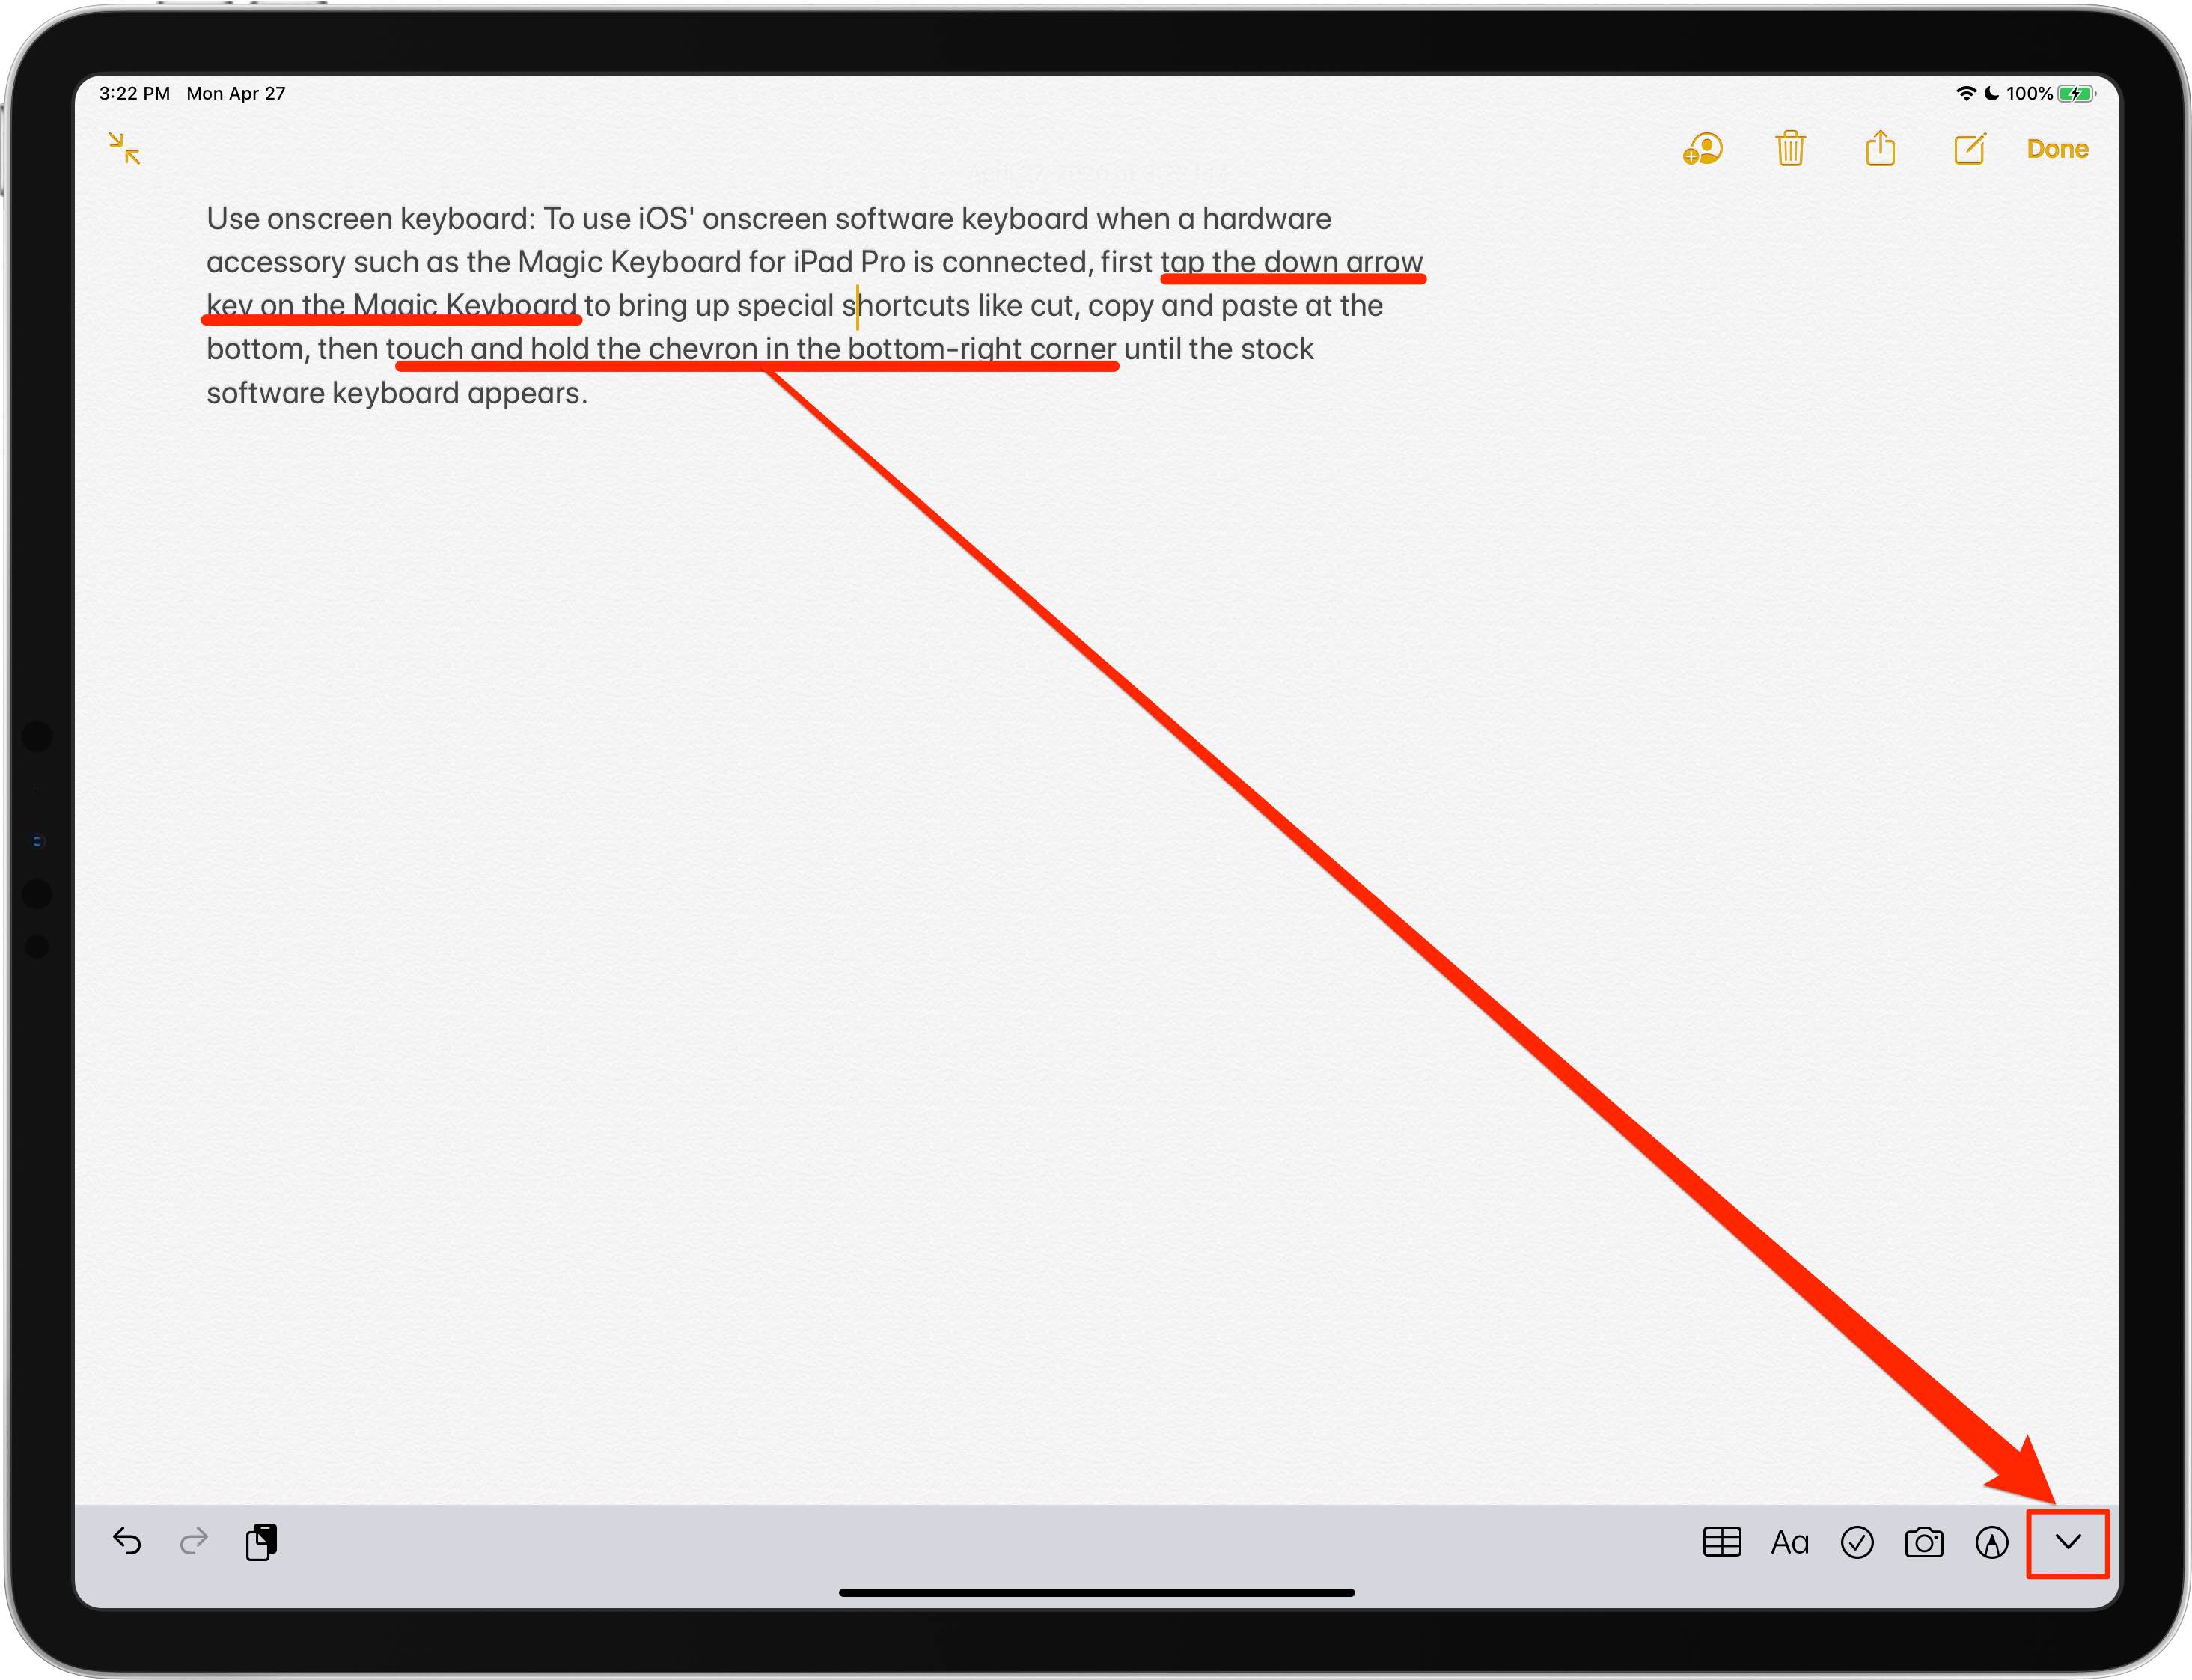
If you need to use the onscreen keyboard when the physical keyboard is connected to the device, tap the down arrow key on the physical keyboard to bring up text controls, then touch and hold the chevron near the bottom-right corner to bring up the software keyboard.
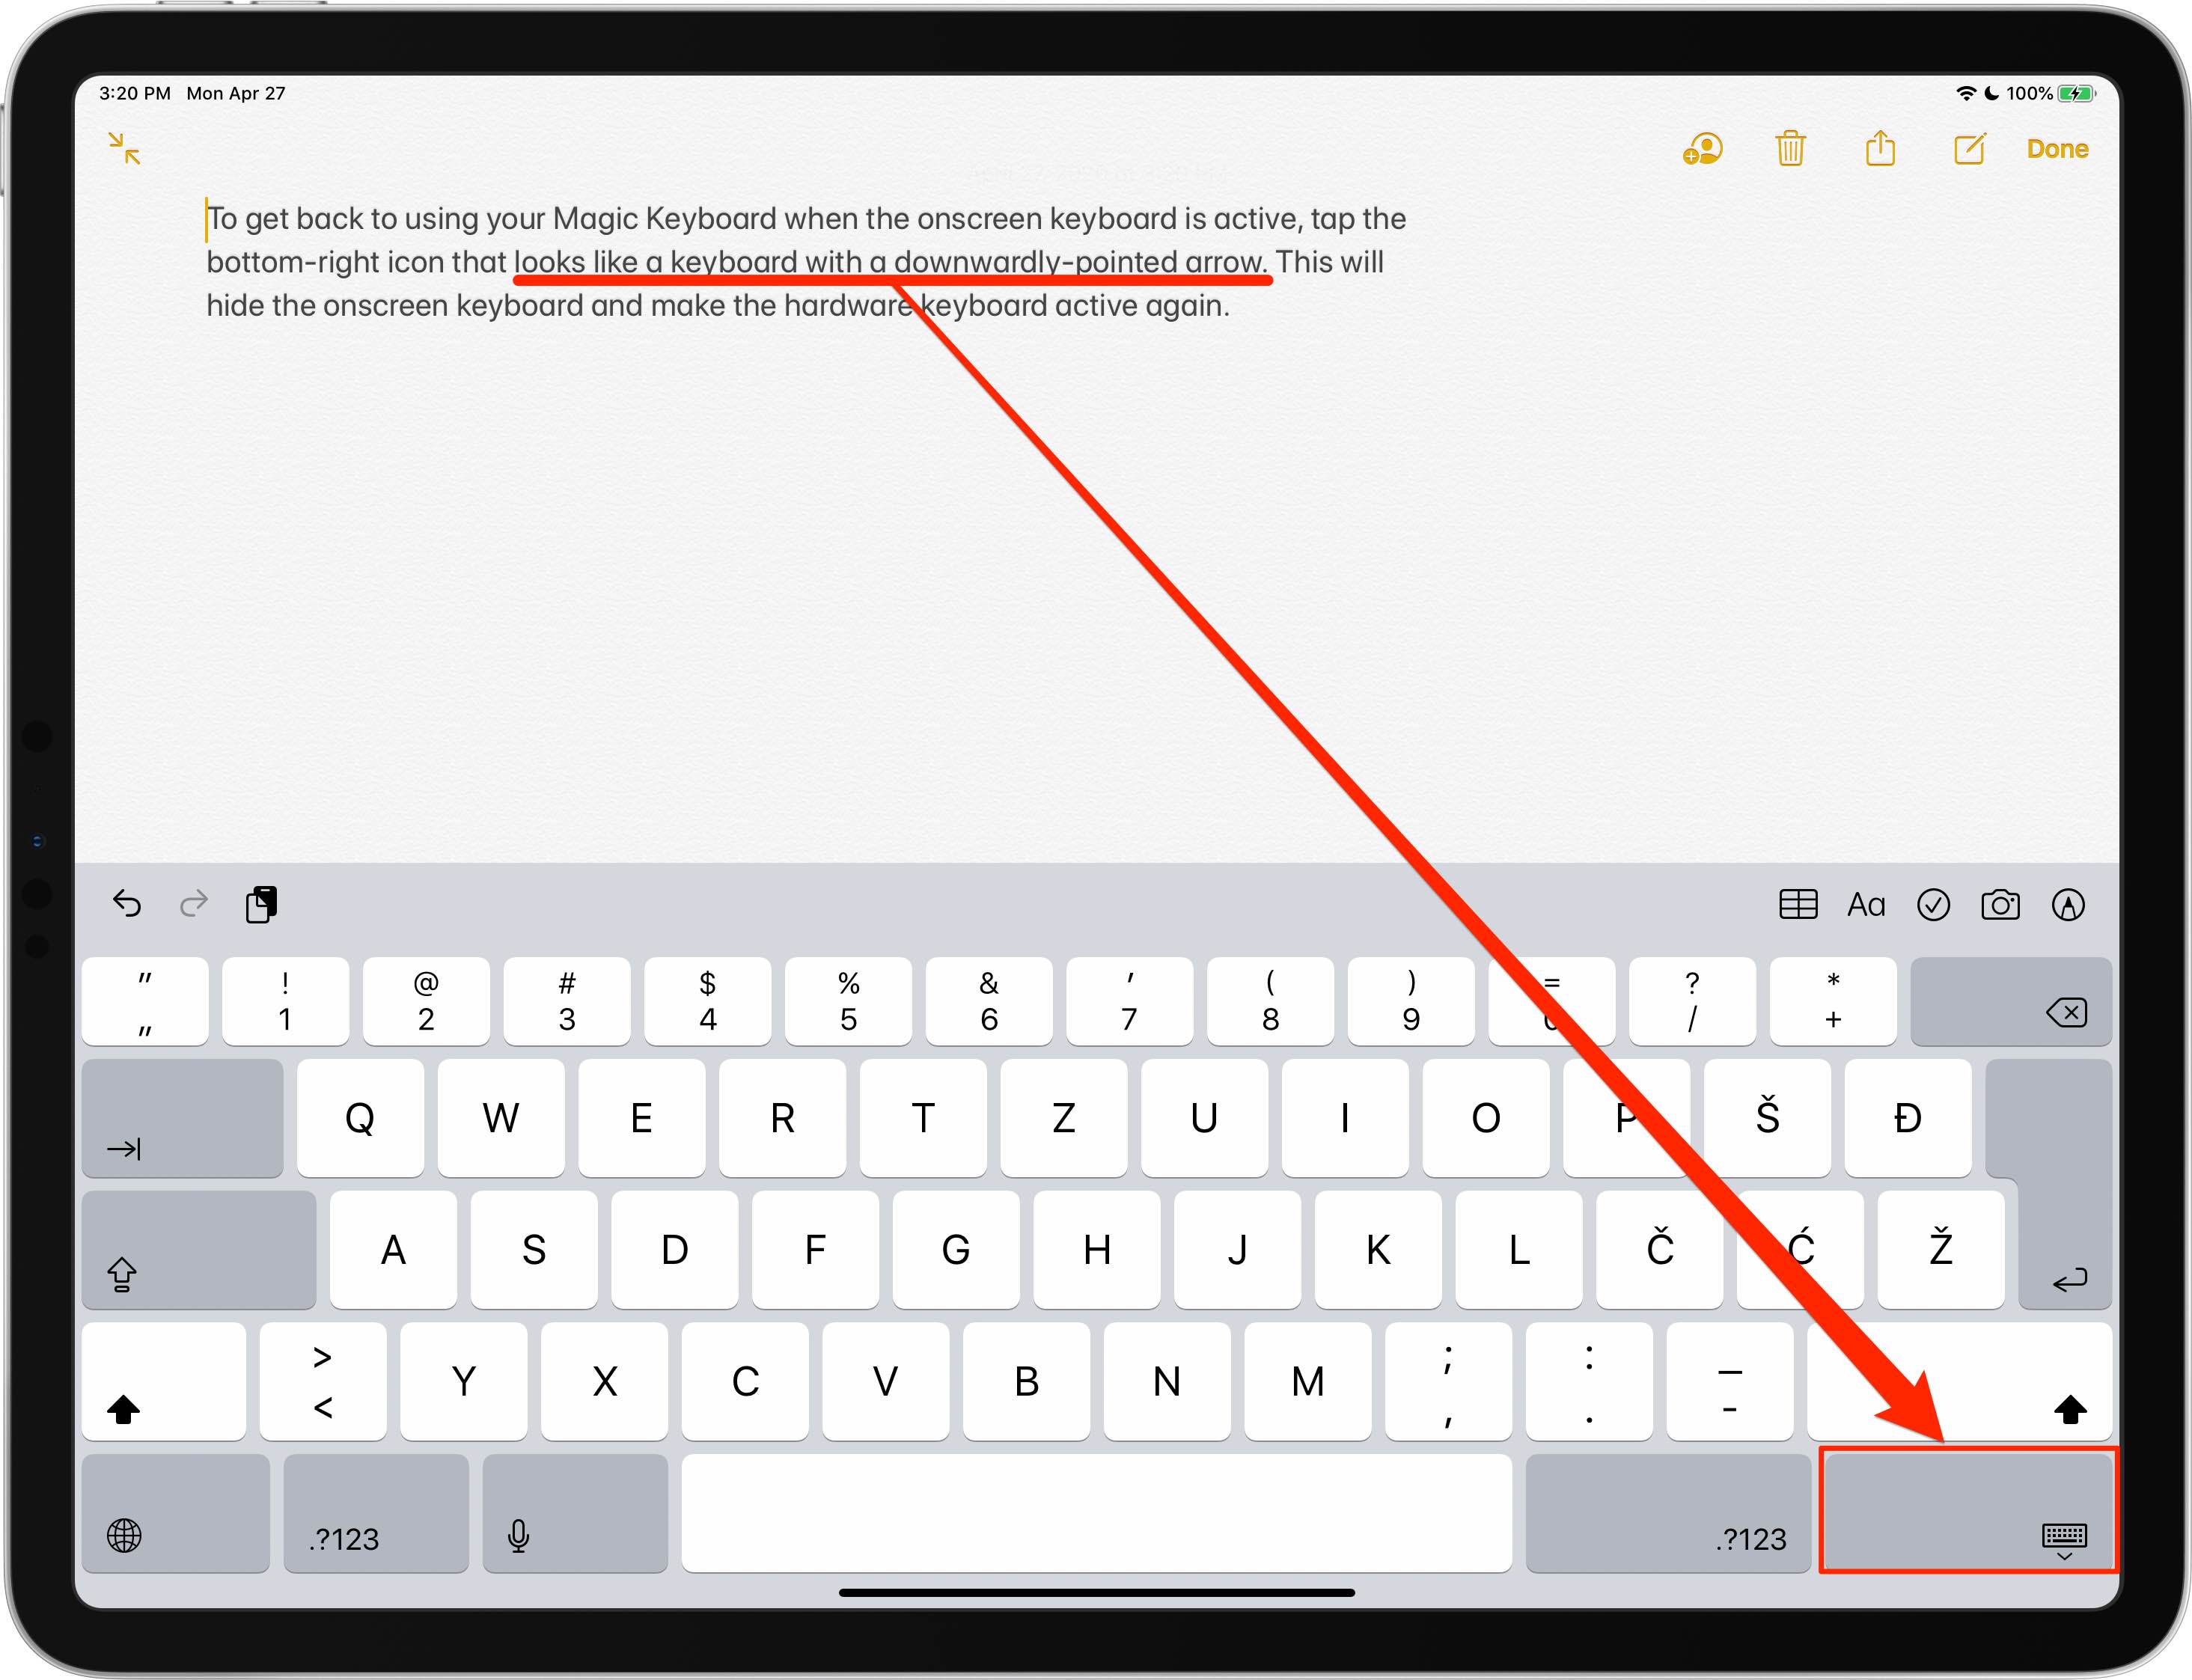
When you’re done using the software keyboard, you can get back to using its hardware counterpart quickly: tap the bottom-right icon on the onscreen keyboard which resembles a keyboard with a downwardly-pointed arrow to dock the software keyboard.
Wouldn’t it be great if you could make this change permanent?
Actually, you can do just that by going to Settings → Accessibility → Touch → AssistiveTouch, then enable the option Show Onscreen Keyboard underneath the Pointer Devices heading (the AssistiveTouch button at the top must also be toggled on).
Now the onscreen keyboard will always pop up, even if a hardware keyboard is connected.
If you’d like to type on the onscreen keyboard using Mouse Keys or with the pointer while a keyboard is connected, be sure to enable this setting.
You can even enter text by typing on the software and hardware keyboards interchangeably.
Full Keyboard Access
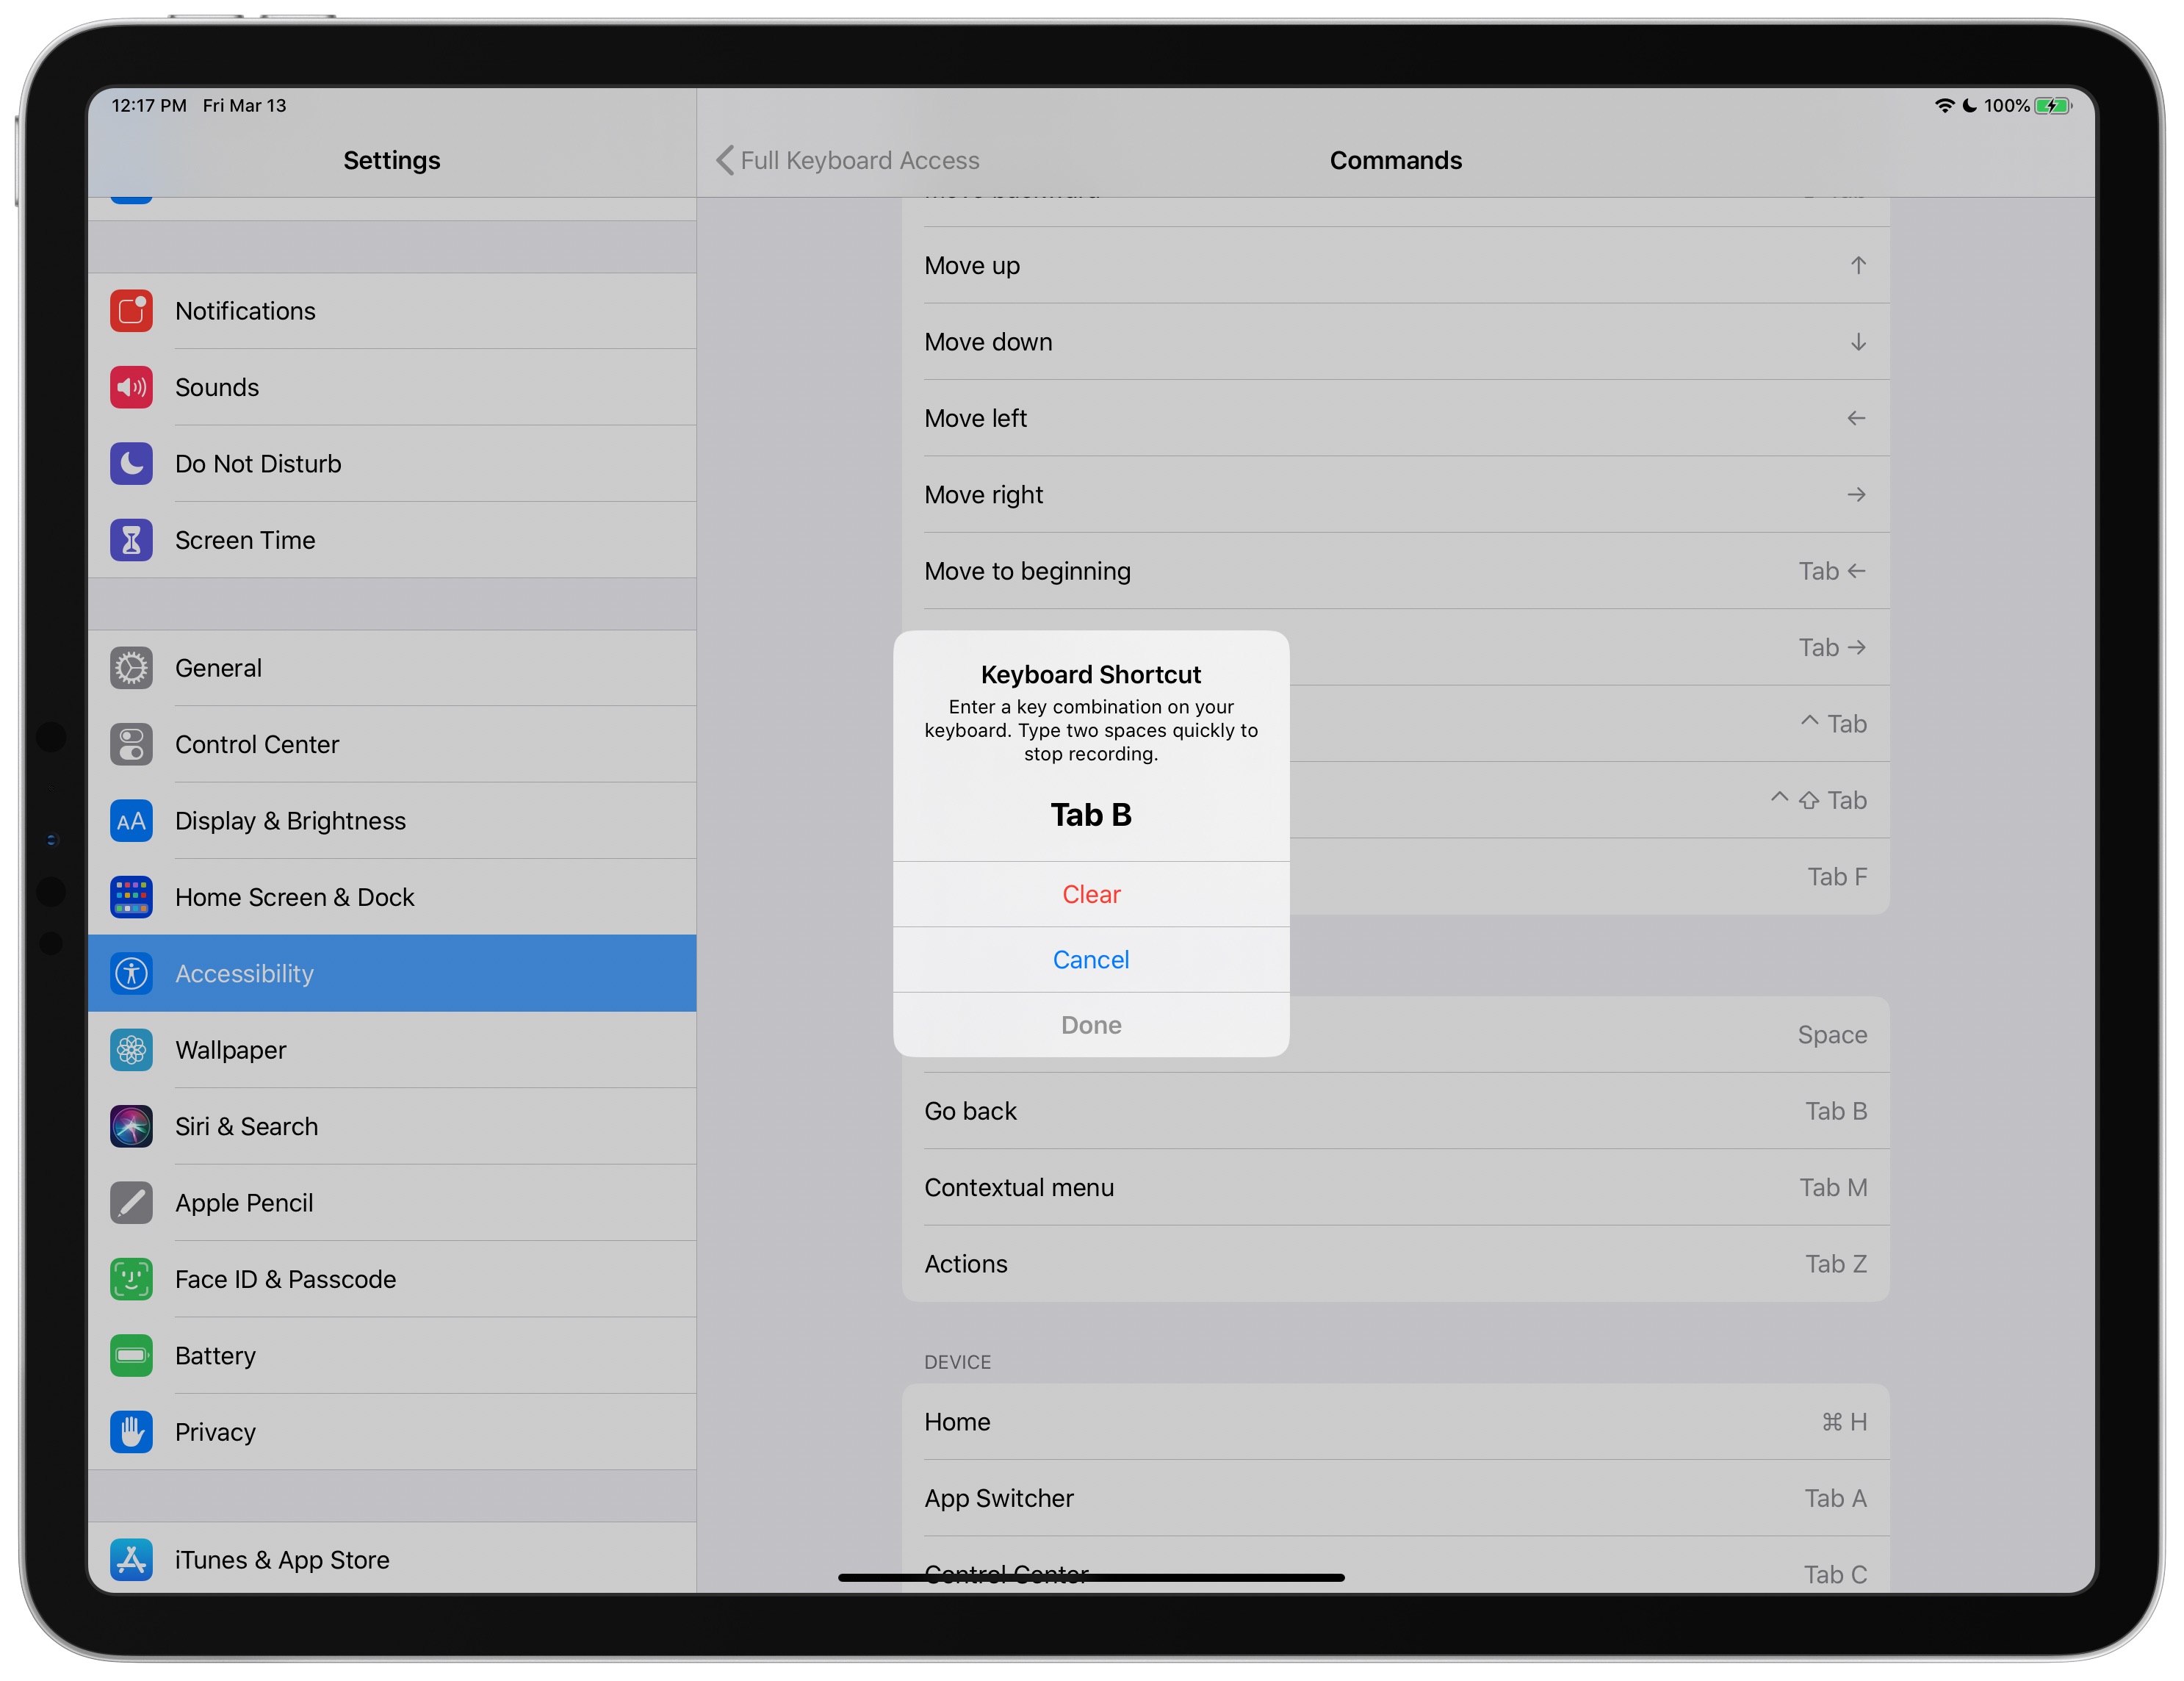
Speaking of accessibility, another cool new feature in iPadOS 13.4 lets you control your Apple tablet and the entirety of the iPadOS user interface with an external keyboard using new accessibility shortcuts, grouped under a new section dubbed Full Keyboard Access.
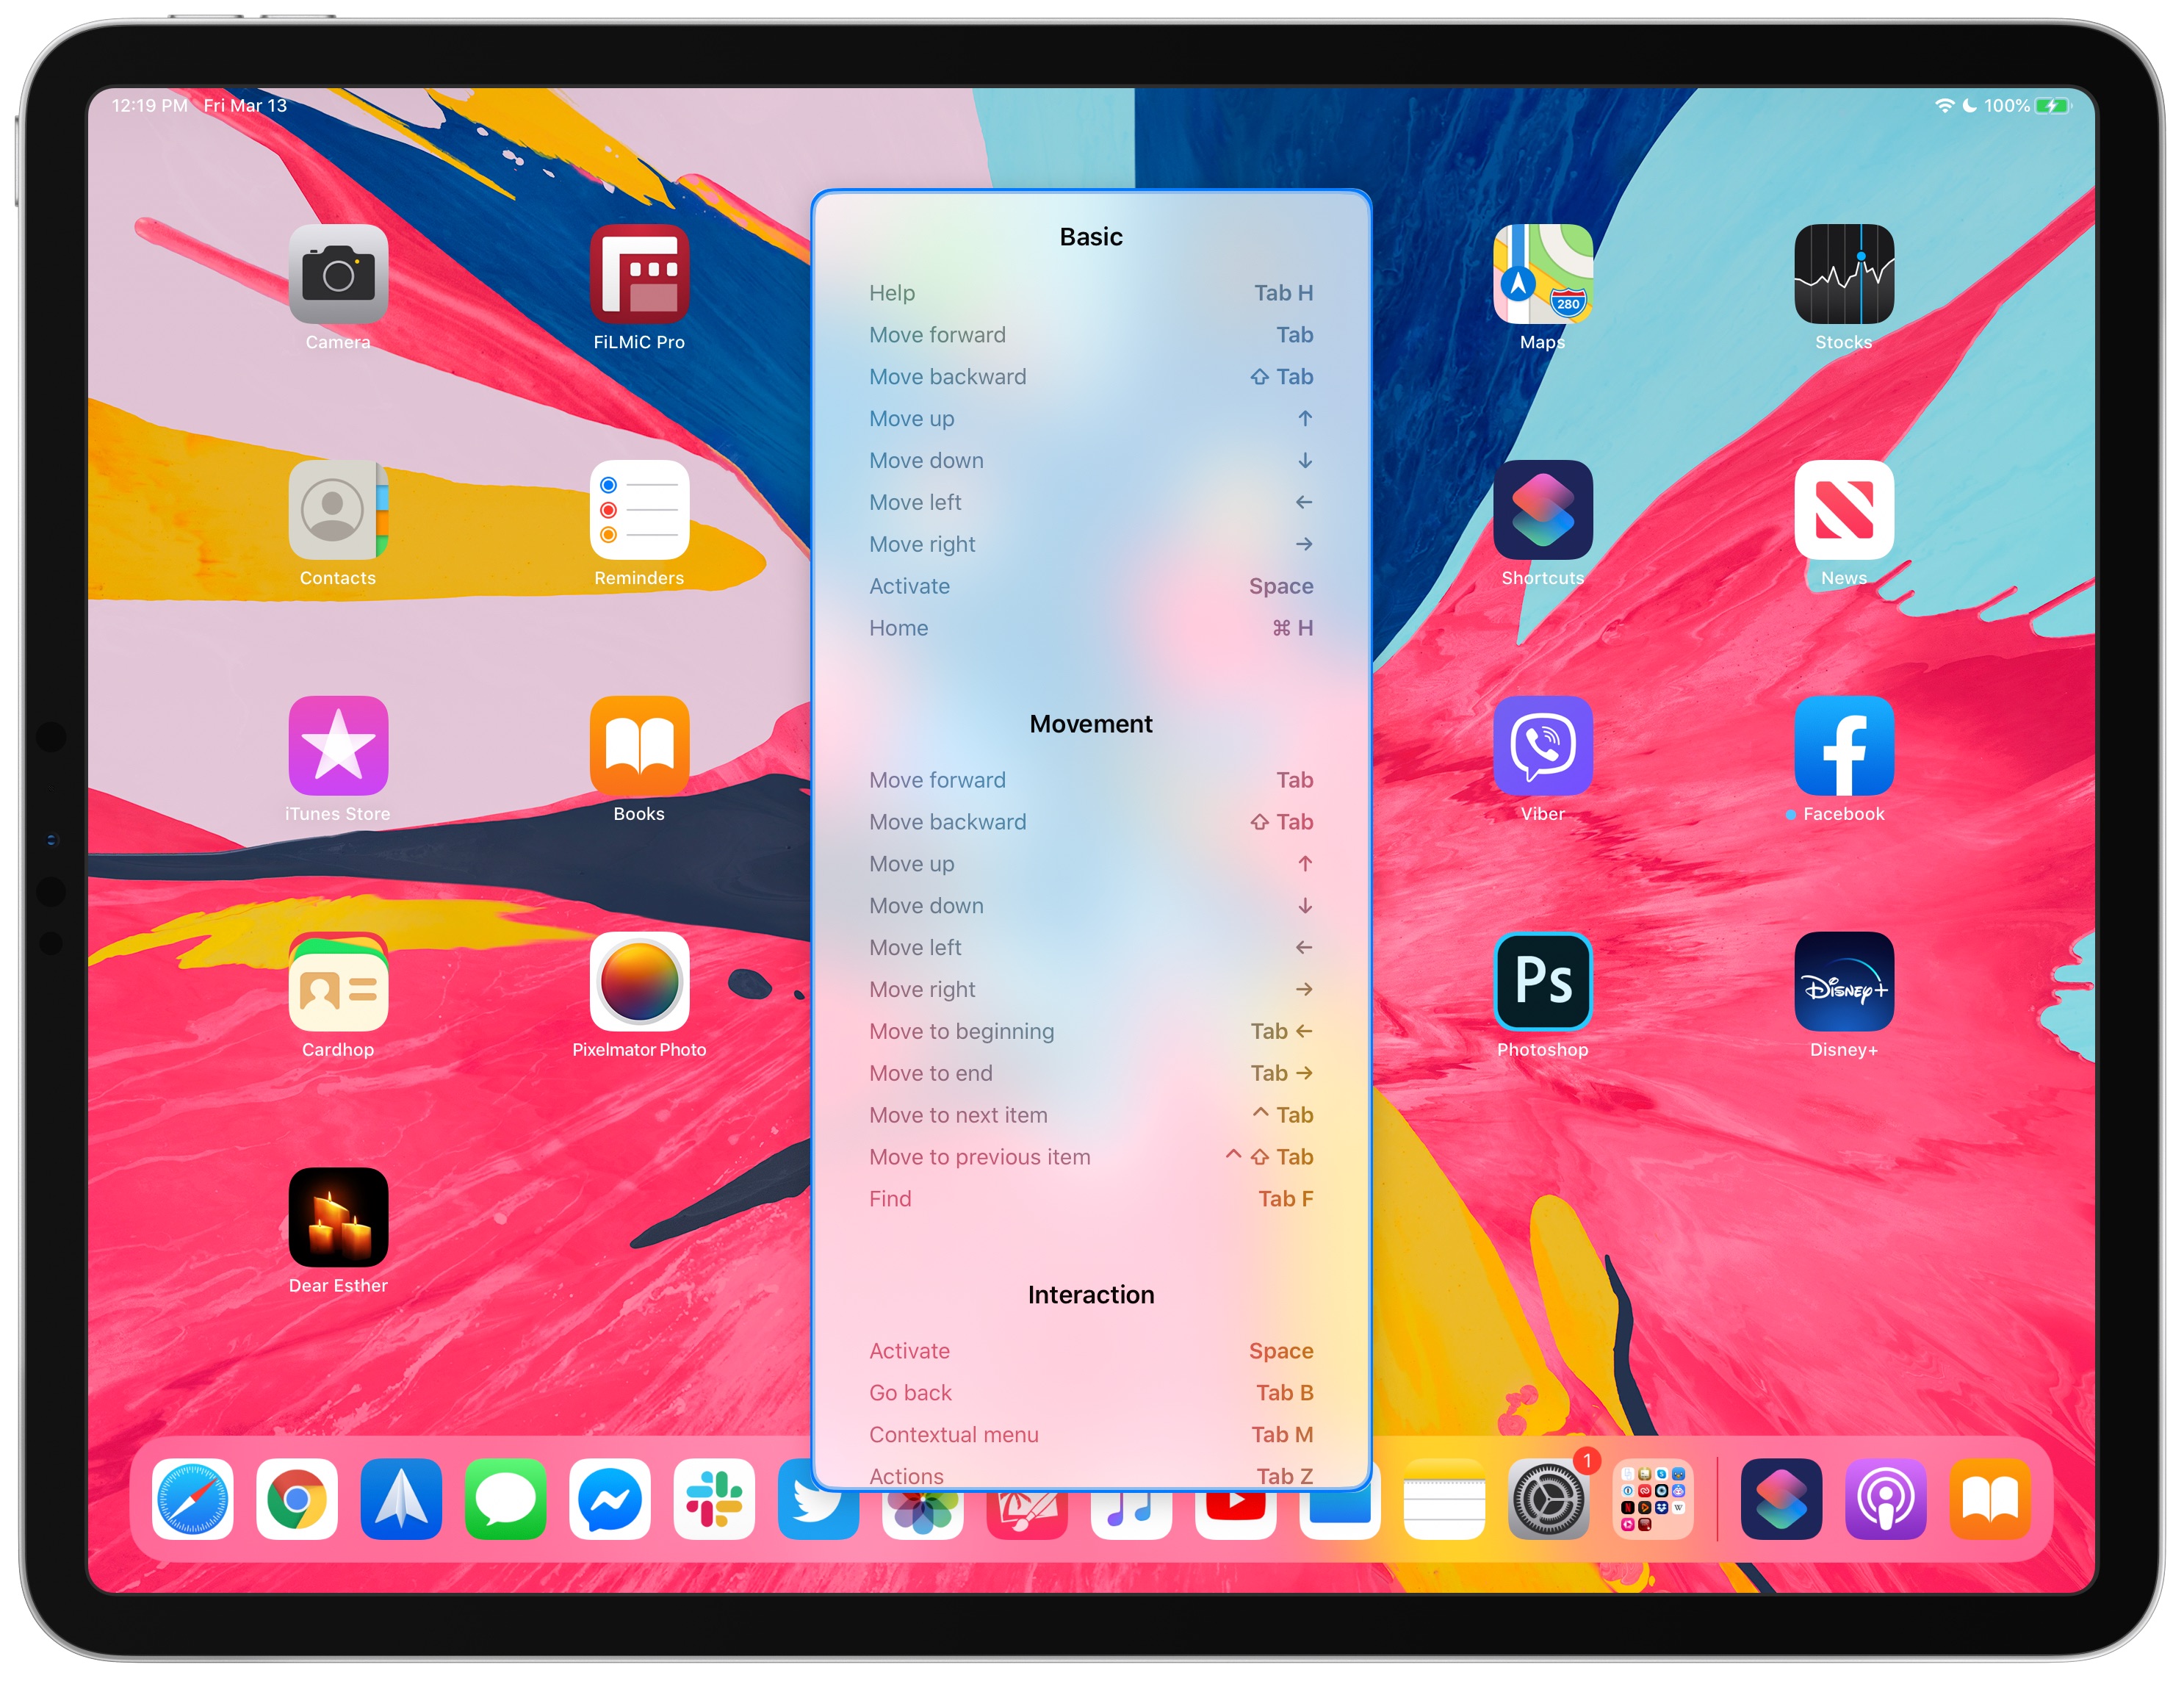
This feature uses a focus rectangle to indicate the currently selected onscreen element which will receive input from you. Full Keyboard Access includes a bunch of keyboard shortcuts that you can remap to your liking, even assigning your Shortcuts scripts to a custom keystroke.
Features like the Notification and Control Center, and device actions like restarting, can be executed without problems via keyboard gestures available with Full Keyboard Access.
TUTORIAL: How to view available keyboard shortcuts in Mac apps
To learn more about Full Keyboard Access and how to use it, peruse our dedicated tutorial.
Need help? Ask iDB!
If you like this tutorial, pass it along to your friends and leave a comment below.
Got stuck? Not sure how to do certain things on your Apple device? Let us know via [email protected] and a future tutorial might provide a solution.
Submit your own how-to suggestions via [email protected].
Source link: https://www.idownloadblog.com/2020/05/05/control-ipad-pointer-with-keyboard-tutorial/

Leave a Reply