

Why and how to enable Advanced Data Protection for iCloud
In this comprehensive tutorial, we’ll explain Advanced Data Protection and show you how to enable it on your Apple Account to add end-to-end encryption for additional items like iCloud Notes, Photos, and more.
While most items stored on iCloud are encrypted to some extent, Advanced Data Protection goes a step further by allowing you to enable end-to-end encryption for items that aren’t already protected by default.
Advanced Data Protection for iCloud was introduced in 2022 (the FBI opposed it and demanded access to it), but it’s in the news again in 2025 because Apple has removed the feature in the UK after the government wanted backdoor access to user data. If you live outside the United Kingdom, here’s how to make use of this excellent feature to strengthen your privacy.
Apple’s standard and advanced data protection
Apple has two main kinds of protection levels for your iCloud data:
- Standard data protection
- Advanced Data Protection
The standard protection is the default setting for all Apple Accounts. In this setup, around 15 things (listed below) are end-to-end encrypted (just like Advanced Data Protection), and the remaining stuff have standard data protection.
With standard data protection, your data is still encrypted when it leaves your device and when it’s stored on Apple’s/Apple-partnered servers. However, the encryption key to decrypt your encrypted data is saved with Apple. So, if someone were to hack Apple and get those decryption keys, they could technically get their hands on your personal data.
Advanced Data Protection, on the other hand, adds end-to-end encryption to 11 more iCloud features (listed below), giving you a wider sense of protection. So, in total, 15 (standard data protection) + 11 (Advanced Data Protection) = 27 data categories are now end-to-end encrypted.
When you enable Advanced Data Protection, the decryption key for your encrypted data is stored only on your trusted devices (iPhone, iPad, Mac, etc.), not with Apple. This means that even if Apple’s servers are hacked or a data breach occurs, hackers cannot decrypt your data because the keys are securely stored on your devices. Additionally, with end-to-end encryption, even Apple cannot access or assist in decrypting your data—only you can do so using your trusted devices or recovery keys.
What’s already end-to-end encrypted with standard data protection
Apple uses end-to-end encryption for these 15 categories, even if you don’t turn on Advanced Data Protection:
- iMessage
- Messages in iCloud, when device iCloud backup is off
- Your saved account usernames and their passwords, plus other Keychain items
- Your Wi-Fi passwords
- Your payment information, like credit card details saved to your Apple Account, Apple Pay, and Safari
- Apple Card transactions
- Your health data
- Journal data
- Home app data
- Vocabulary your iPhone or iPad keyboard has learned based on your typing
- Safari browser history, Tab Groups, and iCloud Tabs
- Maps data like your search history, Guides, and Pins
- Siri information like your Siri settings, personalization, etc.
- Your Memojis
- W1 and H-series Bluetooth keys (W and H series chips are used in AirPods and Beats headphones)
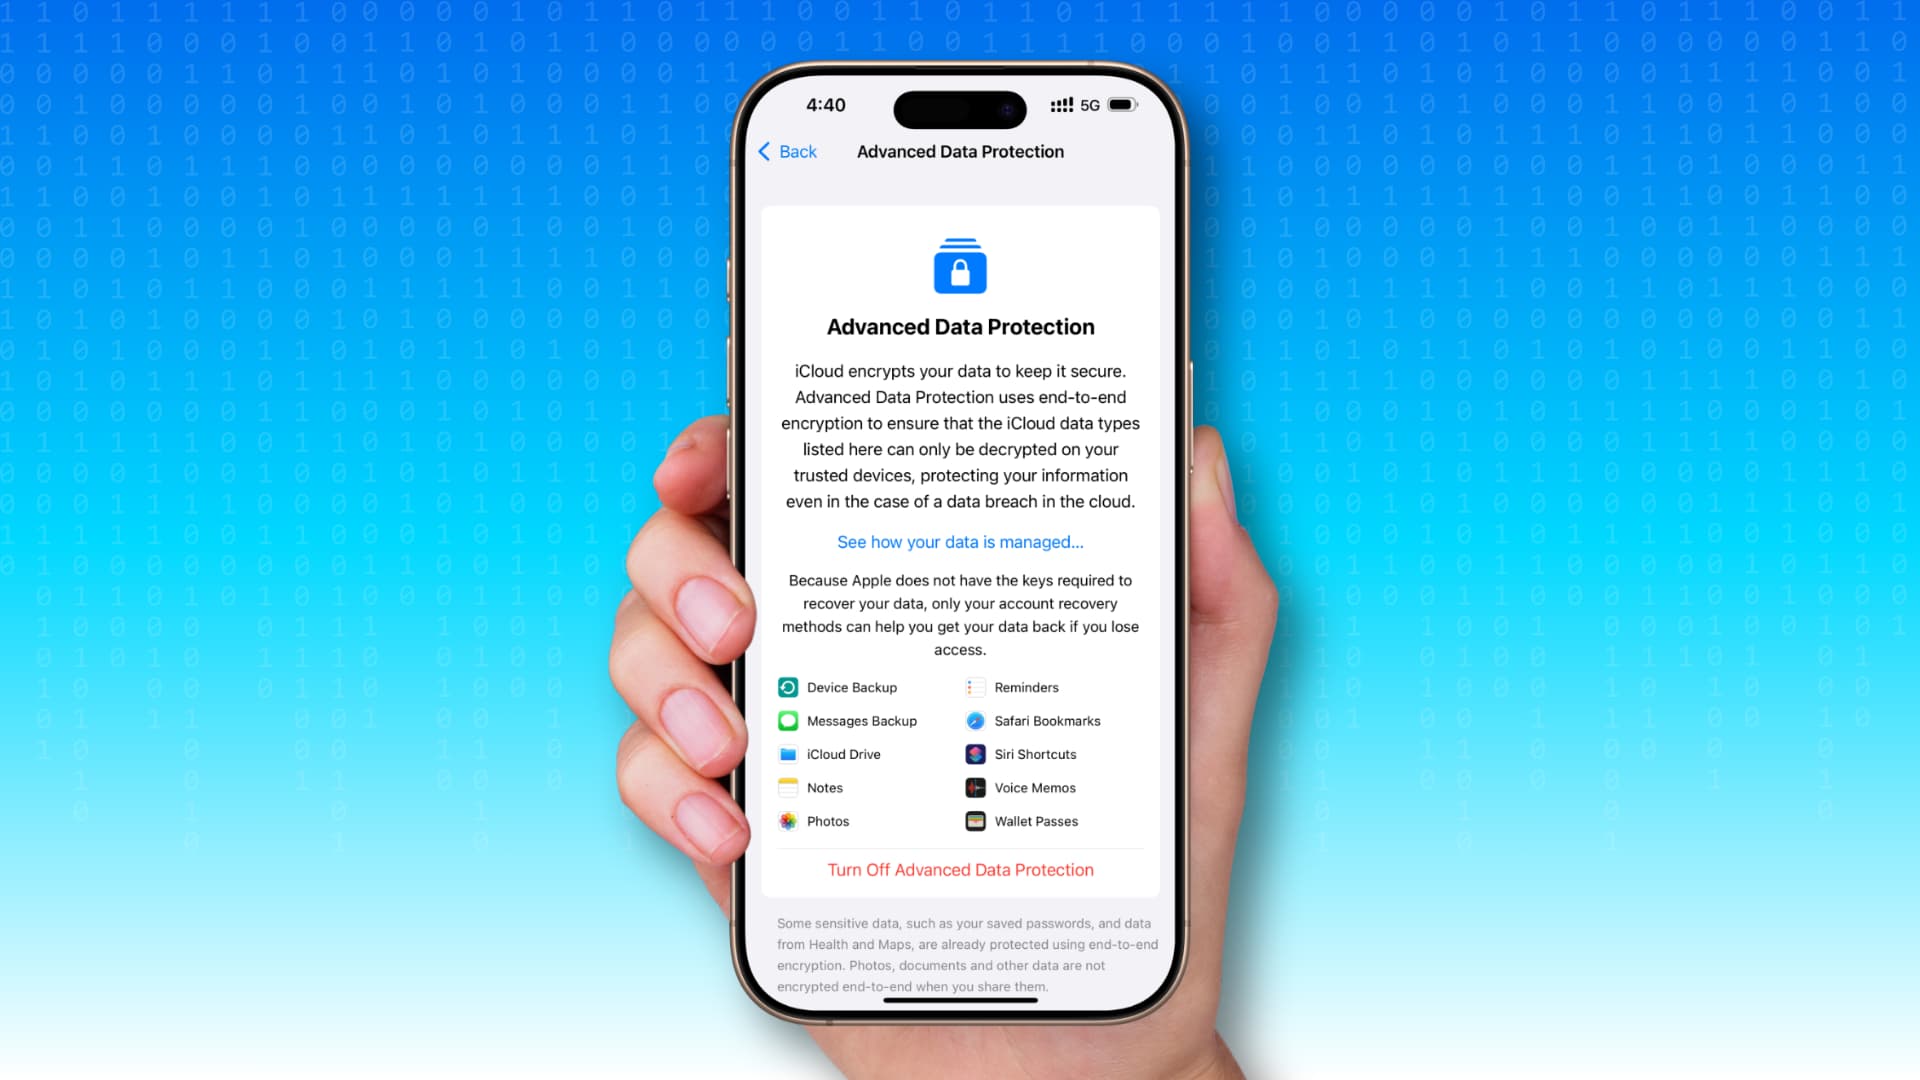
What more is encrypted after turning on iCloud Advanced Data Protection
Things that are already end-to-end encrypted (listed above) with standard data protection remain unchanged. However, the following additional data — which were not end-to-end encrypted with standard data protection — become end-to-end encrypted when you enable Advanced Data Protection:
- iCloud backup of your iPhone and iPad (this includes Messages backup)
- Files saved to iCloud Drive
- iCloud Photos
- iCloud Notes
- iCloud Reminders (But reminders synced using CalDAV aren’t end-to-end encrypted)
- Voice memos you save to iCloud
- Wallet passes
- Safari Bookmarks
- Siri Shortcuts
- Freeform documents
- Unpublished invitations in the Apple Invites app. And published invitations, provided all participants have Advanced Data Protection enabled
What’s still not end-to-end encrypted
Even after you enable Advanced Data Protection, the following apps maintain their standard security and are not end-to-end encrypted:
- iCloud Mail
- iCloud Calendars
- iCloud Contacts
- Shared Albums in Photos app
- When you collaborate on a document, spreadsheet, or presentation in iWork apps, namely Pages, Numbers, and Keynote
- When you share something like a note, iCloud Drive folder or file, etc., using the “Anyone with the link” option. However, it’s end-to-end encrypted if you share these only with people who also have Advanced Data Protection enabled.
Advanced Data Protection doesn’t protect iCloud Mail, Calendars, and Contacts to maintain interoperability with global email, contacts, and calendar systems and apps. Furthermore, contacts and calendars are built on CardDAV and CalDAV industry standards that don’t support end-to-end encryption.
Similarly, shared documents, files, folders, and photos aren’t end-to-end encrypted, as Apple must have access to them, so anyone who has the link can open such shared files.
You can learn more at Apple Support.
Requirements to turn on iCloud Advanced Data Protection
- Apple Account with two-factor authentication (it’s almost certain that you already have this). Child Apple Accounts and Managed Apple Accounts aren’t supported.
- Your iPhone, iPad, Mac, or other device must have a device passcode or password set.
- Account recovery contact or recovery key. You’ll be asked to set it up if you don’t have it already.
- Make sure all your devices are running the latest version of iOS, iPadOS, macOS, watchOS, tvOS, and HomePod software. If you use iCloud on a Windows PC, update the app to the latest version.
One important thing to keep in mind
In my opinion, you should enable Advanced Data Protection only if you can securely save or memorize your Apple Account password and recovery key. Additionally, ensure you add only trusted individuals as your recovery contact and remove them if the relationship changes.
Apple won’t be able to help you regain access to your Apple Account if you lose your recovery key and can’t get help from your recovery contacts. We’ll go over how this works later in the tutorial.
Turn on Advanced Data Protection for iCloud to secure your data
You can enable Advanced Data Protection on your iPhone, iPad, or Mac. But note that you don’t need to do this on all your devices, as turning on Advanced Data Protection on one of them will activate it for your entire Apple Account and all your supported devices.
Note that the steps here are only this extensive if you haven’t set up a recovery key and contact for your Apple Account. Once you have those in order, turning on Advanced Data Protection takes just a few taps.
Step 1: Add recovery contact to your Apple Account
1) Open the iOS Settings app and tap your Apple Account name at the top.
2) Select iCloud.
3) Select Advanced Data Protection at the bottom of the screen.
4) Tap Account Recovery.
5) You have two choices here — Add Recovery Contact and Recovery Key. Choose the former for now and authenticate with Face ID, Touch ID, or passcode.
6) Select a person added to your Apple digital family setup and hit Next. You can also tap Choose Someone Else and select them from your contacts list.
7) You’ll now have to send a message to that person, informing them that you’ve added them as your recovery contact. You can hit Send to use the pre-written text or tap Edit Message and explain it in your own words.
8) After sending the message, you’ll see the “Account Recovery Contact Added” screen. Tap Done here.
Important: The person may have to accept your request to become your recovery contact by tapping the link in the message and hitting Accept. So, ask them to do that.
Note: You can add more than one person as your recovery contact.
Step 2: Add a recovery key to your Apple Account
With recovery contact added, you can now set up your recovery key so that you have an additional way to regain access to your account.
1) Tap Recovery Key on the Account Recovery screen (Settings > Apple Account > iCloud > Advanced Data Protection > Account Recovery).
2) Tap Turn On Recovery Key, followed by Use Recovery Key, and enter your device passcode if asked.
3) You’ll see a 28-digit recovery key. Take a screenshot, note it on a different device, or write it on paper and keep it safe and private. Then, tap Continue.
4) To ensure you have taken note of your recovery key, Apple needs you to type the recovery key here and verify. So do that and hit Next. You don’t have to type the dashes (-) or worry about the lower and uppercase situation.
5) You may now be taken to your Apple Account Sign-In & Security screen. Review your primary email, phone number, recovery methods, etc. Then, tap the back button and follow the next step.
Step 3: Turn on Advanced Data Protection
With account recovery options in place, you can enable end-to-end encryption for your iCloud backups, notes, reminders, Drive files, and more by following these simple steps.
1) Go to iOS Settings and tap your Apple Account name in the top, followed by iCloud > Advanced Data Protection.
2) Tap Turn On Advanced Data Protection.
3) Apple informs you that you’ll be responsible for your data recovery. Hit the Review Recovery Methods button here.
4) You’ll see your recovery contacts. Tap Continue or Contacts Up to Date, provided they are.
5) Now, you must type your recovery key so Apple knows you have it saved and hit Next.
6) Finally, enter your iPhone or iPad passcode and tap Done to turn on Advanced Data Protection.
Once enabled, you’ll see these screens:
The fundamentals of enabling Advanced Data Protection on macOS are precisely the same as on iOS.
1) Open System Settings and select your Apple Account in the top left.
2) Click iCloud.
3) Select Advanced Data Protection.
4) Click Turn On next to Advanced Data Protection and follow along.
Accessing iCloud.com in a browser after you turn on Advanced Data Protection
Activating Advanced Data Protection turns off iCloud data access in a web browser on your iPhone, iPad, Mac, Windows PC, or Android phone. However, you can go to Settings > Apple Account > iCloud and turn on Access iCloud Data on the Web.
If you have a Windows computer
After turning on Advanced Data Protection, you may get an alert on your Windows PC saying, “HEVC Video Extension Required.” Clicking this alert takes you to the Microsoft Store, where you’ll be asked to download a paid app.
However, in my test on a Samsung Galaxy Book running the latest version of Windows 11, I found that my HEVC videos (recorded on iPhone) and synced to Windows PC via iCloud Photos play in both the Microsoft Photos app and File Explorer without using any extra HEVC extension or app.
Manage your recovery contact and key
If you’re no longer with the person who is added as your recovery contact or if you think your recovery key is lost or someone has access to it, head to Settings > Apple Account > iCloud > Advanced Data Protection > Account Recovery. From here, you can:
- Remove an existing recovery contact
- Add more people as your recovery contact
- Create a new recovery key
- Remove recovery key
How to use your recovery key and recovery contact to get access to your Apple Account
You won’t need to use your recovery contact or recovery key in daily life. However, if you try to sign in to a new, erased, or signed-out device, like an iPhone, iPad, Mac, etc., you’ll be asked to enter your Apple ID email address and the right password. Then, you must authenticate via a popup & code sent to your other trusted Apple device or a code sent via SMS to your trusted mobile number added to your Apple account.
If you don’t remember your account password nor have access to your other trusted devices or your mobile number, then you can use your recovery key or/and the code generated by your recovery contact on their iPhone, iPad, or Mac.
Now, let me demonstrate how this works using my two Apple Accounts on my two iPhones.
Trying to sign in to an iPhone with my Apple Account, whose passcode I have forgotten
1) Tap Sign In on the setup page or in Settings.
2) Select Sign in Manually if shown.
3) Hit Forgot password.
4) Enter your Apple Account email address.
5) Tap “Didn’t get a code?” or “Can’t Use This Number” to confirm you can’t use your mobile number.
6) Tap Use Recovery Key and enter the recovery key you had saved when enabling Advanced Data Protection.
7) Alternatively, you may see a screen saying “Get Help from Your Recovery Contact.” Tap Get Help Now and select iPhone, iPad, or iPod touch, or Mac. Now, ask your contact to follow the steps in the next heading to generate a recovery code for you. Enter that code on your iPhone (and the recovery key if asked) to complete the password-changing or sign-in process.
Generating a recovery key for my friend so they can get access to their Apple Account
1) Open Settings and tap your Apple Account name.
2) Tap iCloud > Advanced Data Protection > Account Recovery and select your friend under the “Account Recovery For” screen. Then, tap Get Recovery Code and share this code with your friend so they can use it in Step 7 above.
You can do the same from Settings > Apple Account > Sign-In & Security > Recovery Contacts > select your friend under the “Account Recovery For” section and hit Get Recovery Code.
Turn off Advanced Data Protection for your iCloud account
If you don’t want to use it, head to Apple device Settings > Apple Account > iCloud > Advanced Data Protection and tap Turn Off Advanced Data Protection.
What do you think of this optional feature? Do you have it enabled?
Looking for more iCloud tips? Check out 14 tips to secure your iCloud and Apple Account.
Source link: https://www.idownloadblog.com/2025/02/26/how-to-turn-on-advanced-data-protection-for-icloud/

Leave a Reply