

How to use Hide My Email on iPhone, iPad, Mac, and Web
Learn how to keep your main email address private by using the Hide My Email feature to generate random email addresses for apps, websites, newsletters, and other online services.
You may not want to use your main iCloud, Gmail, or other email address when you sign up for a website, app, newsletter, or send an email to someone you do not know or trust.
In these cases, you can rely on Apple’s Hide My Email option, which creates unique and random email addresses for whatever service you are signing up for. Unlike other throwaway or burner email services, these email addresses seem to work with all services as they end in @iCloud, and the service treats it as your main email address.
When you receive an email on these unique Hide My Email addresses, they are forwarded to your main email address. You can check it there or even reply to it.
All in all, things are so smooth, that it won’t even feel like you are using a random email address.
What you need
There are two ways to hide your email address:
- Sign in with Apple: This is a free service for all Apple users, and you can use it to create an account in apps and websites. The random email address for this ends in @privaterelay.appleid.com.
- Hide My Email: You can use this when composing an email, signing up for newsletters, and elsewhere. Its random email address ends in @iCloud.com. This feature requires a paid subscription to iCloud+ or Apple One.
Additionally, your device must be on iOS 15 or later or macOS Monterey or later. However, some features require the latest version of iOS and macOS, so it’s best to ensure your devices are updated to iOS 17, iPadOS 17, and macOS Sonoma.
Create and use Hide My Email address
You can enjoy this feature in several places, and we have listed them below.
In Mail
- Start composing an email in the Apple Mail app. Fill in the recipient’s email address in the “To” section. Note that you must not add more than one recipient.
- Tap Cc/Bcc, From.
- Tap the From section and choose Hide My Email.
- You will see a random email address ending in @icloud.com in the From section. Now, finish writing your email and hit the send button.
You can follow the above steps even when replying to an email.
In Safari
You can hide your main email address when signing up for websites or newsletters in Safari. Note that if a website supports Sign in with Apple, you can simply use that as well.
- Visit a website and tap the email address field.
- Tap Hide My Email above your keyboard. If you don’t see it, tap the arrow or Done and then retry.
- You will now see a Hide My Email interface that shows the random email address, where emails sent to it will be forwarded to, and the website where it’s being used. Add an optional note if you want and tap Continue.
- That random, unique Hide My Email address is auto-filled in the email address section. Finish the rest of the sign up or newsletter requirements as needed.
In Apple Pay
Some apps and websites may require you to enter an email address on the payment sheet. In this case, tap Contact on the payment sheet and choose Hide My Email to fill in a random email address instead of typing your main email.
In Wallet & Apple Pay settings
Similar to a default card and shipping address, you can also set a default email address for your transactions. And if you do not want to disclose your main email, you have the option to mask it with a Hide My Email address.
- Open the Settings app on your iPhone or iPad.
- Scroll down and tap Wallet & Apple Pay.
- Tap Email under the Transaction Defaults heading.
- Tap Hide My Email.
In third-party apps
Imagine you download an app, and it needs you to create an account.
In this case, you can use the Sign in with Apple or Continue with Apple buttons to create a new account. When you do that, you will notice that iOS has already checked the Hide My Email option. So, you can tap Continue to finish the sign-up process. However, if you’d like to use your main email, tap Share My Email.
In case the app requires you to sign in with an email address, tap this field and then select Hide My Email above the keyboard. This is similar to what we have explained under the Safari method.
For custom usage
There may be times when you do not get the Hide My Email option above the keyboard when you try to sign up for an app, websites, newsletter, etc. Other times, someone may ask you for your email address, and you do not want to share the main one.
So, in these cases, you can manually create a Hide My Email address and use it instead.
- Open the Settings app on your iPhone or iPad and tap your Apple ID name from the top.
- Select iCloud.
- Tap Hide My Email under the iCloud+ heading.
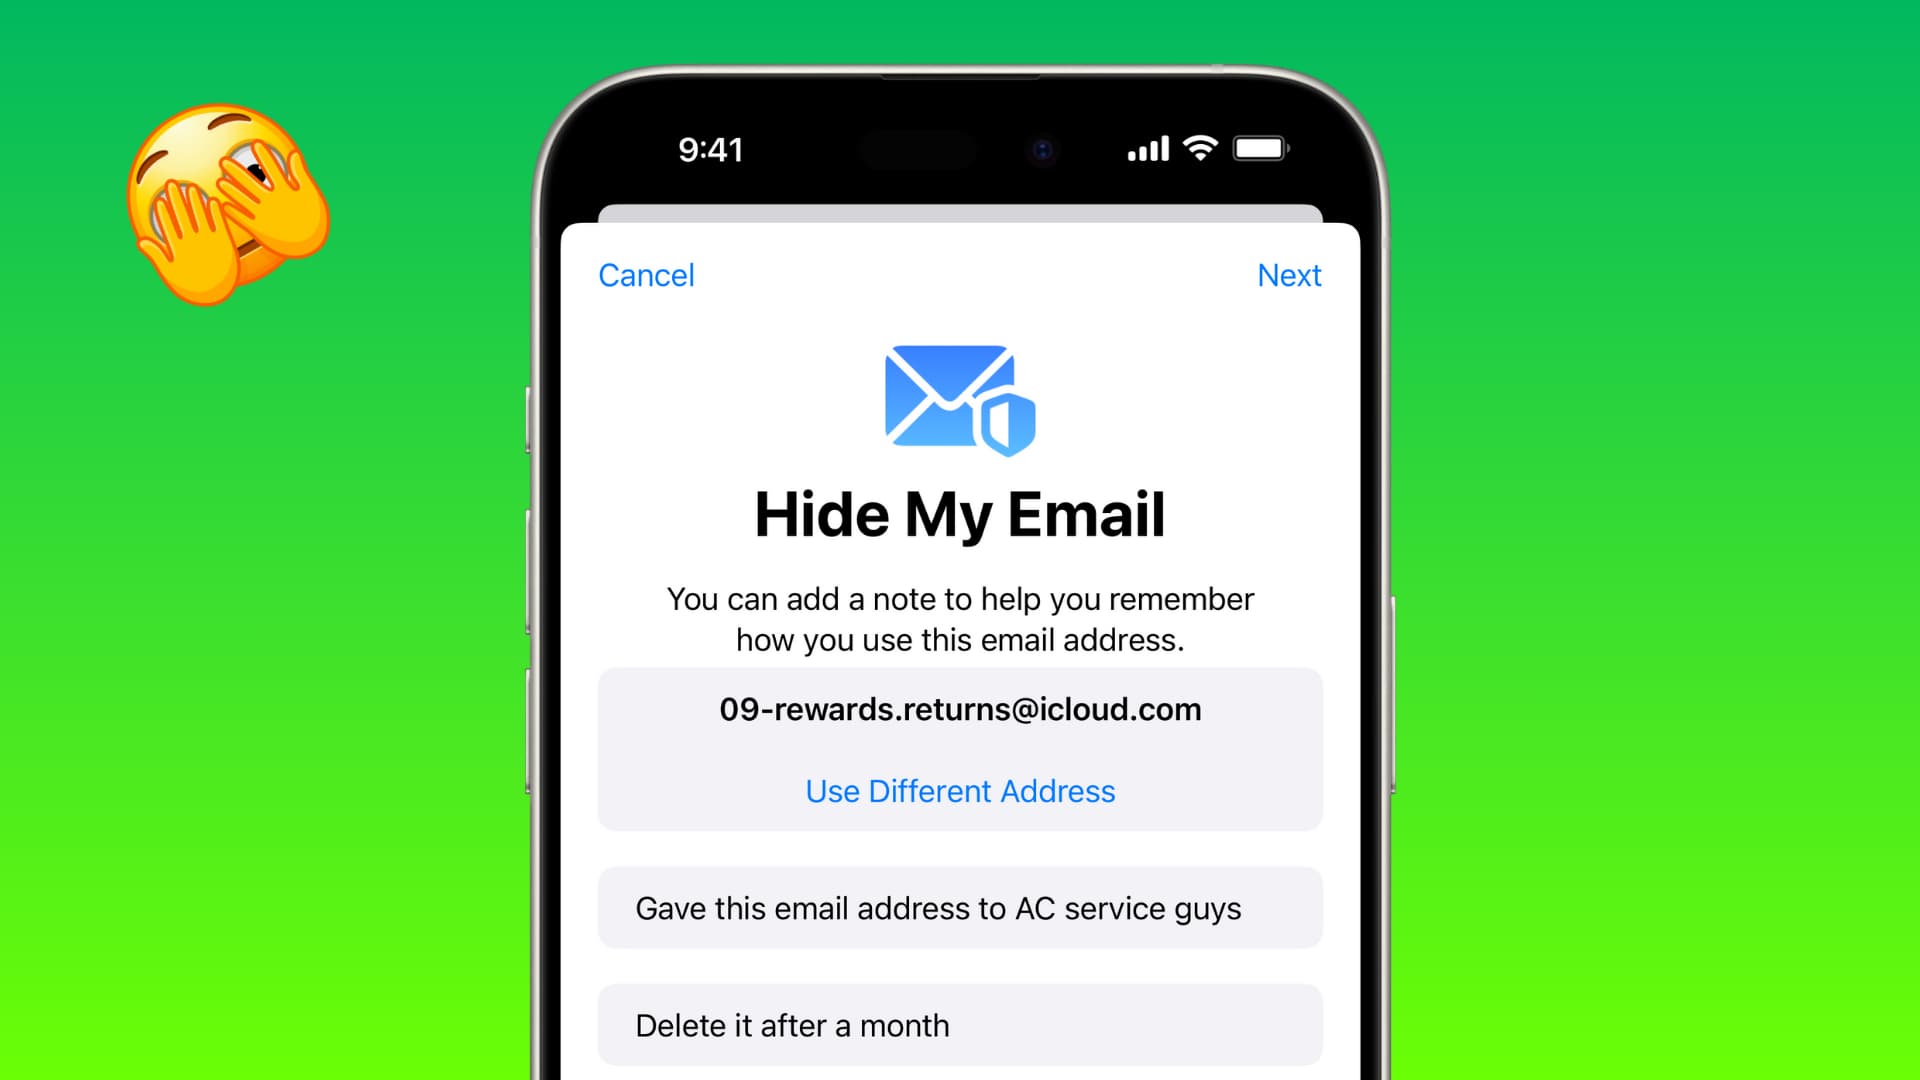
- Tap Create New Address.
- You will see a random @icloud.com email address at the top. If you are not happy with it, tap Use Different Address. In case the random address seems palatable for the job, use the Label Your Address field to enter where you are using this random email address.
- Now, type an optional note and hit Next > Done.
Where to look for emails that are sent to these random addresses
For the majority of people, emails sent to these Hide My Email addresses are automatically forwarded to your primary Apple ID email address.
Simply open the Mail app on your iPhone, iPad, Mac, Apple Watch, iCloud.com/mail, or wherever you use your iCloud email, and you will find the messages.
If these emails are not forwarded to your Apple ID email, follow the steps under the heading below.
Change where these random email addresses are forwarded to
Similar to iCloud Email Aliases, all messages sent to all your unique Hide My Email addresses are forwarded to your main Apple ID email address. But you can choose to forward them to another email address.
- Open the Settings app and tap your name from the top.
- Tap iCloud > Hide My Email.
- Scroll past all the Sign in with Apple and Hide My Email addresses and tap Forward To.
- Select another email address that you have added to your Apple ID account, and tap Done.
You can add or remove email addresses to your Apple ID by tapping Email & Phone Numbers or navigating manually to Settings > your name > Sign-In & Security > Edit > Add Email or Phone Number.
See and copy these random email addresses for use when needed
Go to Settings > your name > iCloud > Hide My Email and you will see all the Sign in with Apple and Hide My Email addresses you are using in various apps, websites, and other places. Tap one and then touch and hold the Hide My Email section to copy this email address to your clipboard.
Deactivate a Hide My Email address
If you no longer want to keep a Hide My Email address active, you can deactivate it.
If the Hide My Email address was created when you used Sign in with Apple, go to Settings > your name > Sign-In & Security > Sign in with Apple. Now, select an app or website and tap Stop Using Apple ID.
In case you created the Hide My Email address somewhere else, follow these steps to deactivate it.
- Go to iPhone or iPad Settings > your name > iCloud > Hide My Email.
- The tiny “From” section like “From Mail” will tell you where you created this Hide My Email address. Select an entry here.
- Tap Deactivate Email Address > Deactivate.
Reactivate your deactivated Hide My Email addresses or delete it permanently
Return to the Hide My Email screen and tap Inactive Addresses from the bottom of the screen. Tap an inactive address and hit Reactivate Address.
You can also use the Delete Address option to permanently remove it. However, this may result in you losing access to the app or website where you still use that random iCloud Hide My Email address.
On Mac
The basics for using Hide My Email on Mac are similar to what we’ve explained under the iPhone section.
Mail: Click the Form section and choose Hide My Email.
System Settings: You can manually create and manage it in Mac’s System Settings > your Apple ID name > iCloud > Hide My Email. Click the plus button (+) to create a new random address.
Note that you may not always find the option to use Hide My Email in Safari and apps on Mac, even though that site or app may give you this option on an iOS device. So, if this happens, go to System Settings to manually create a random, unique address.
On iCloud Web
Click the From section in the Mail app on iCloud Web and select Hide My Email.
Additionally, you can create and manage Hide My Email addresses by following these steps:
- Log in to iCloud.com and click your profile picture from the top right, followed by iCloud Settings.
- Select iCloud+ Features from the top.
- Click the Hide My Email tile.
- From here, you can see your active email addresses, where they are forwarded to, and inactive addresses.
- To create a new random email address, click the plus button, give it a name, and hit Create email address.
On a related note: What is Mail Drop and how to use it on iPhone, Mac, and PC
Source link: https://www.idownloadblog.com/2024/05/02/how-to-use-hide-my-email/

Leave a Reply