How to use the macOS Hover Text assistive feature to aid readability of text on your Mac

If you’d like to make a specific macOS user interface element larger without zooming the entire screen of your Mac, take advantage of a cool assistive feature called Hover Text.
Hover Text brings things into view
With this feature turned on, you can press a custom shortcuts key to get an enlarged version of the text, text fields, menu items, buttons and other interface elements under the mouse pointer.
The zoomed versions of these items appear in a separate window.
You can customize the window font, set the activation key, lock the Hover Text window so it’s always shown, customize the window’s border color, background color and more.
Hover Text is supported on macOS Catalina and later.
How to turn on Hover Text
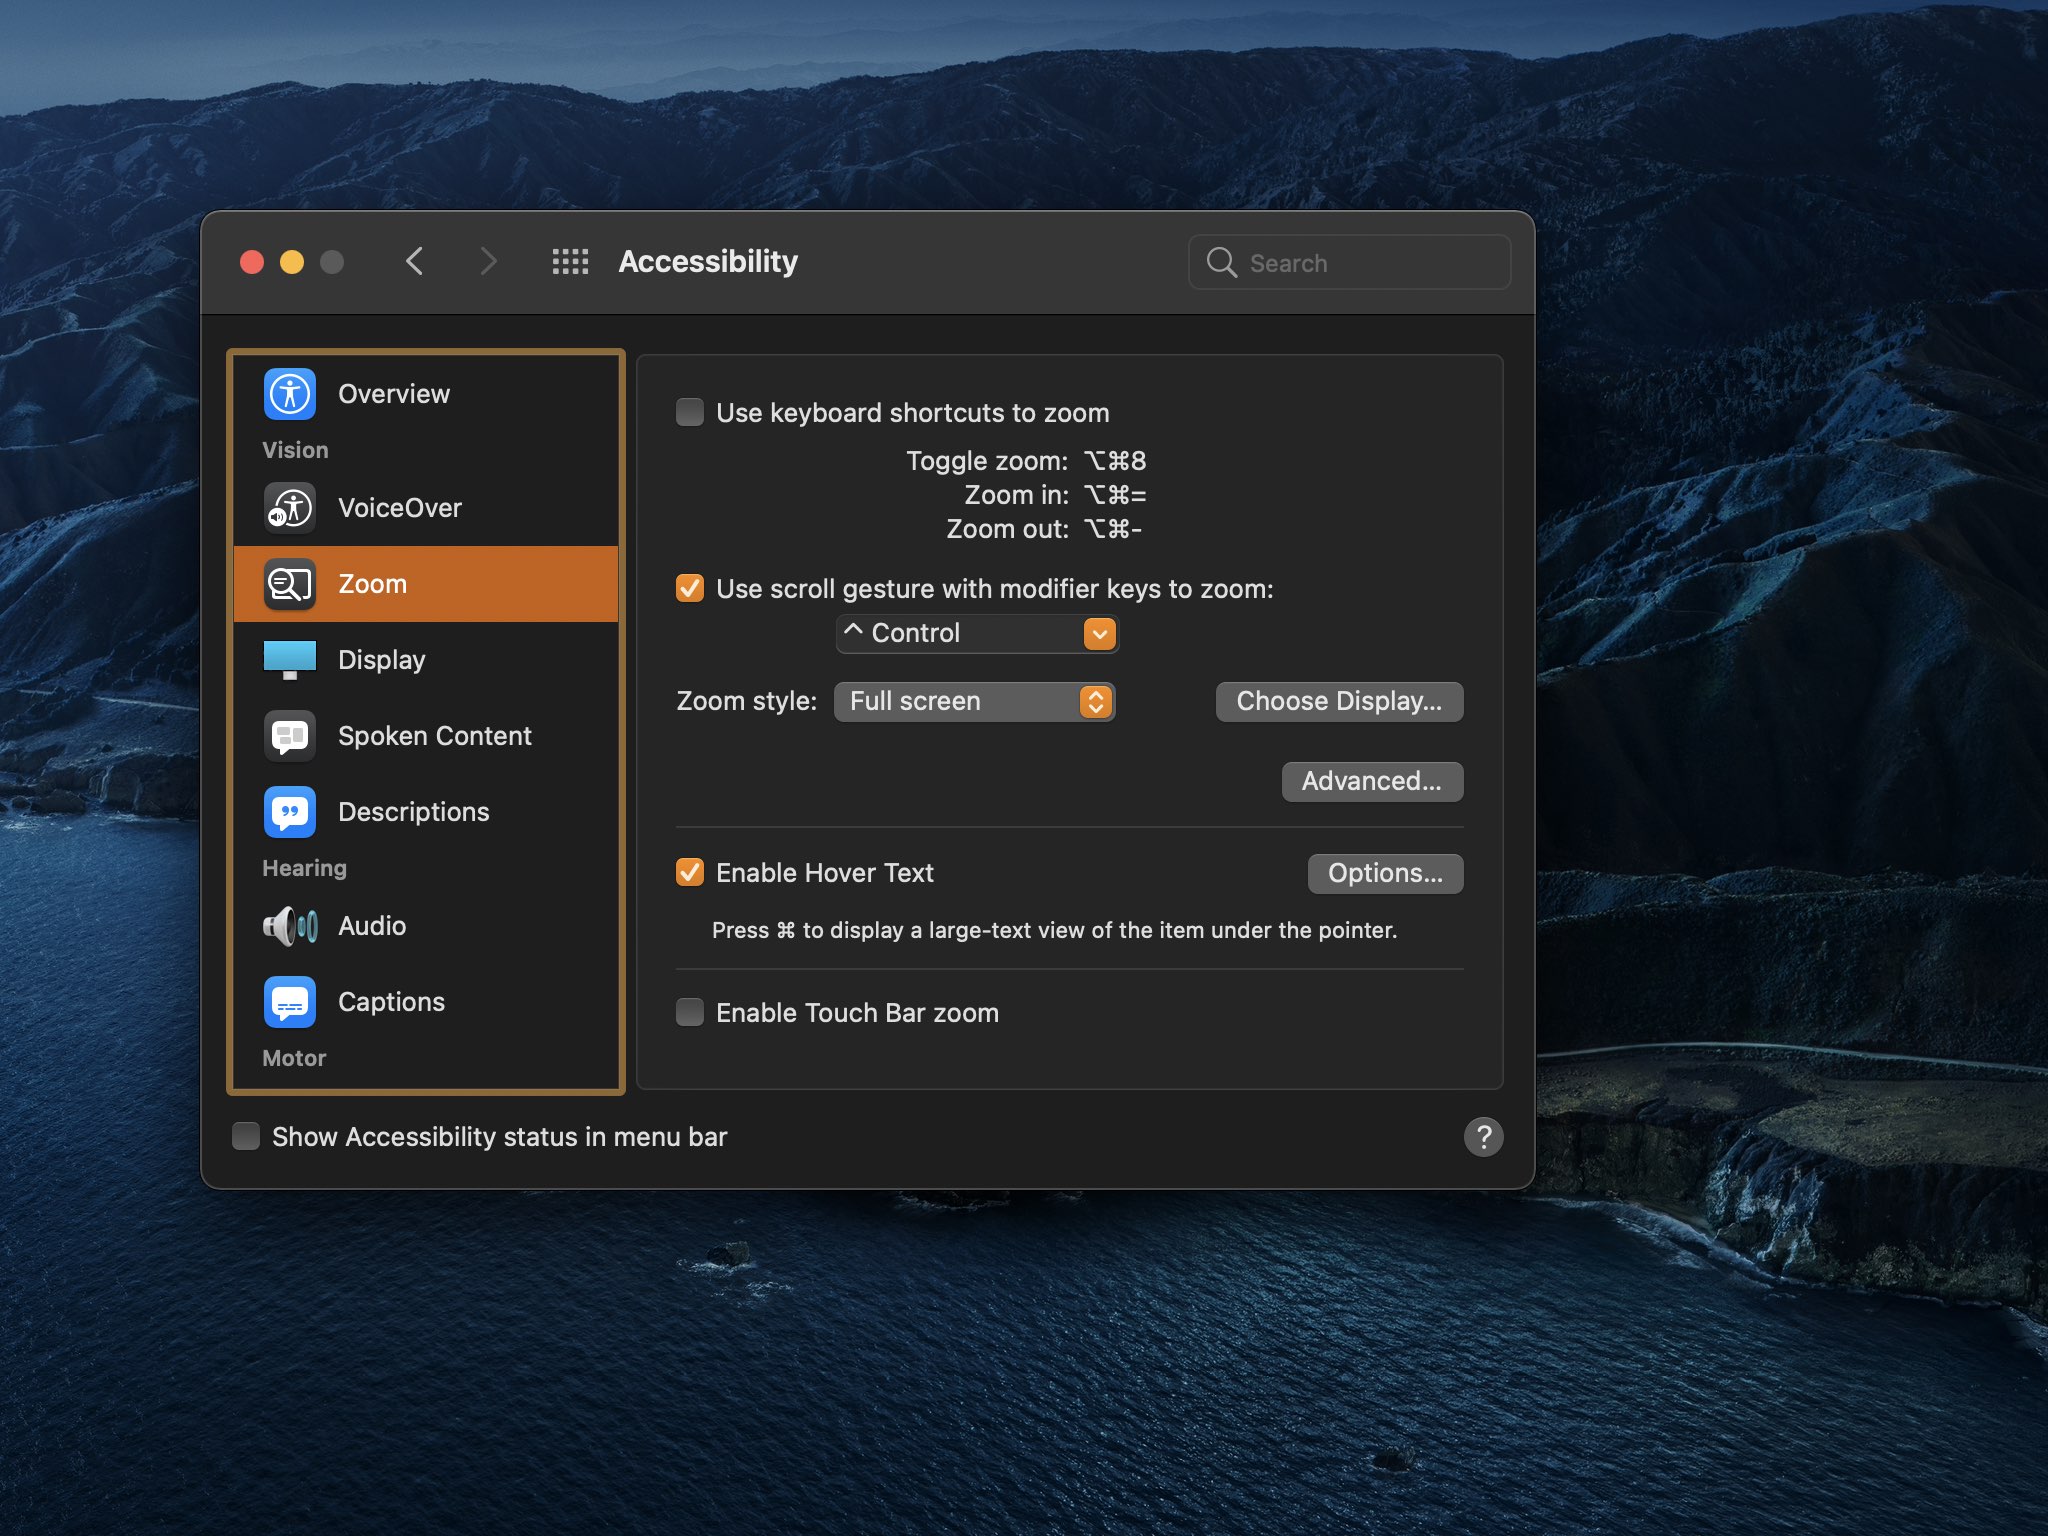
Hover Text is an assistive feature that must be manually turned on in System Preferences.
- Click the Apple menu, then choose “System Preferences.”
- In the System Preferences window, click the icon labeled “Accessibility.”
- Select “Zoom” in the left-hand sidebar.
- Tick the box next to “Enable Hover Text” in the right section to enable the feature.
You can now start using Hover Text to improve the readability of text on your Mac.

Conversely, you can turn off Hover Text at any time by unticking the box.
Customizing Hover Text features
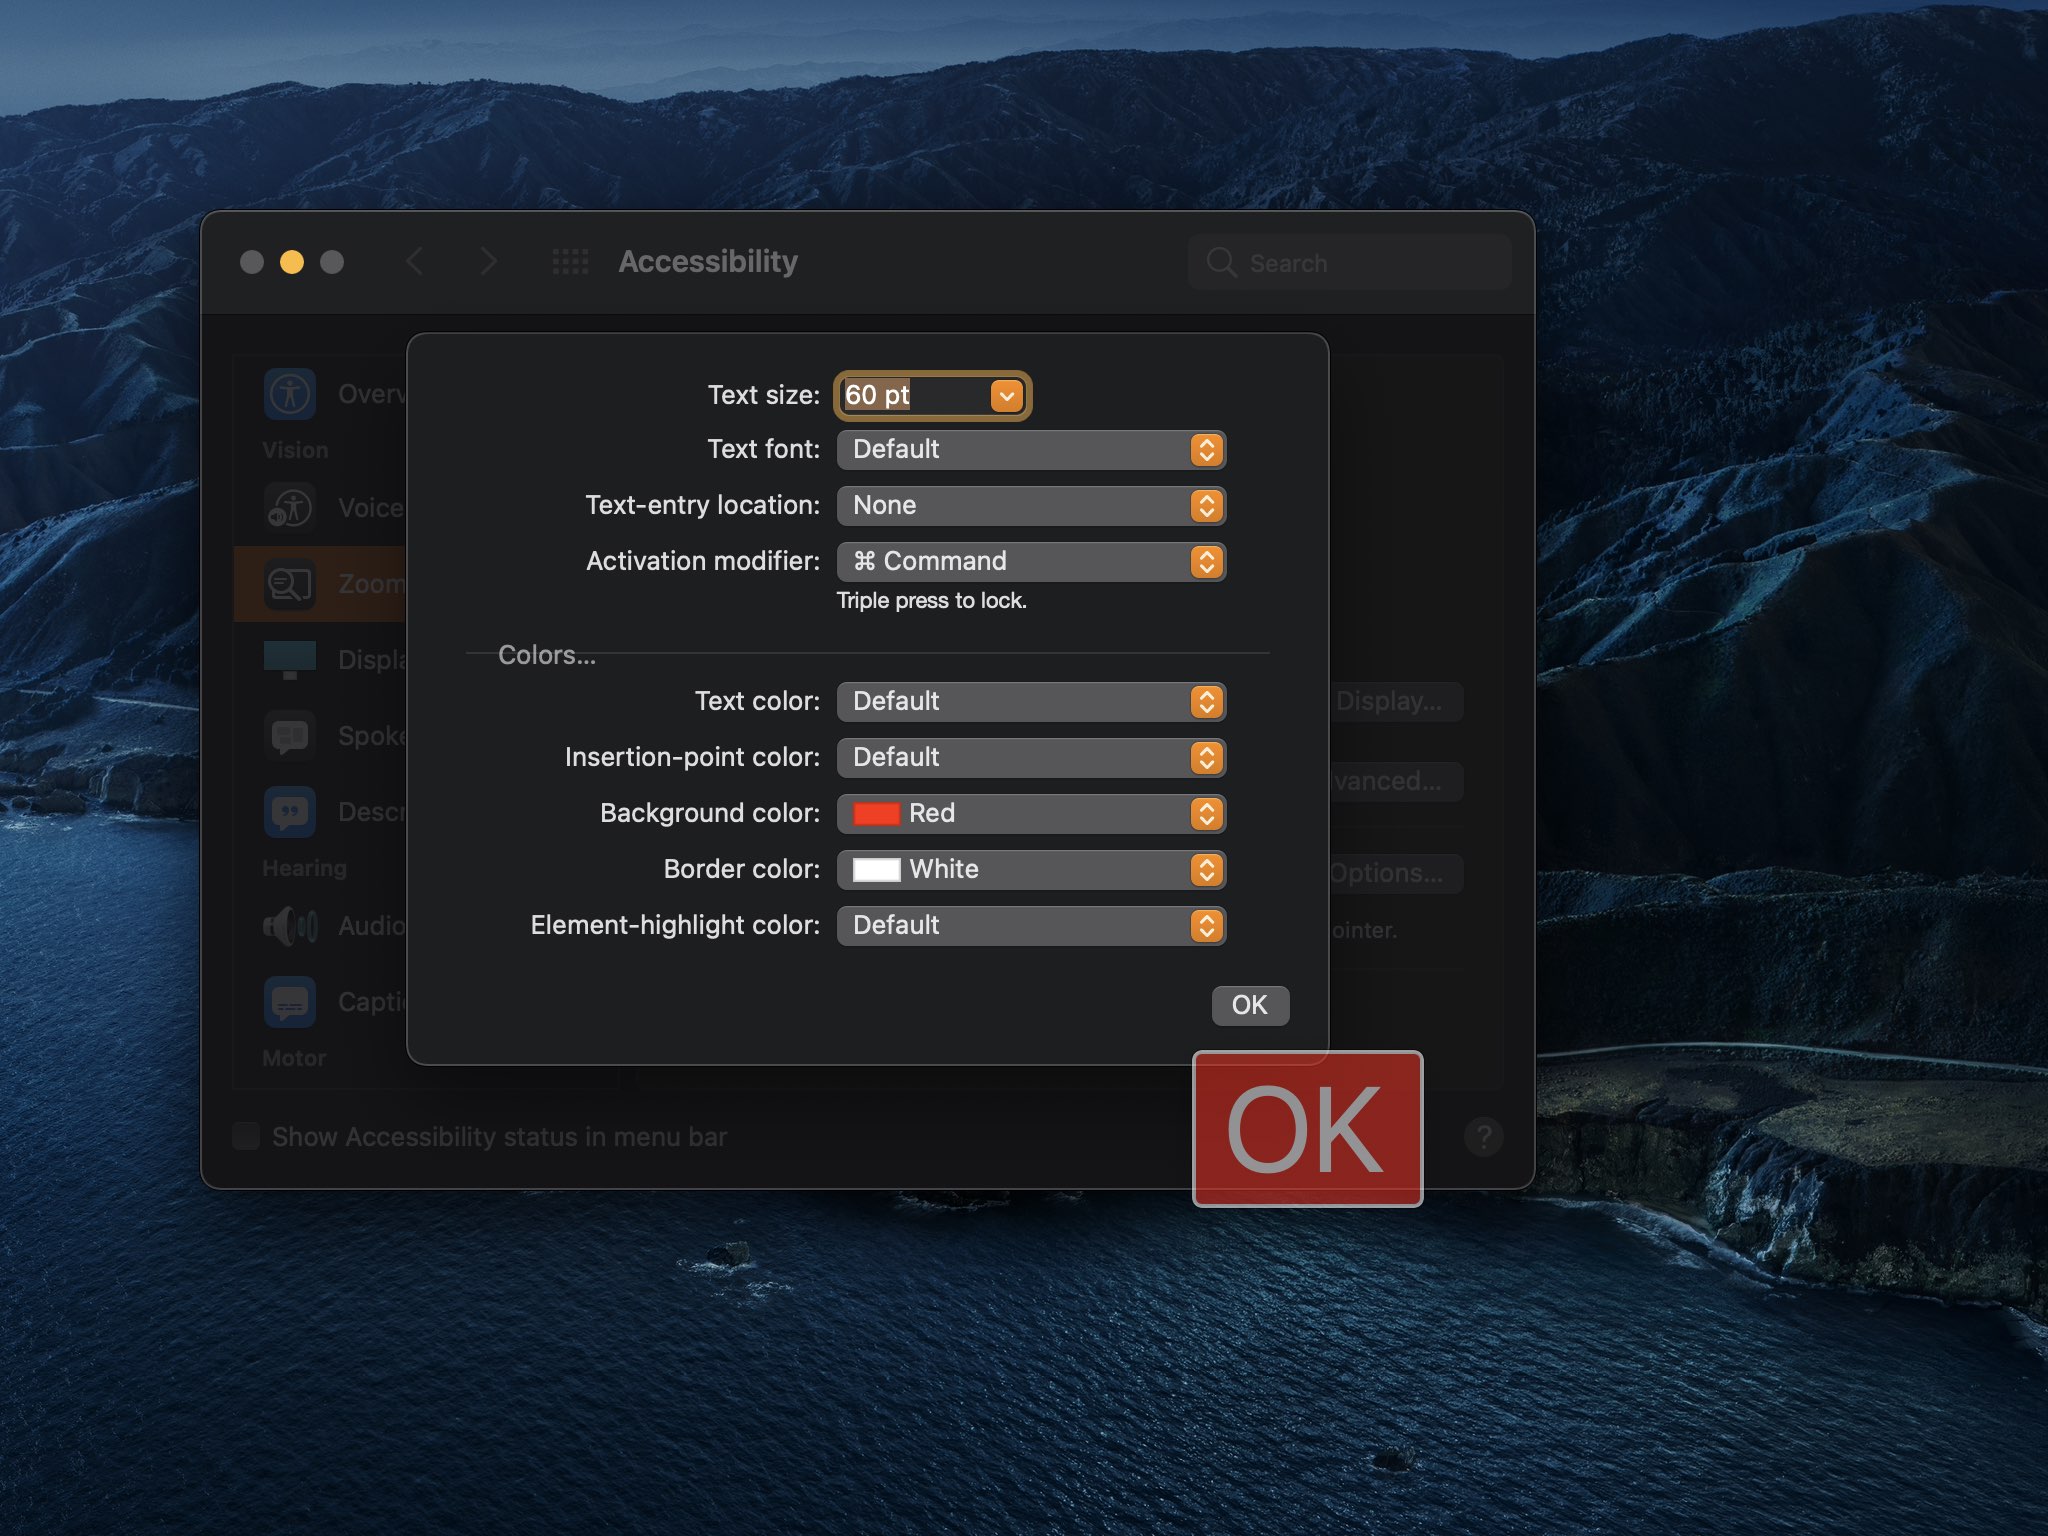
Use the Mac Hover Text settings in your System Preferences to customize features like the window color, border and background, the modifier key used to invoke Hover Text and more.
- Set the Hover Text hotkey: Click the “Activation modifier” menu and set whether to invoke Hover Text with the Command (⌘), Option (⌥) key or Control (⌃) key.
- Customize the Hover Text window: You can set the specific typeface, font size and color for the enlarged text shown within the Hover Text window. You can also adjust the colors used for the window itself and for when you enter text.
- Window text:
- Font size: Click the “Text size” menu and set the preferred text size.
- Typeface: Click the “Text font” menu and set the preferred font.
- Text color: Click “Colors,” then click the “Text color” popup menu and choose your desired color or create a custom one.
- Hover Text window:
- Border color: Click “Colors,” then click the “Border color” menu to choose a predefined color or to create a custom one.
- Background color: Click “Colors,” then click the “Background color” menu to set your preferred color for the Hover Text window border.
- Window text:
- Adjust the window features when entering text: You can change where on your Mac screen the Hover Text window is shown when Hover Text is active and you’re entering text, as well as adjust the color of the insertion point and the highlight color.
- Window position: Click the “Text-entry location” pop-up menu, then choose whether to display the Hover Text window near the current line under the pointer or in one of the four corners of the screen. If you’d like to be able to drag the Hover Text window anywhere you like when entering text, choose “Custom”. To avoid showing the window when entering text, choose “None”.
- Insertion-point color: To change the color of the insertion point within the Hover Text window, click the “Insertion-point color” menu and pick a color.
- Highlight color: To change the highlight color within the Hover Text window, click the “Element-highlight color” menu and pick a color.
Apple explains in a support document on its website:
If you chose to show the text entry window, a window appears at the location you specified, such as the top-left corner of the screen, whenever you’re in a text entry field or area. As you type, a larger version of what you’re typing is displayed in the window.
Here’s how the interface looks like.

You can play with these options until you achieve the aesthetic you feel comfortable with because any changes you make here are visible as soon as you pick a menu option.
How to use Hover Text
With the Hover Text feature turned on in your accessibility settings, and with its options perfectly customized to your liking, simply press and hold the Hover Text modifier key and move the pointer over something on the screen to see its enlarged version.
This works for many macOS users intercase elements, including:
- Text
- Input fields
- Menu items
- Buttons and sliders
You can also lock and unlock the Hover Text window:
- Lock the Hover Text window: To have the Hover Text window displayed automatically when moving the pointer over an item, press the hotkey key three times.
- Unlock the Hover Text window: To unlock the window, press the key three times.
You cannot lock the window when Hover Text is disabled.
Hover Text isn’t just a simple zoom restricted to a specific segment of the screen underneath the pointer—in many cases, you get additional helpful information that you normally don’t see.
Useful Hover Text tips
Take as an example the Control Center controls for the screen brightness and the sound volume. These are simple sliders that don’t show any numerical values. But if you use Hover Text on a slider such as the sound volume in the Control Center, you’ll get a numerical readout of the current value—for instance, you may see something like “sound volume 12.8 percent”.
One of my fave Mac #accessibility features: Hover Text. I have 2 displays; one is always harder for me to see, especially content to the far right. Hover Text is an awesome and super lightweight way to bring things into view! Find it in System Preferences -> Accessibility -> Zoom pic.twitter.com/0fVdVfwFWL
— Sommer Panage (@Sommer) January 29, 2021
In fact, you can explore other menu bar items this way to surface underlying information that you didn’t even know existed. As another example, using Hover Text on the Wi-Fi icon in the macOS menu bar reveals information about signal strength. In my case—I use Apple’s AirPort Time Capsule as my router— I saw “Wi-Fi, Connected, 3 bars.”
Wrapping up, whether you have focus issues due to macular hole surgery or suffer from astigmatism or some other condition that affects your eyesight, Hover Text is a great feature to help discern that radio button label printed in small type, text in very small typeface etc.
Source link: https://www.idownloadblog.com/2021/02/25/mac-hover-text-tutorial/


Leave a Reply