

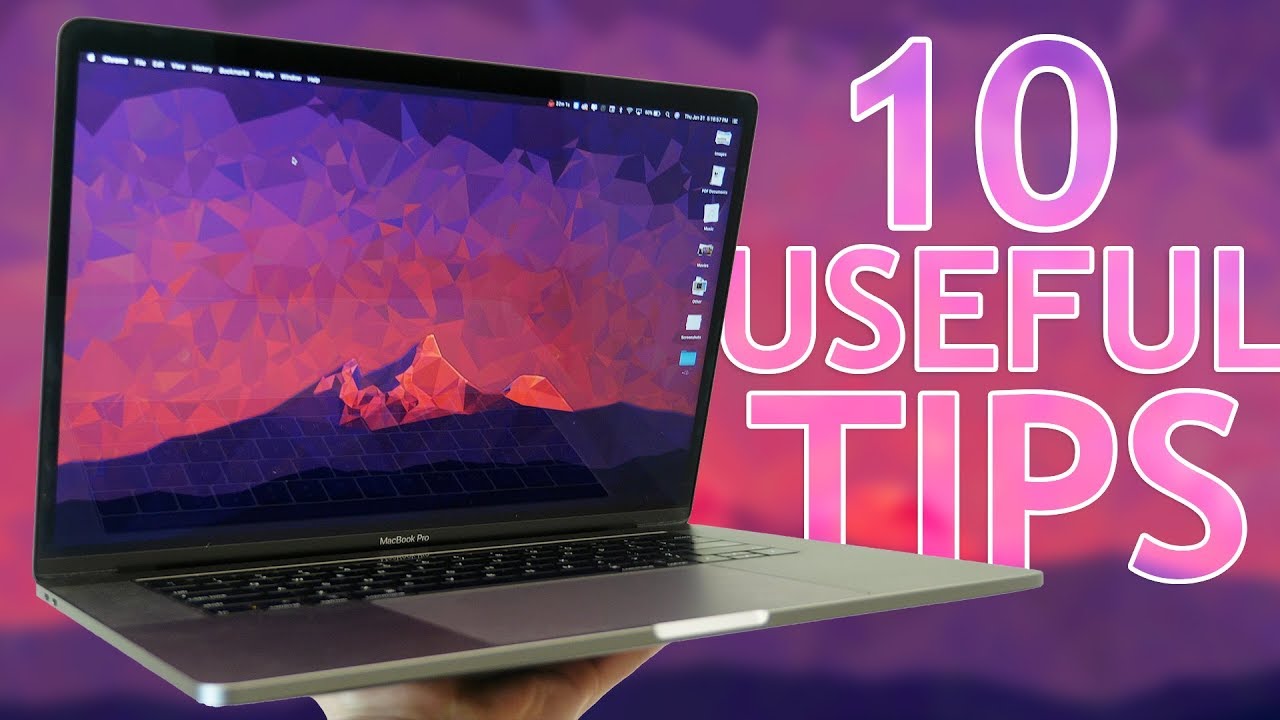
12 actually useful tips and tricks every Mac owner should know about
If you liked our short and sweet video tutorials covering some of the most useful tips for your iPhone, iPad and Apple Watch, you’re wholeheartedly recommended to take a look at our newest selection of tips and tricks that every Mac owner should definitely know about.
Video walkthrough: 10 useful Mac tips
Our video editor Harris Craycraft has been on a roll lately with his tips series. Be sure to watch his video embedded below that showcases some of the most useful tips for your Mac.
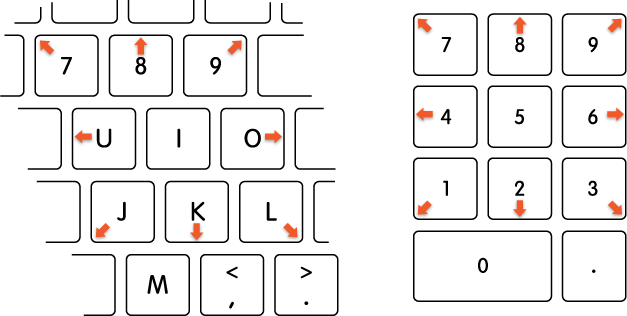
Here are your Mouse Keys controls:
Move the mouse pointer
- With a numeric keypad: Use the 7, 8, 9, 4, 6, 1, 2, 3 keys on the keypad.
- With the keyboard:Use the 7, 8, 9, U, O, J, K, L keys.
Click the mouse button
- With a numeric keypad: Press 5 on the keypad.
- With the keyboard: Press I.
Hold the mouse button
- With a numeric keypad: Press 0 (zero) on the keypad.
- With the keyboard: Press M.
Release the mouse button
With a numeric keypad: Press “.” (period) on the keypad.
With the keyboard: Press “.” (period).
Controlling the mouse pointer with your keyboard isn’t just handy if your mouse or trackpad breaks but also whenever high precision is required, like aligning objects in an image editor.
Adjust the volume & brightness in fine increments
By default, pressing the volume or brightness keys on your Mac’s keyboard results in full increments but you can force smaller increments with a little help from a modifier key.
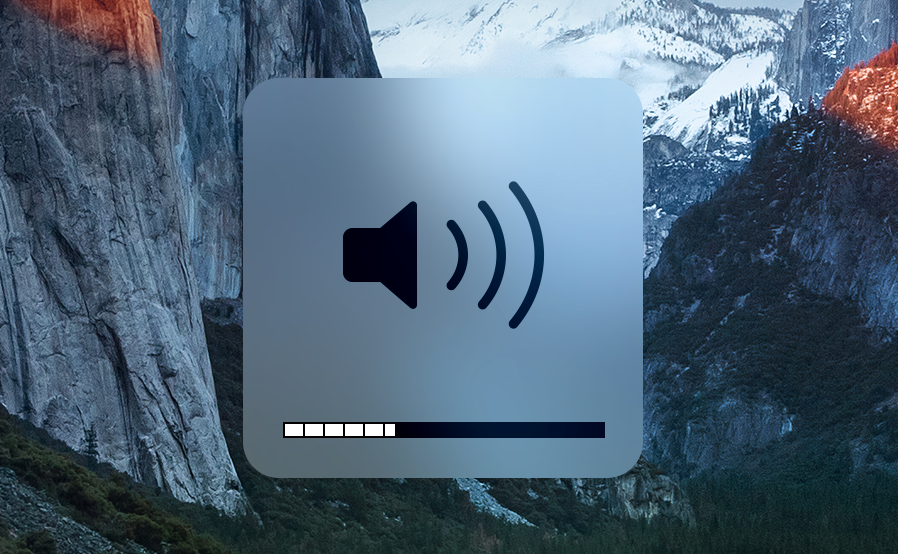
To change the volume or brightness in quarter increments instead of full increments, hold down the Shift + Option keys when pressing the corresponding volume or brightness key on the keyboard or your Touch Bar.
This small feature can come in handy when you’d like to get down to the absolute lowest screen brightness without installing third-party software like Shady, or getting your Mac’s volume at just the right level so you can hear it comfortably without disturbing others.
Quickly access volume & brightness settings
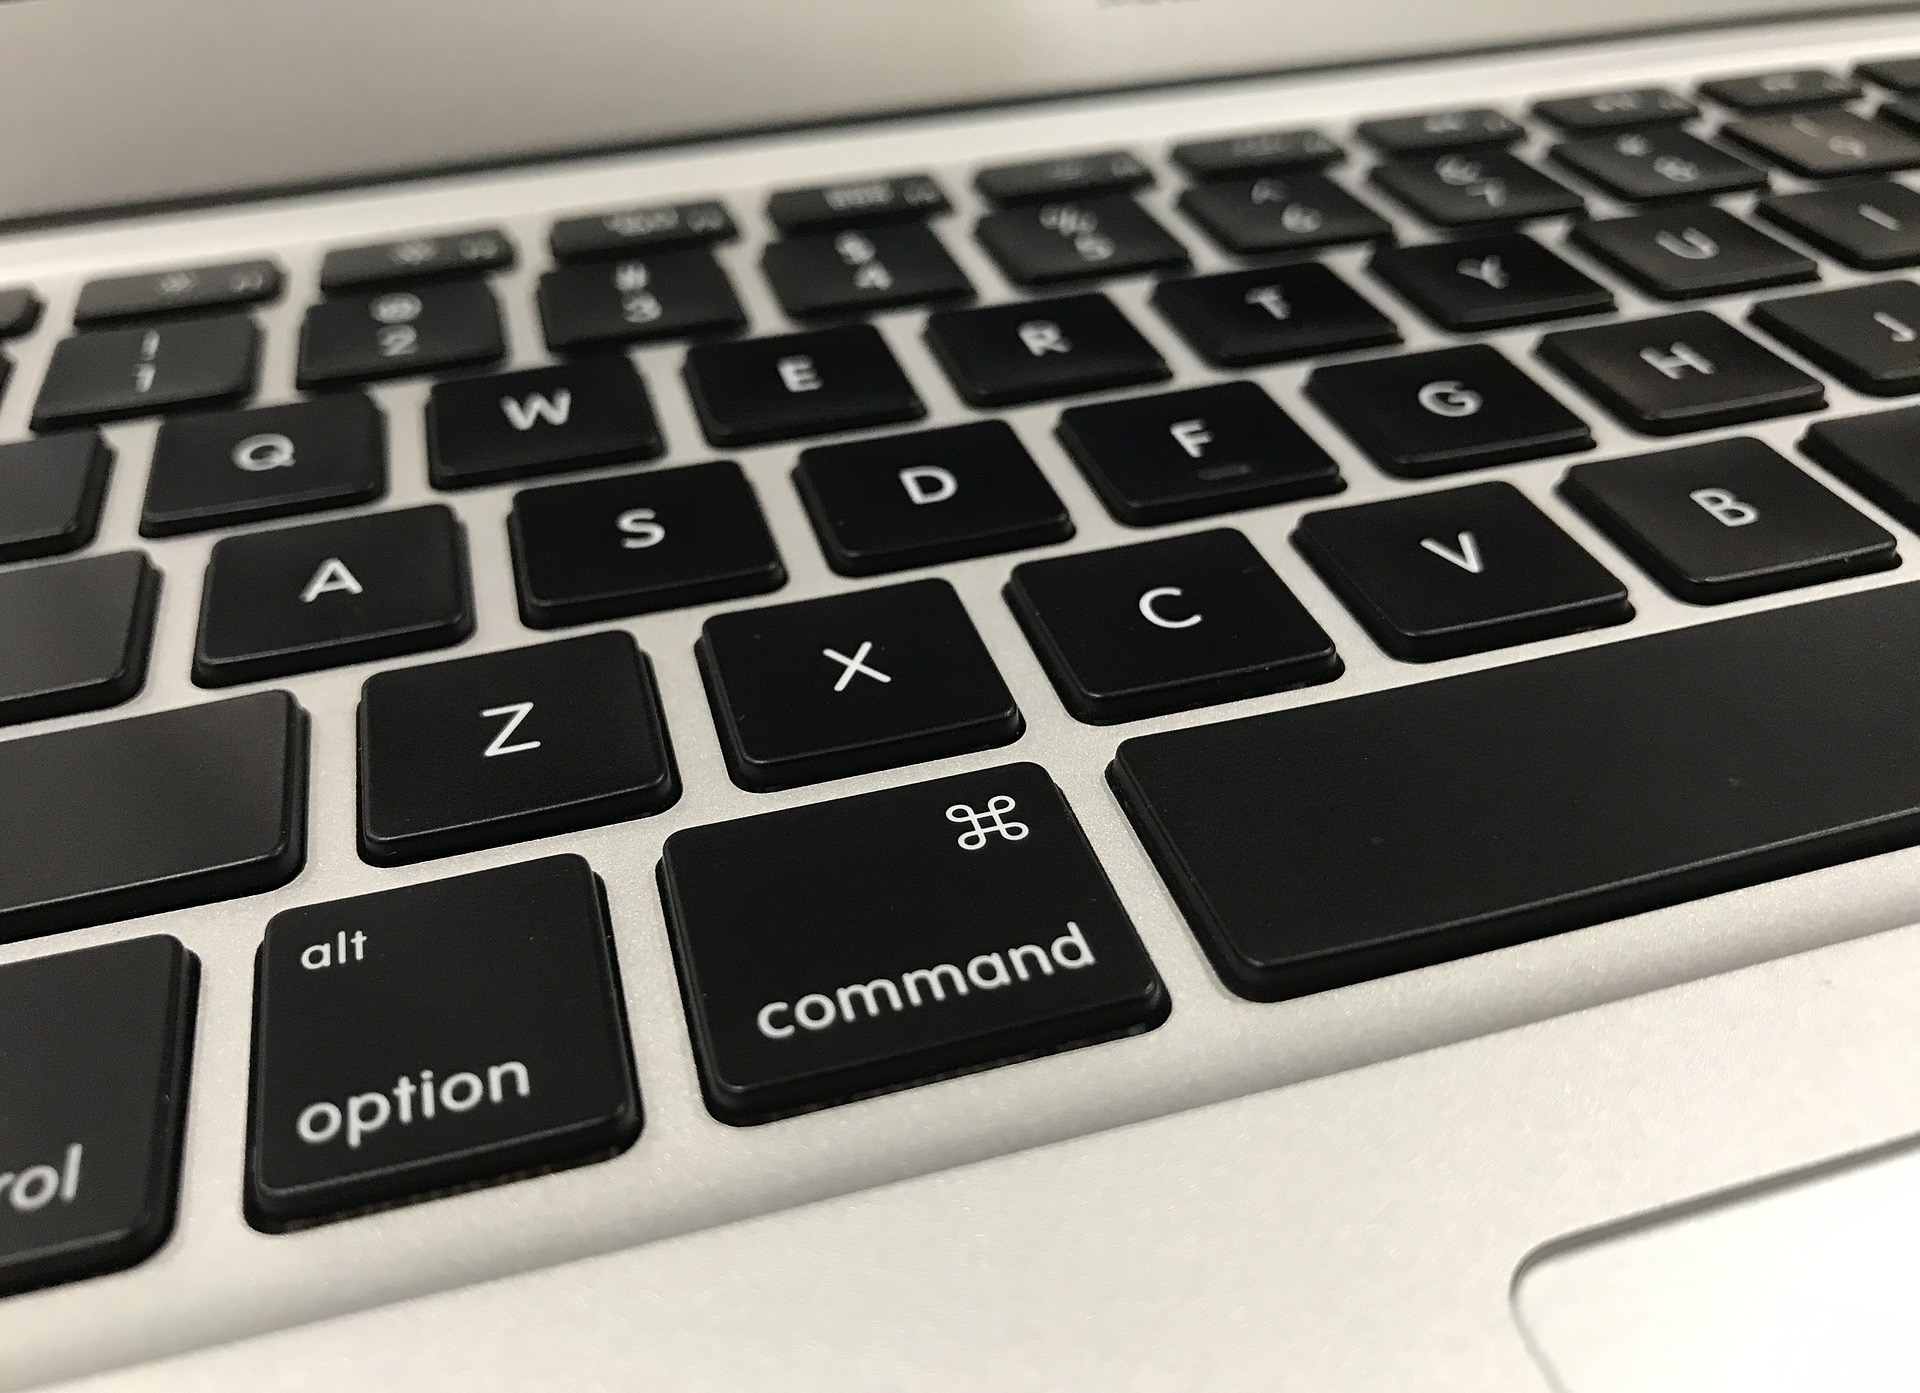
To quickly get to the Display or Sound preference pane, press and hold the Option key while pressing the volume up/down or brightness up/down on the keyboard or the Touch Bar. Just like that, you’re taken directly to the Sound and Displays preference pane, respectively. Be sure to check out the 11 System Preferences shortcuts that will save you a lot of time.
The Option key can be used in conjunction with other keystrokes to get to various Mac features faster. To boost your productivity even further, we wholeheartedly suggest checking out the 50 common keyboard shortcuts that every Mac owner should know.
Force PiP on sites that don’t support it
Picture-in-picture (PiP) video is a great feature when you want to keep tabs on your favorite TV show while doing some productive work on your computer. The problem is, some websites don’t support this mode natively while others, such as YouTube, intentionally hide PiP controls.
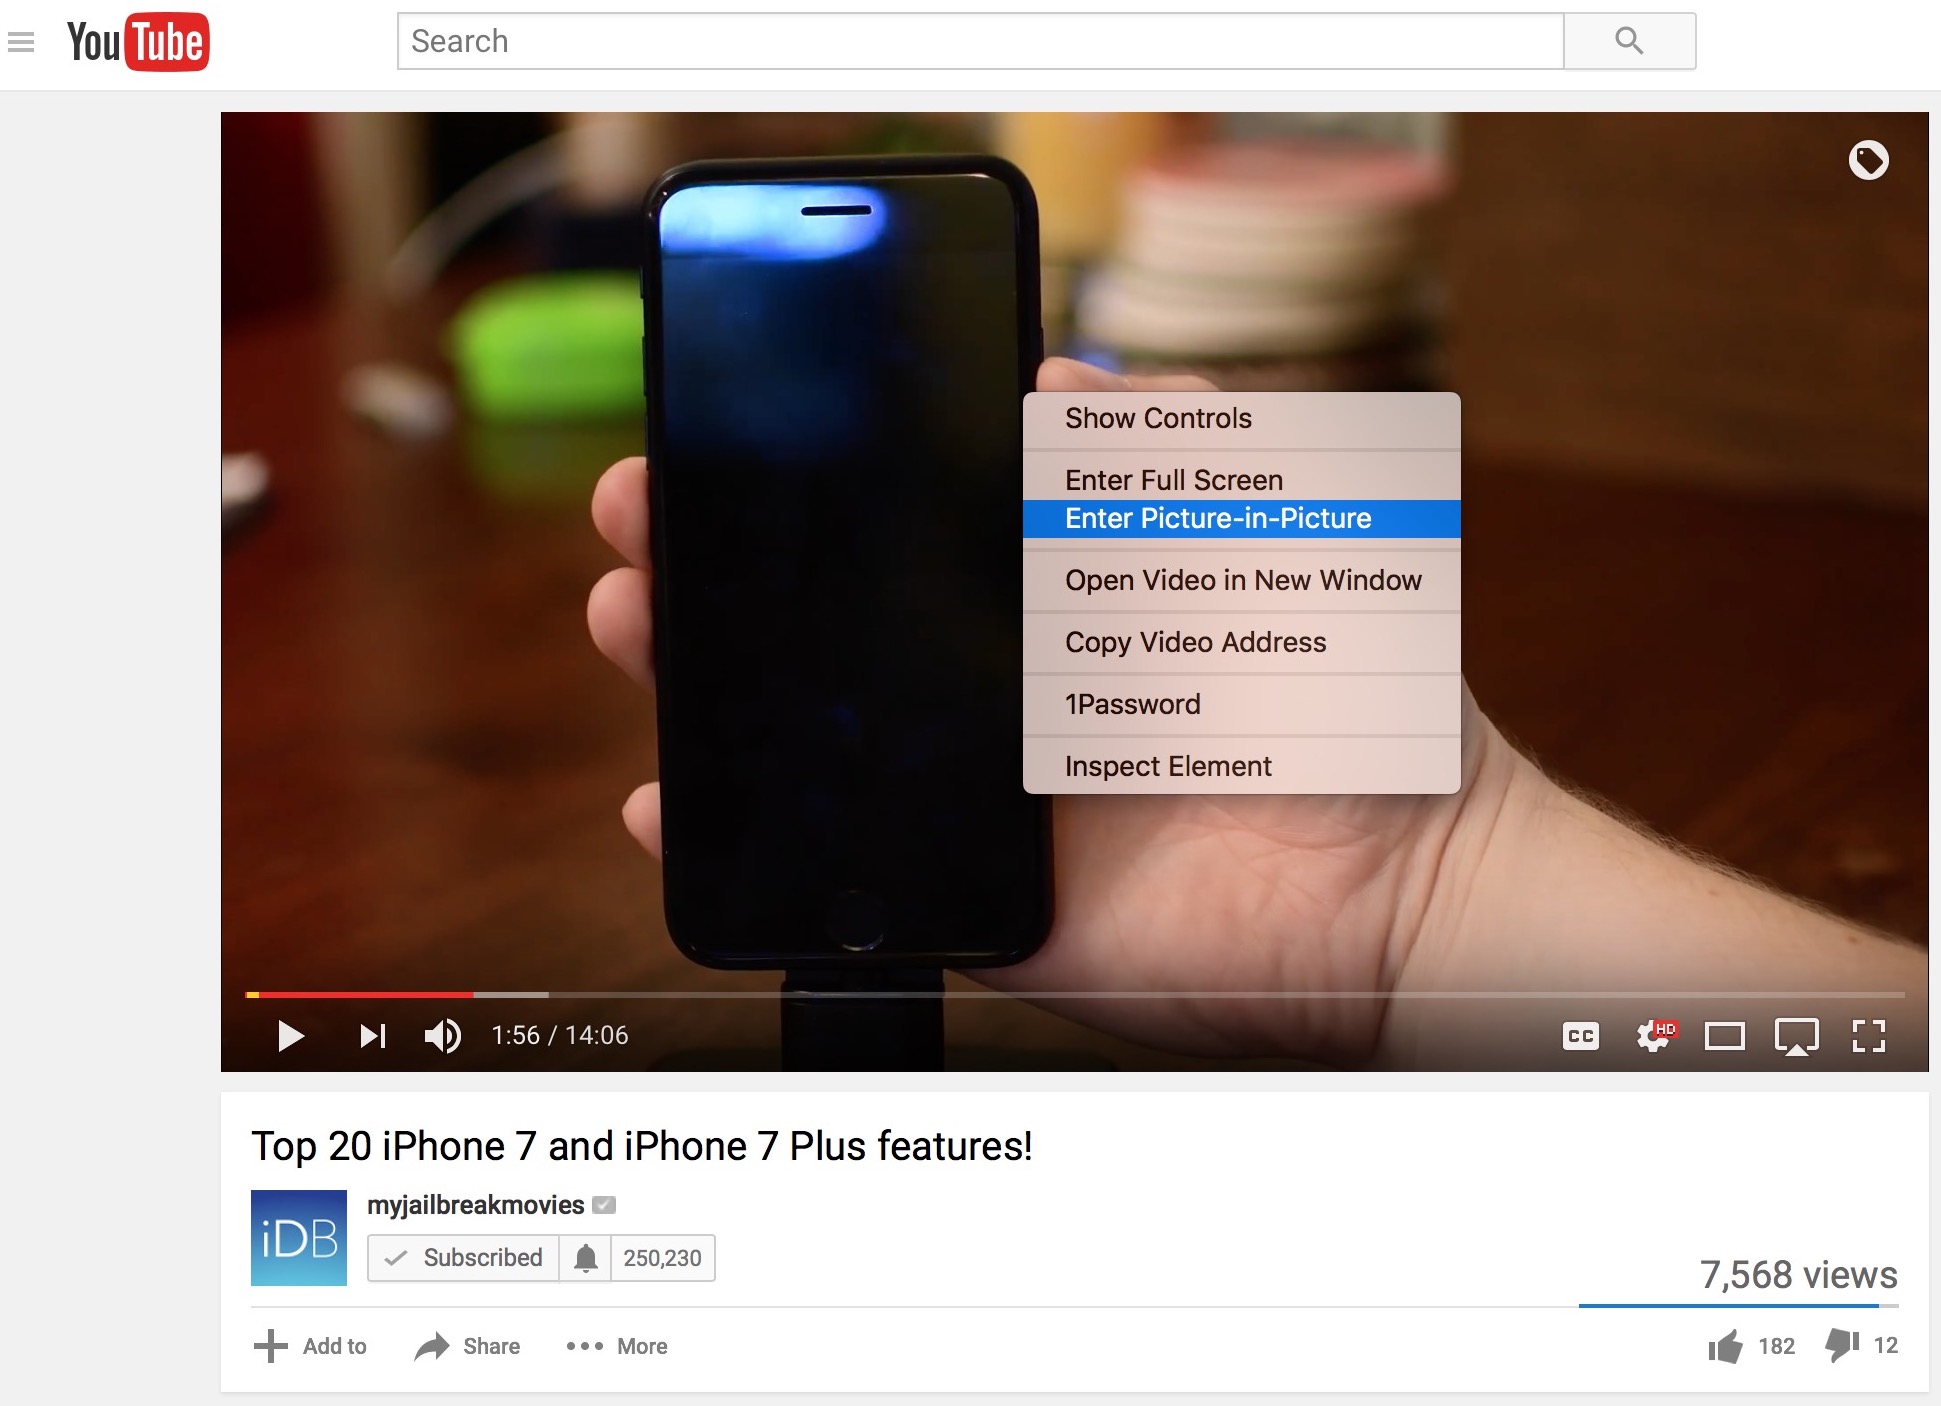
Just right-click on the video twice (or press Control while clicking twice) to access a hidden menu with the option to enter PiP mode (works great on YouTube).
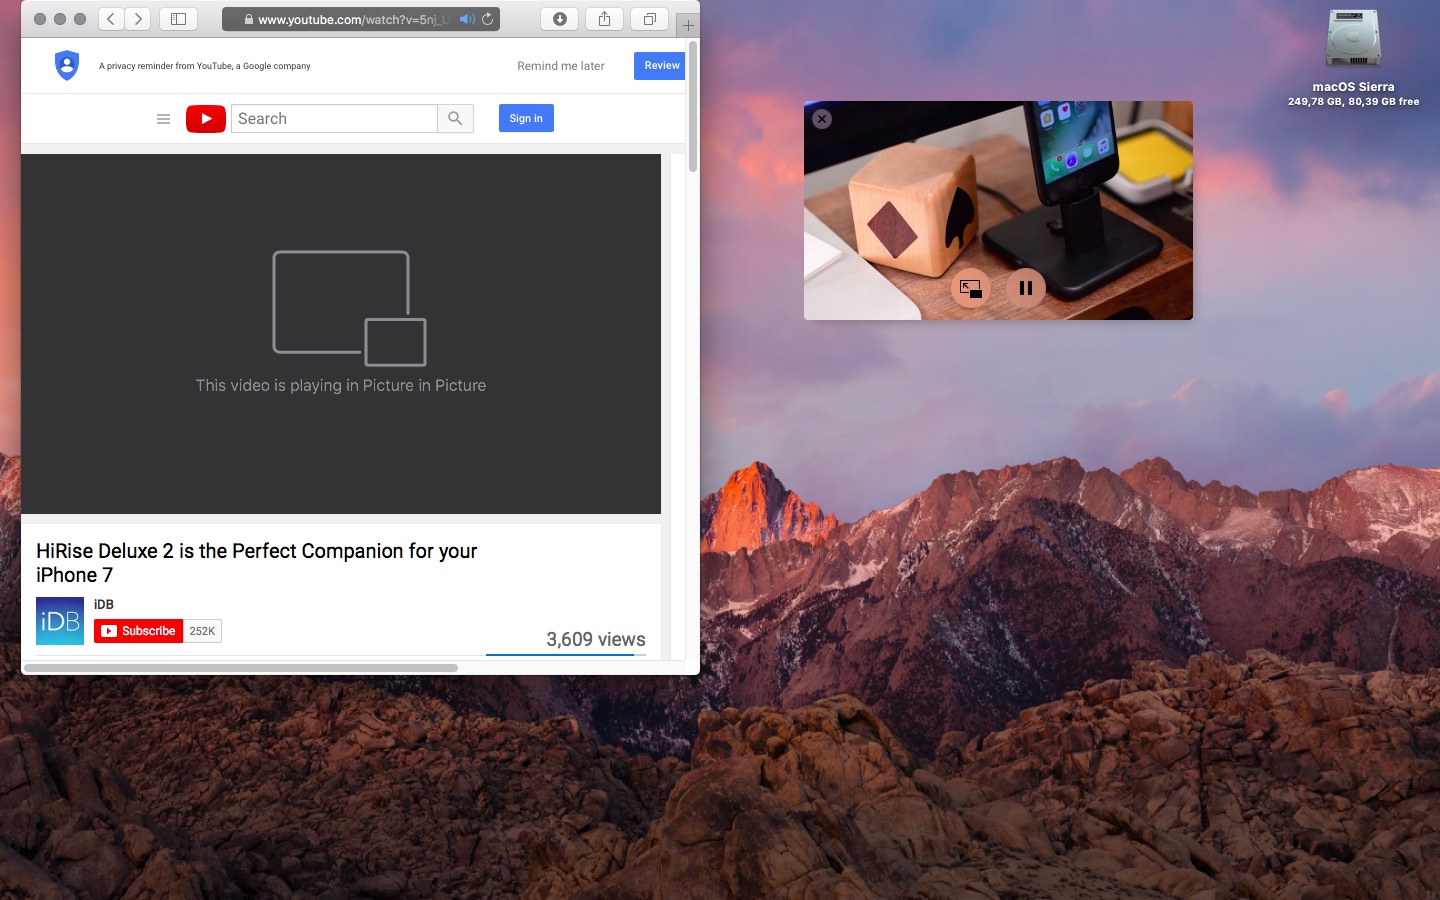
When using PiP, the video is detached from the player in a floating overlay that can be docked overlay to one of the four screen corners. If you’d like to move the PiP video freely anywhere you like, be sure to hold the Command key when dragging the PiP overlay.
Rearrange or remove those menu bar icons
macOS displays icons for the commonly used system features in the menu bar. Thankfully, their position is not set in stone as it will probably appear to you at first sight.

To rearrange your stock menu bar icons, hold down the Command key while dragging the desired icon to the new location icon. You can only move these things between the leftmost stock icon and the Spotlight menu bar icon in the menu bart.
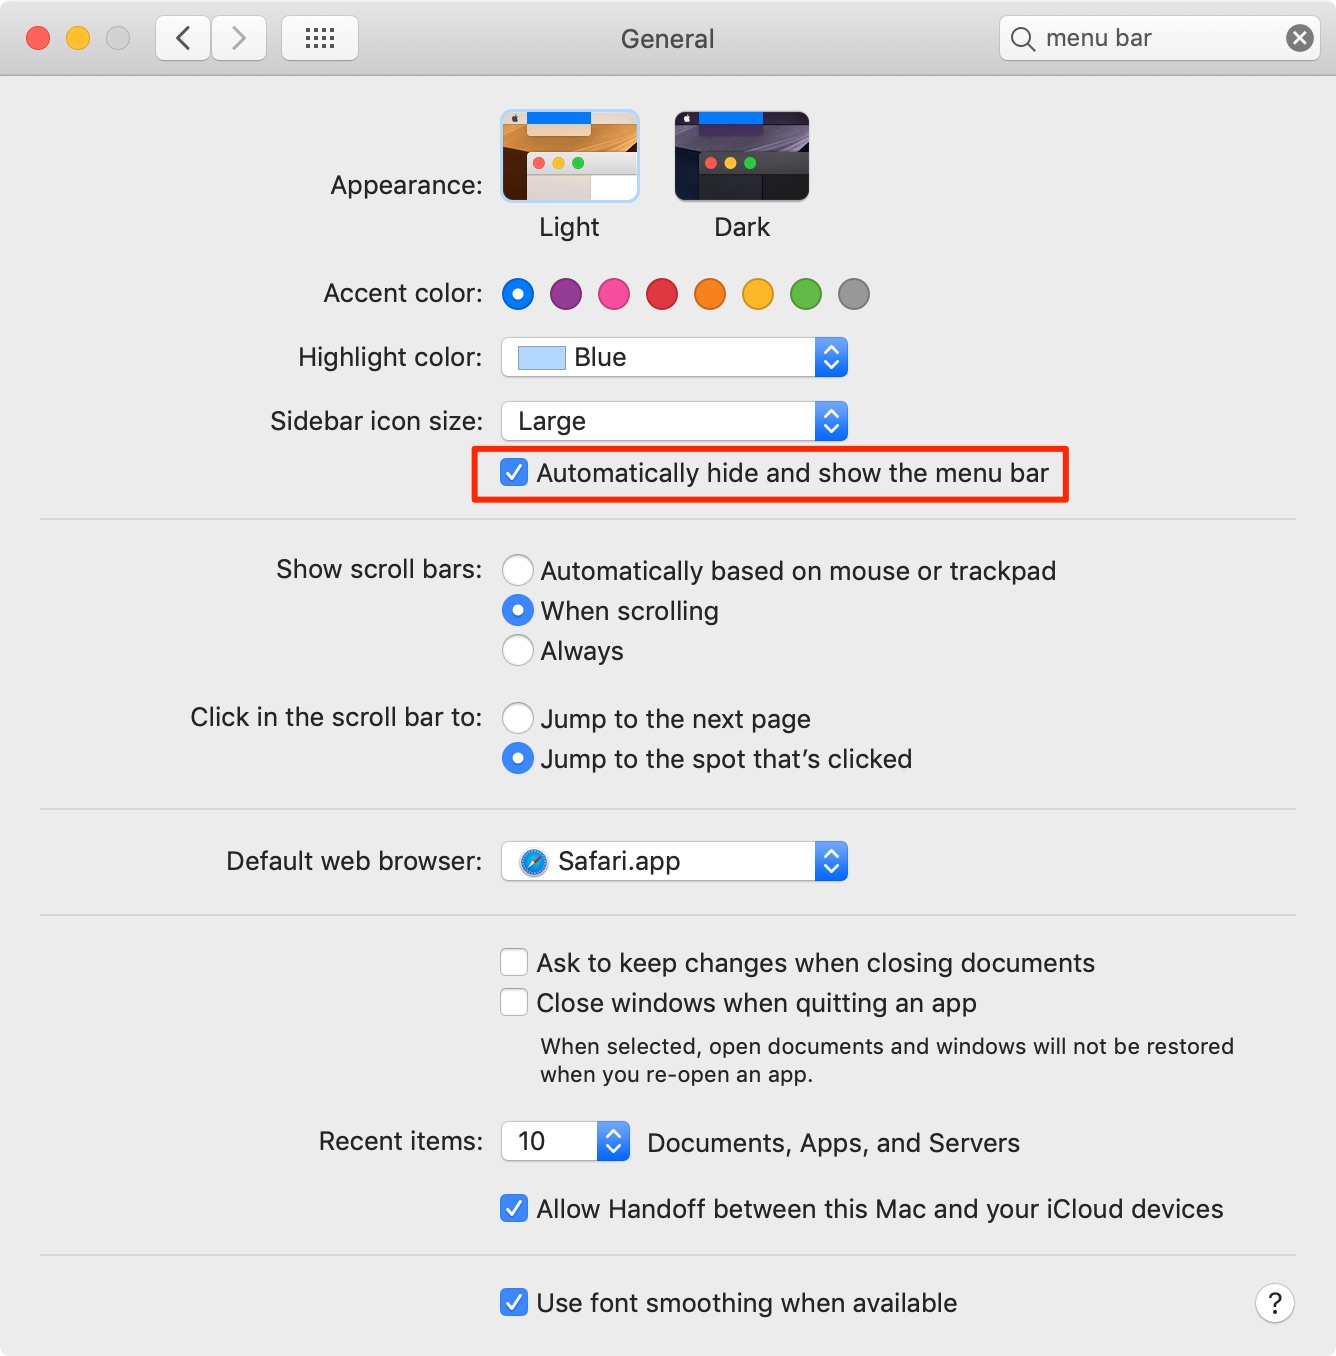
Hide the Dock & the menu bar
The persistent menu bar and the Dock take up valuable space. To maximize screen real estate and see more content in apps, you can separately hide the Dock and the menu bar.
To have the system menu bar automatically disappear from sight when you’re dragging the cursor away from the top-right corner, go to System Preferences → General and tick the option labeled “Automatically hide and show the menu bar”.
To automatically hide and show the Dock, venture into System Preferences → Dock, then tick the box that reads “Automatically hide and show the Dock”. The Dock will now instantly hide out of view, reappearing automatically when you move the mouse pointer to the screen bottom.
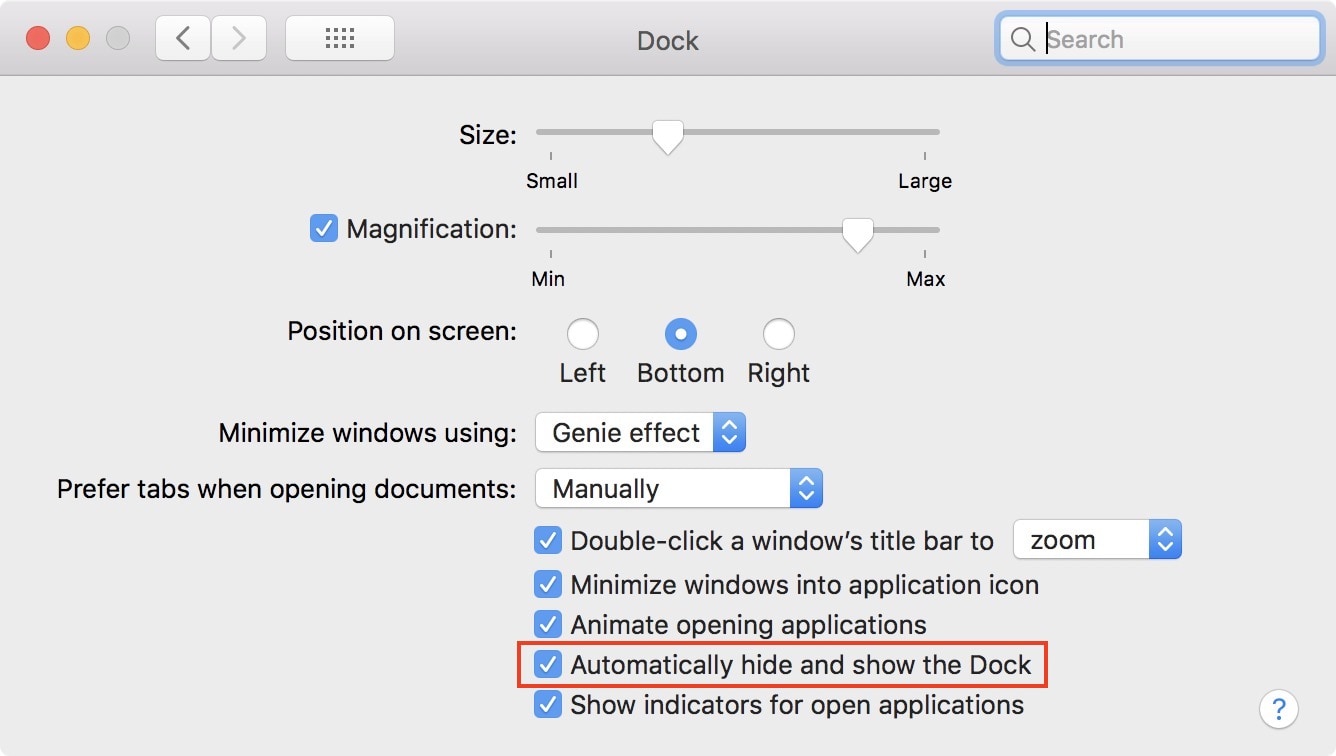
Alternatively, hit the Command – Option – D keyboard combo to show or hide the Dock on the fly. You can even use a simple Terminal command to make the Dock auto-hide faster.
Tidy up that cluttered desktop with Stacks
A new feature in macOS Mojave, Stacks is a really neat way to manage files that can clutter your desktop. With Stacks enabled, any files you save to the desktop get automatically arranged into piles, grouped by kind. For example, all the screenshots you take go into the image pile and your spreadsheets are filed into the document pile.
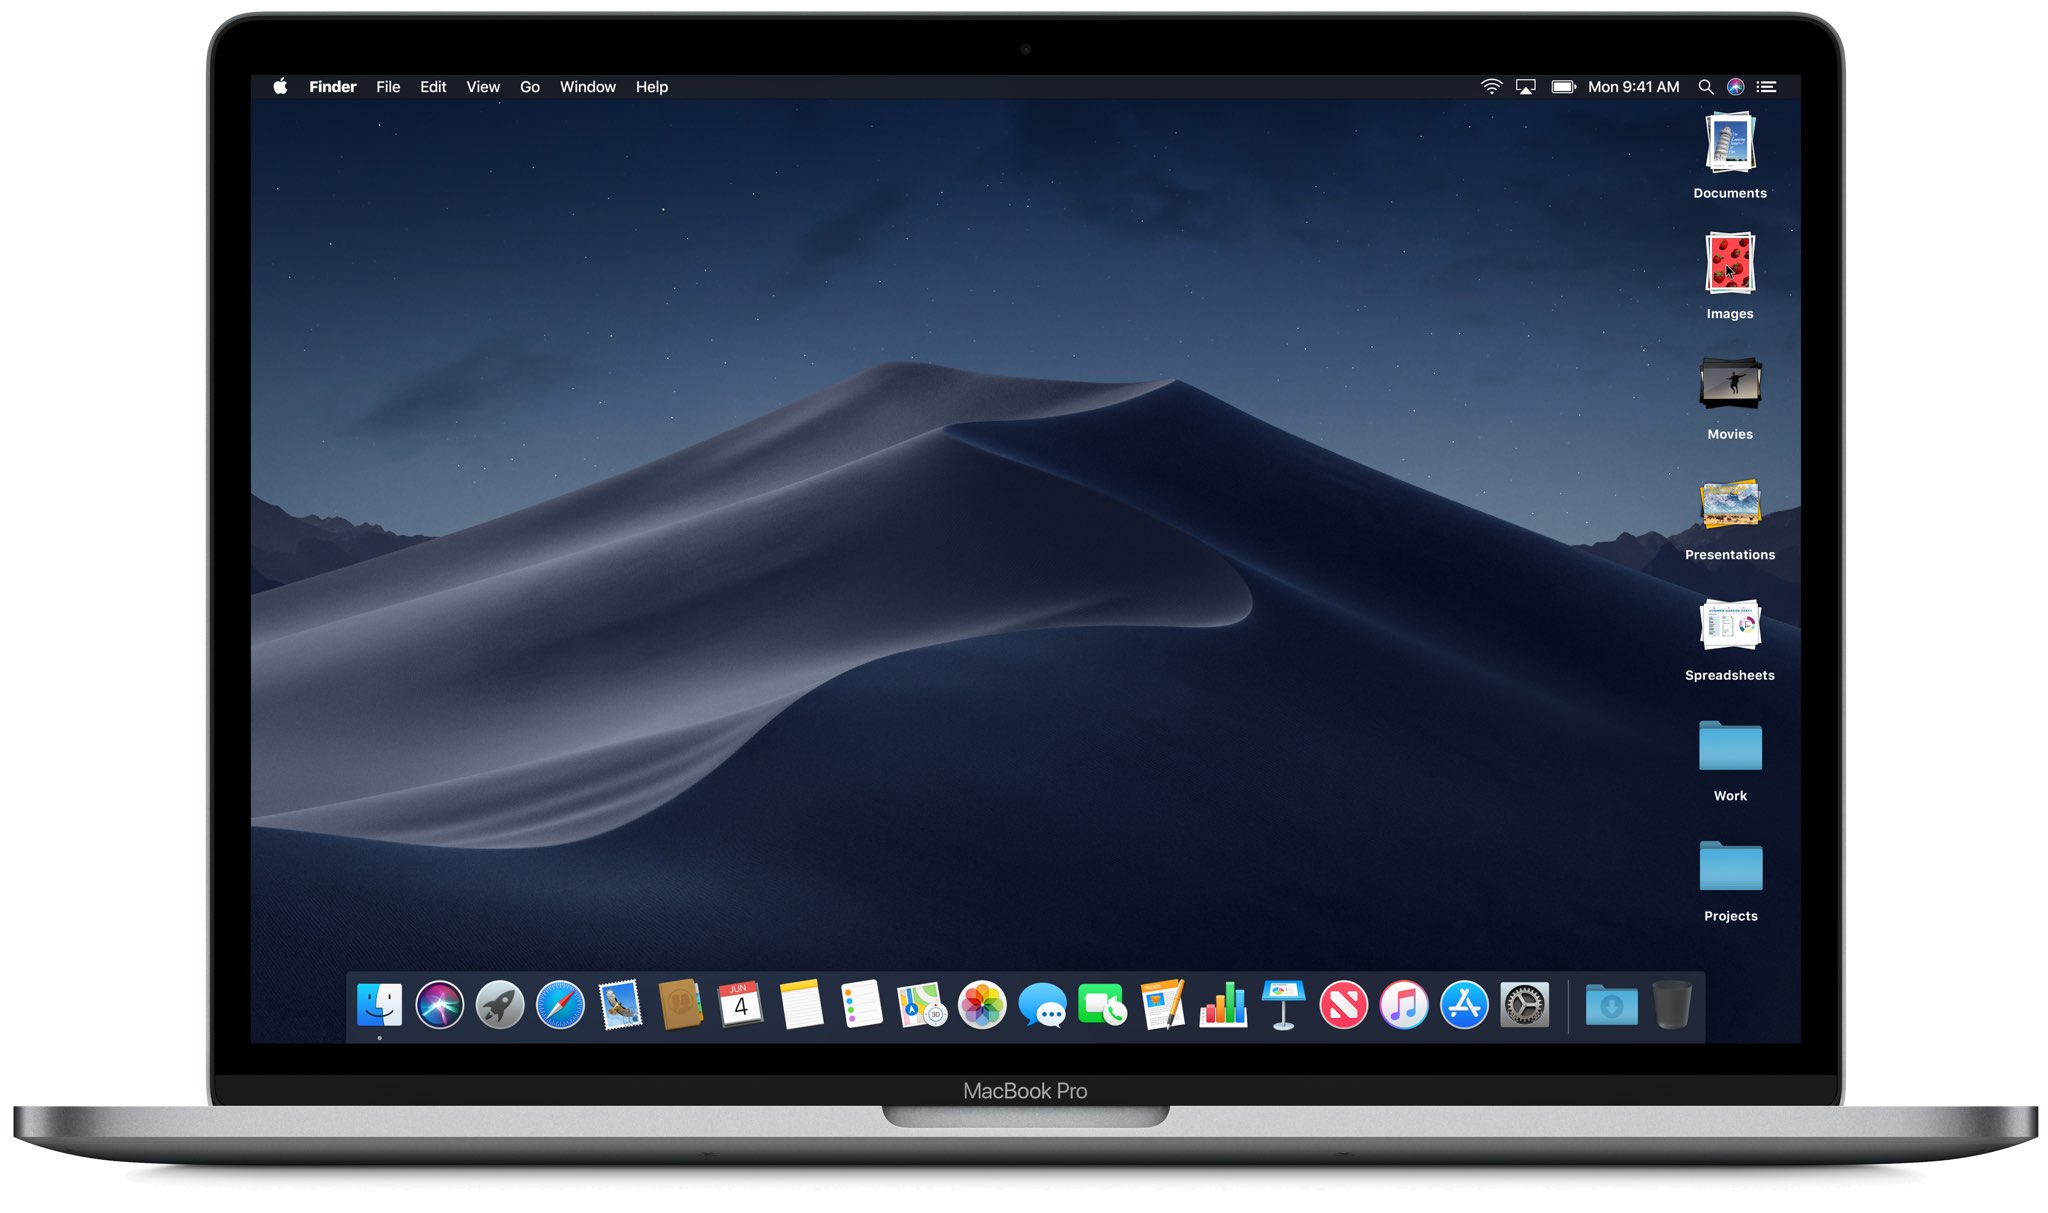
To use Stacks, click the Finder’s View menu while on the desktop and choose the option Use Stacks. You can access the grouping options by right-clicking on the desktop or clicking the View menu, then select Group Stacks By.
Find your stuff easily with Smart Folders
Like in iTunes, Smart Folders in the Finder make it extremely convenient to find all the files that match your criteria in one central place. Not only do Smart Folders automatically gather files by type and subject matter, they’re instantly updated as you change, add and remove files.
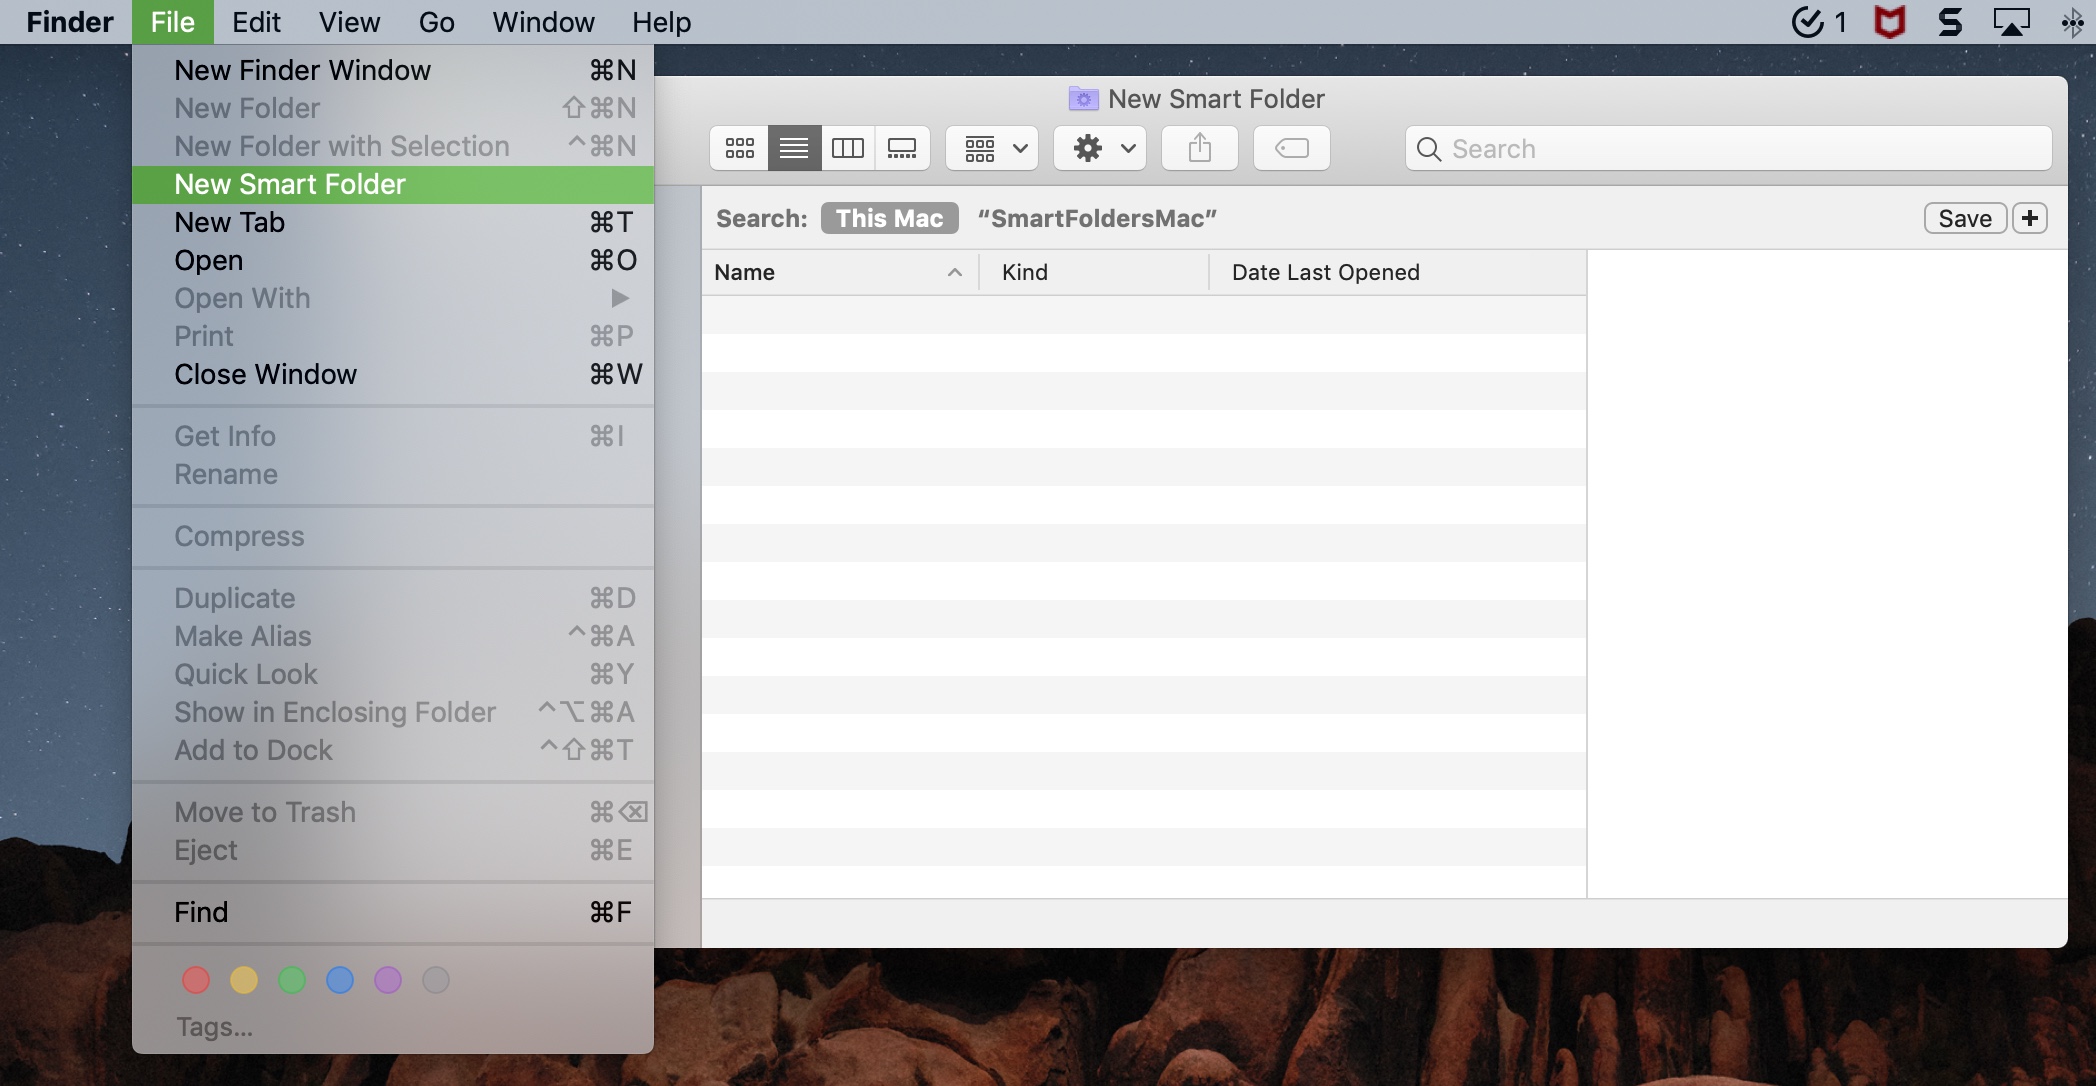
To create a Smart Folder, click the Finder’s File menu, then choose the option labeled New Smart Folder. Select where the items for the folder should come from (such as This Mac), then click the plus sign on the right to add attributes for your Smart Folder.
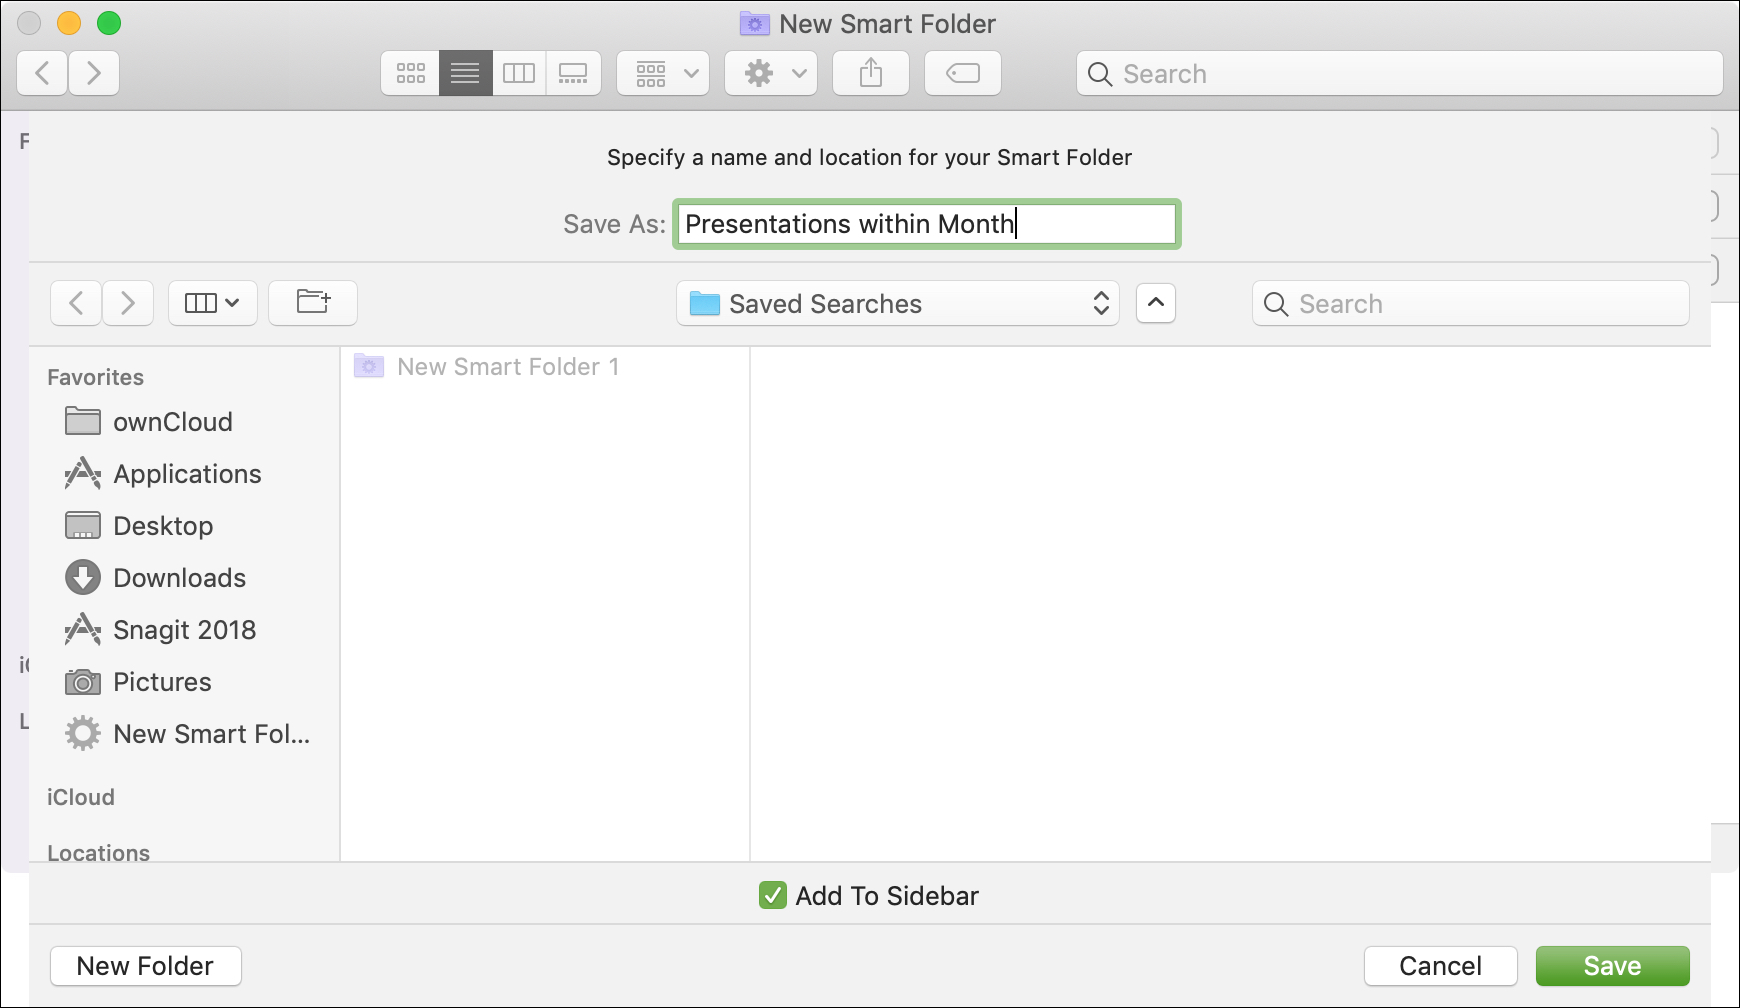
When done editing this Smart Folder, click the Save button near the top-right, select the location for your Smart Folder, name it and click Save again. Smart Folders let you do clever things such as add a recently opened files folder to the Dock.
Organize your music with Smart Playlists
Similar to Smart Folders in the Finder, iTunes has a Smart Playlist feature for gathering music based on simple rules you specify. Conveniently, these Smart Playlists automatically refresh as your library changes. To create a new Smart Playlist, click the File menu in iTunes then choose New → Smart Playlist and specify your rules.
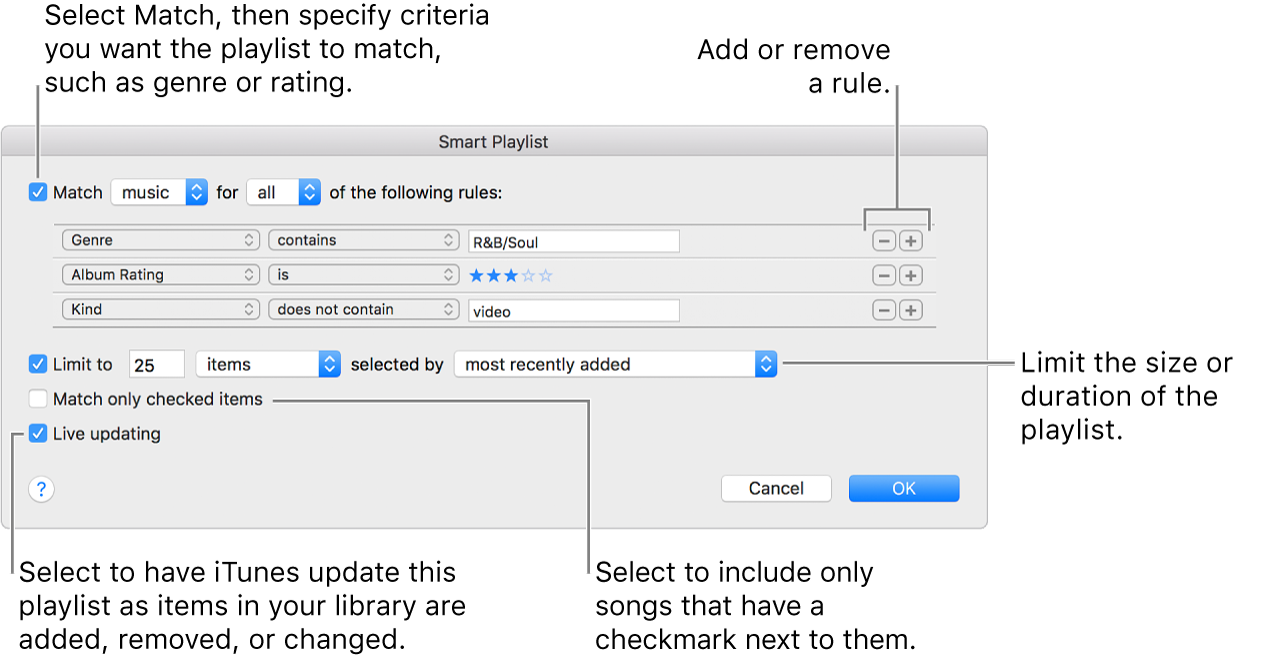
As an example, you can create a Smart Playlist of your love songs on Apple Music. Or, you may want to create a Smart Playlist which lists Apple Music songs in your library that are no longer available for streaming. Though you can create playlists in the iOS Music app, Smart Playlists must be created in desktop iTunes and they won’t auto-update on an iOS device.
Restore document versions
When you save a file on your Mac, macOS keeps a history of all the changes so that you can easily roll back to a document’s previous version To do so, open a document with your preferred app, then click the File menu and choose Revert To → Browse All Versions.
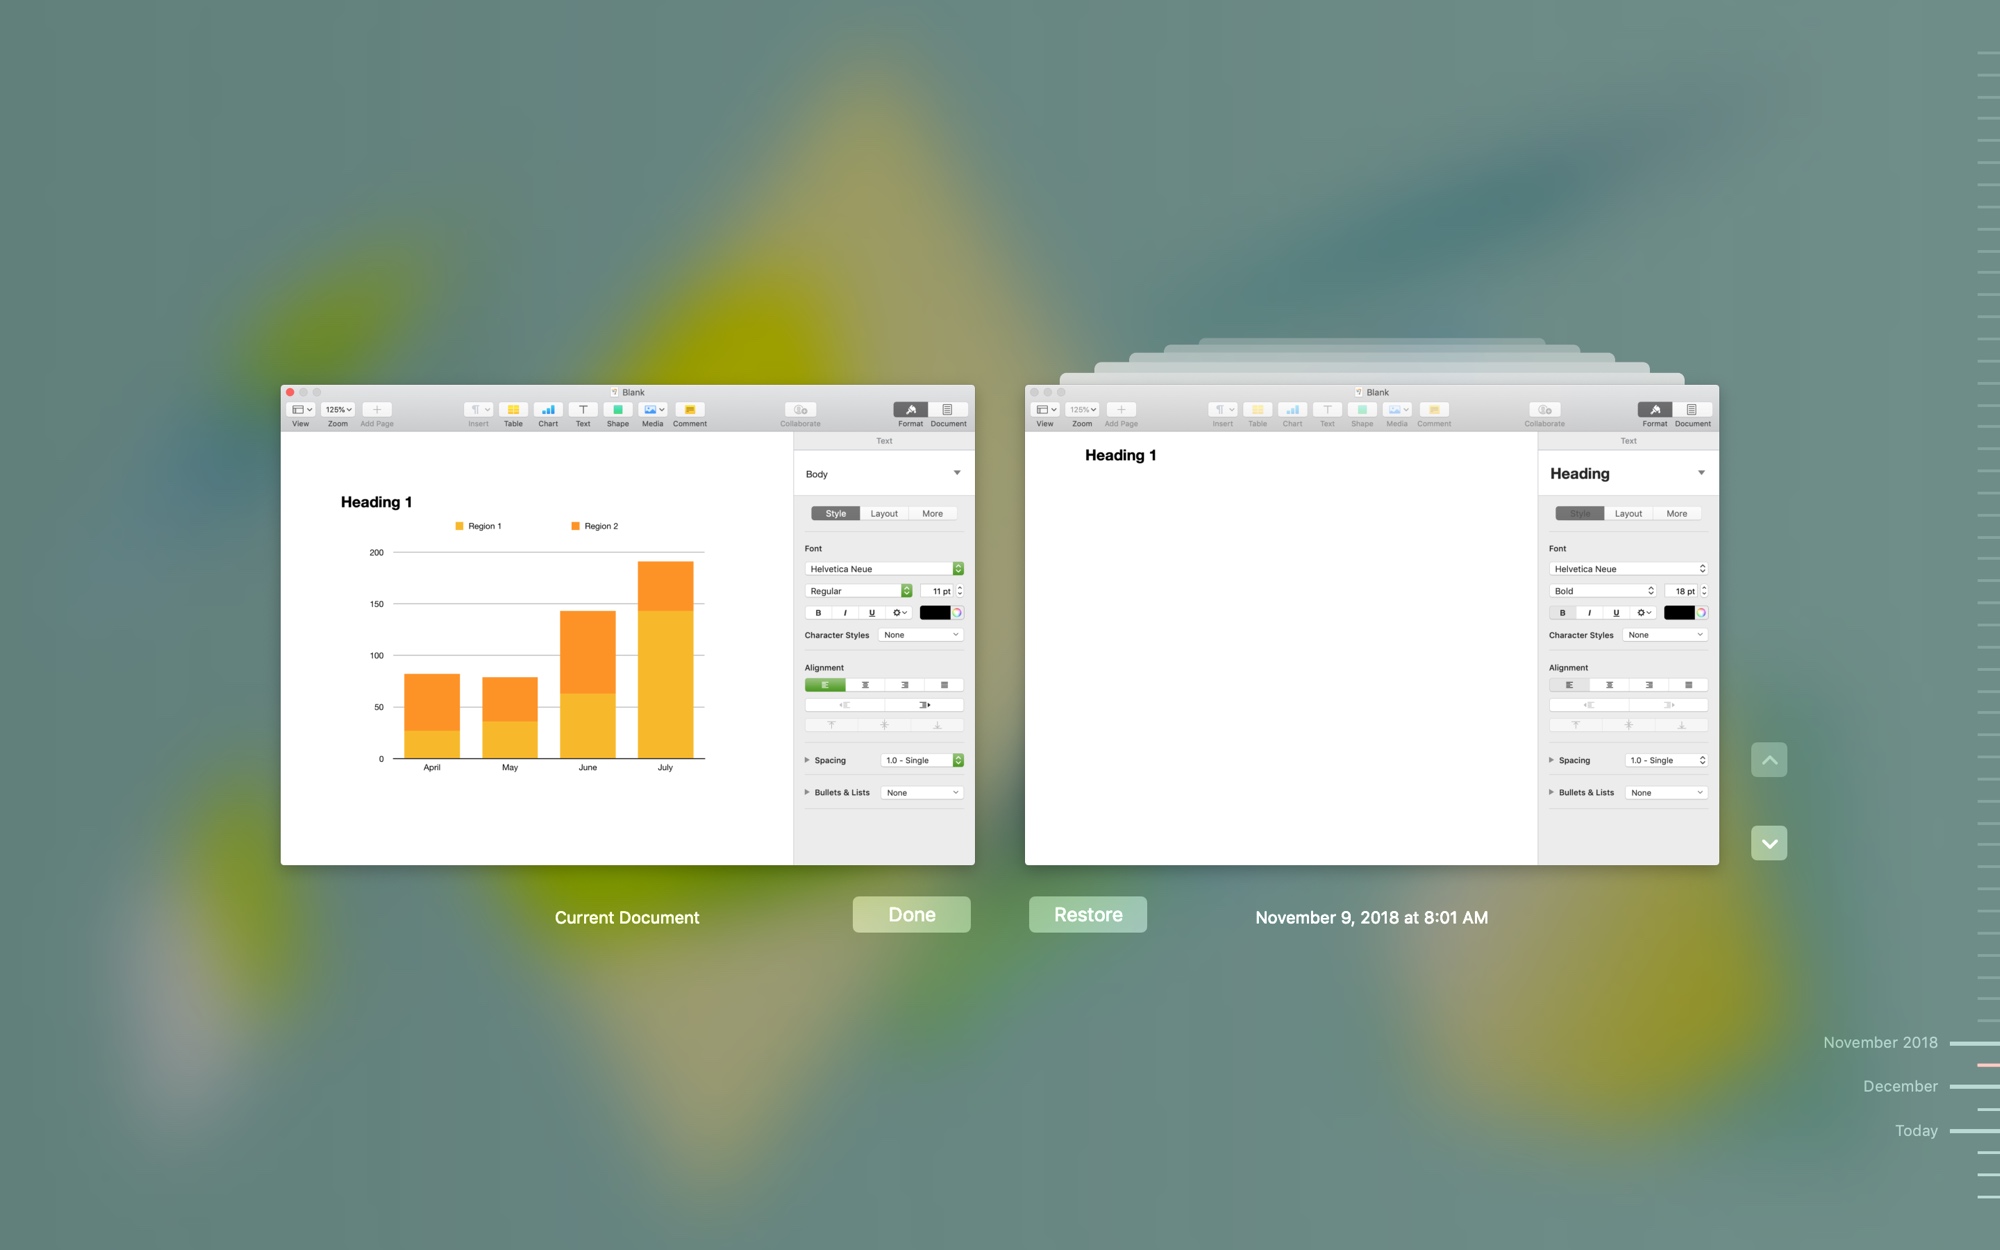
Up pops a Time Machine-like interface for browsing documents versions. Simply use the arrow keys to go back in time, then click Restore when you see the version you’d like to revert to.
Checking your Mac’s uptime
Knowing when you last started up or rebooted your computer should be an important step in every user’s troubleshooting workflow. Just type uptime in Terminal and press Enter to see how long it’s been since you last restarted your Mac.
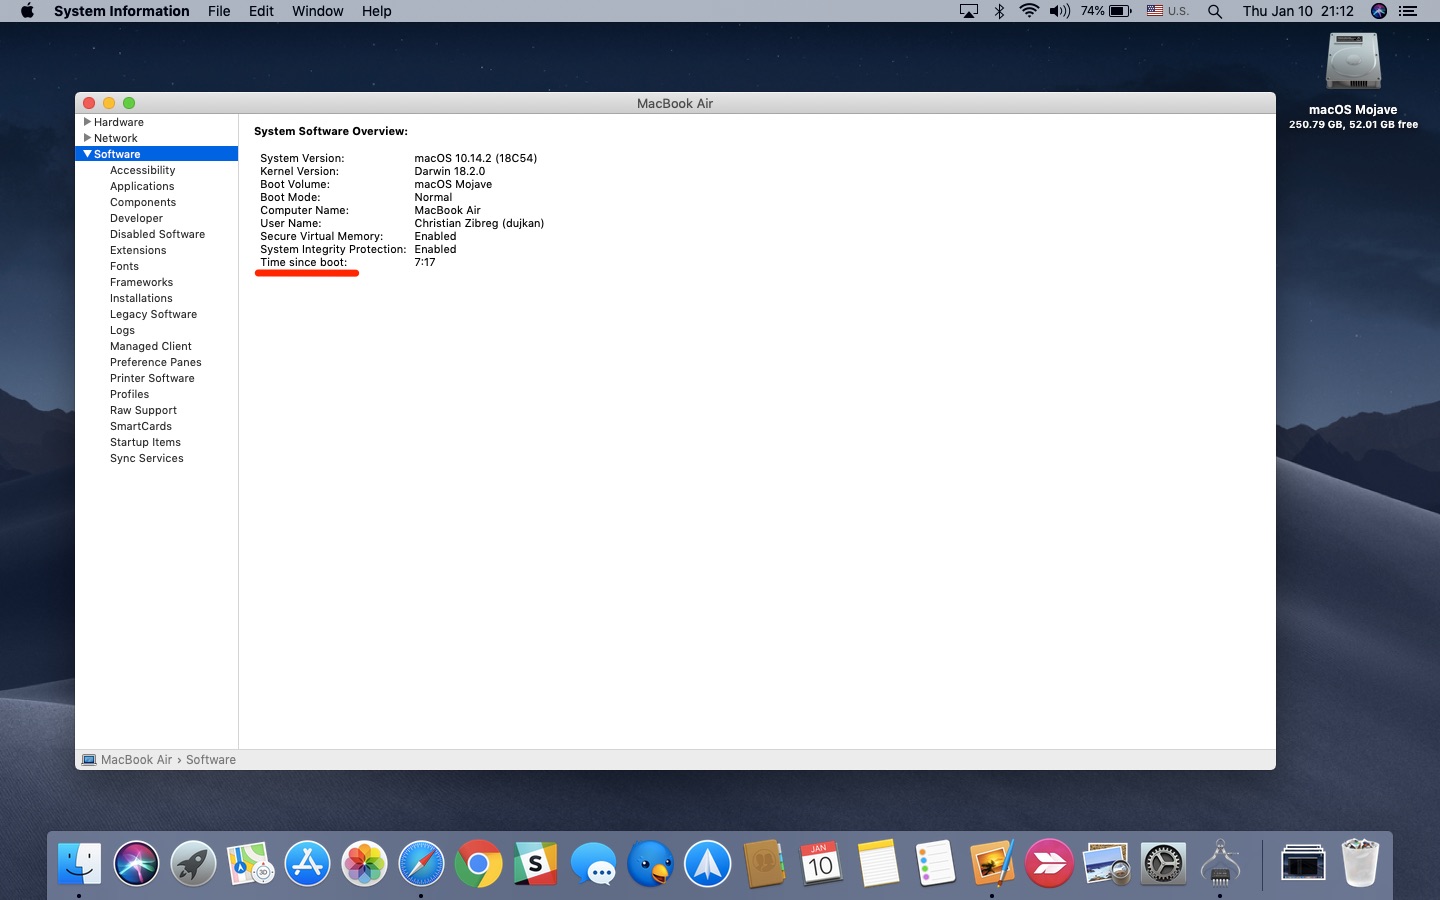
Alternatively, hold the Option key while clicking the Mac menu, then choose the option labeled System Information. Now select Software in the lefthand column and you’ll find your Mac’s uptime next to “Time since boot” in the righthand section.
Make the Touch Bar your own
The default per-app shortcuts available to your through the Touch Bar are not very useful. Thankfully, you can customize them to your liking and add ones you’ll really use, like the Do Not Disturb toggle. Simply open an app whose Touch Bar shortcuts you’d like to personalize, then click the View menu and select Customize Touch Bar.
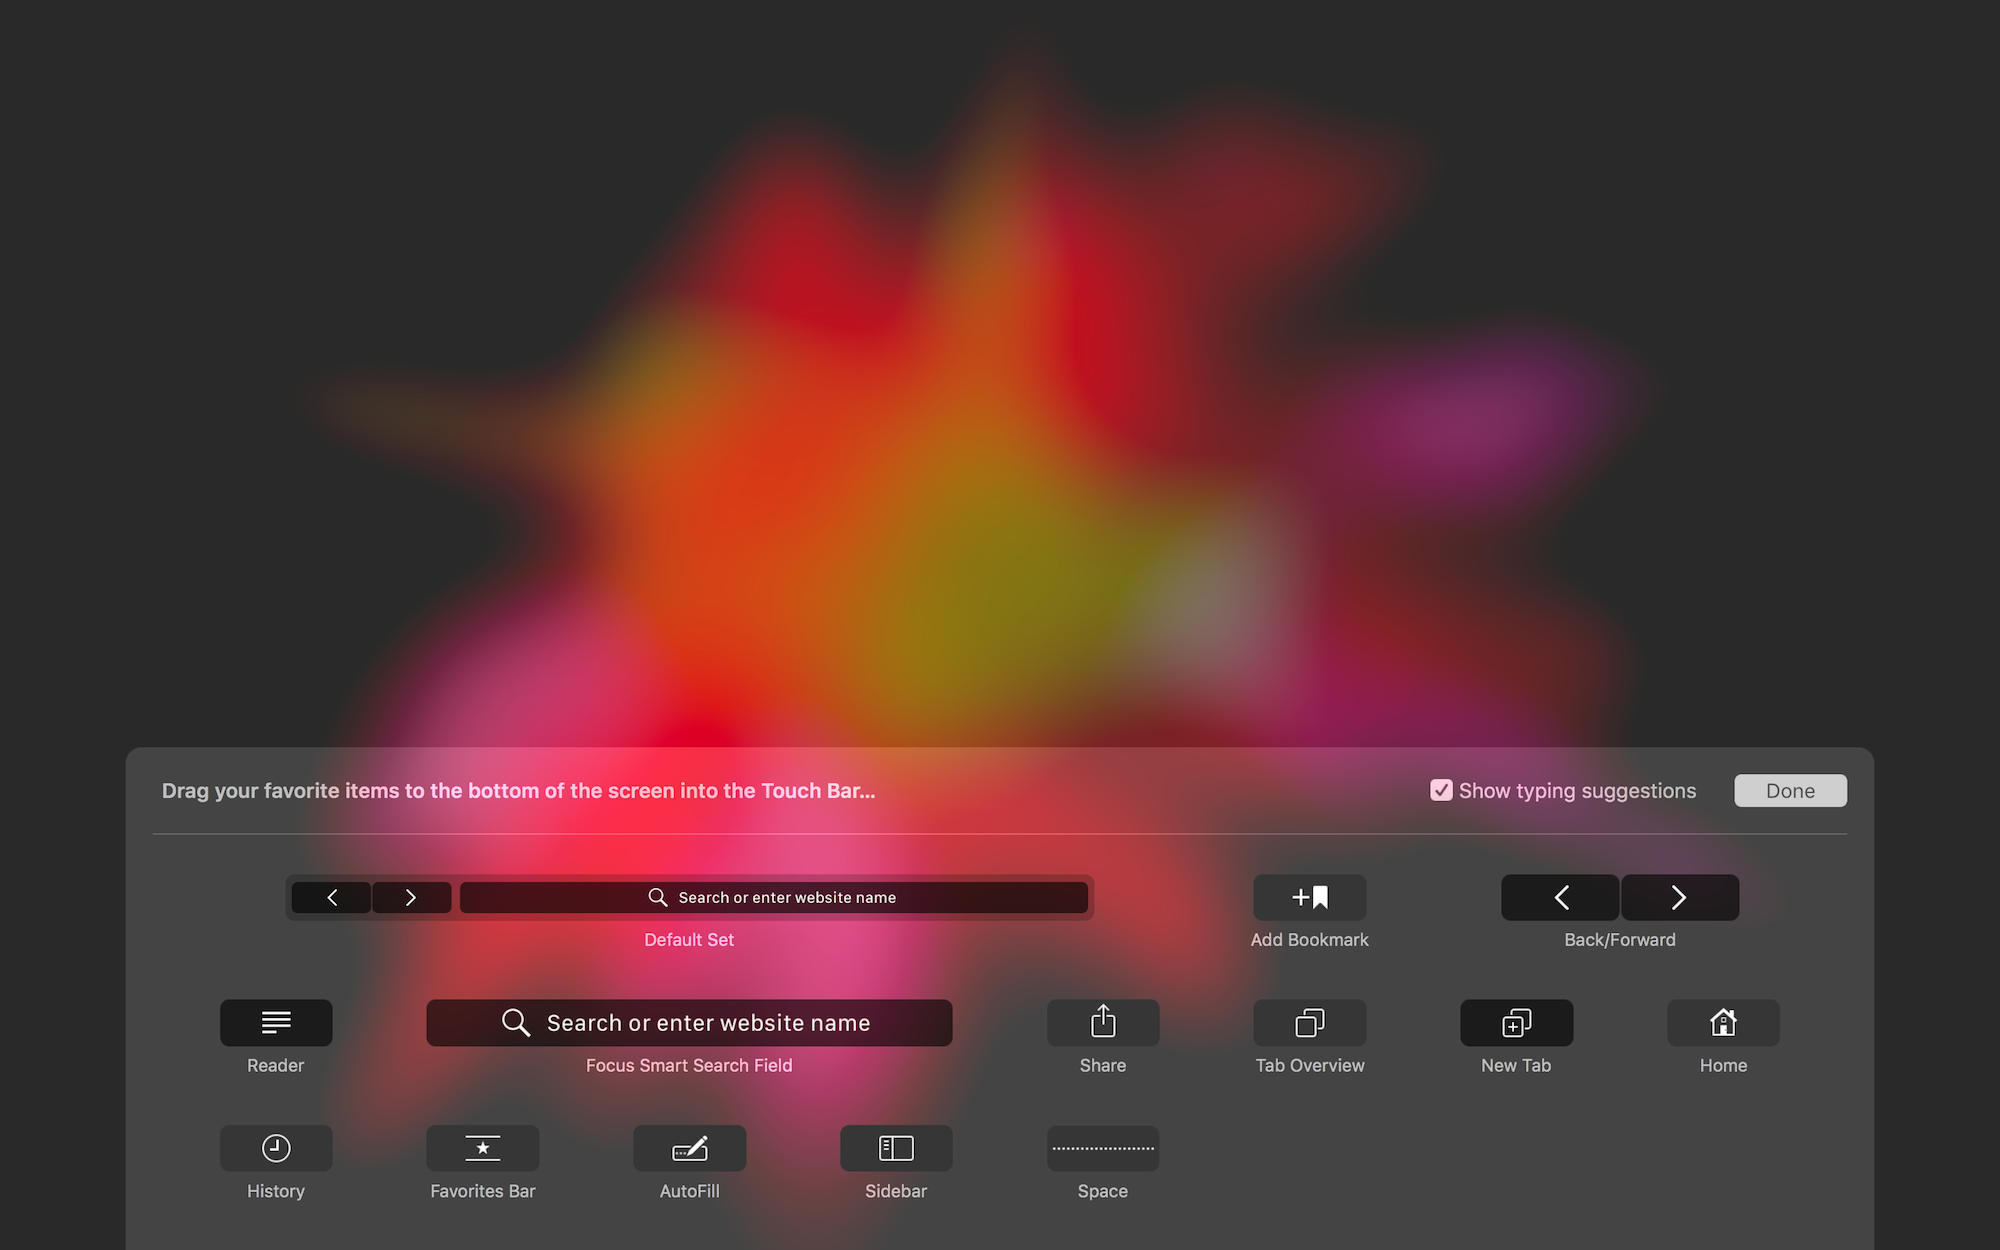
Using the trackpad, drag a shortcut from the screen and drop it onto the Touch Bar. You can also drag and drop items within the Touch Bar to reorder them just the way you like.
And that’s it, boys and girls! You should memorize your favorite little tips from this post in order to boost your productivity and really make the most out of your Mac.
Your own tips?
We hope you have learned something about the features in your Mac that you didn’t know existed or may have simply forgotten about.
Let us know in the comments how you liked these tips, which one was your favorite and why? If you have any useful Mac tips of your own, do share them with the iDB community down below.
Source link: https://www.idownloadblog.com/2019/02/05/10-useful-mace-tips/

Leave a Reply